background image

CC9600 Chassis User Guide

6

CommPlete Communications Server

Introduction

This chapter contains only general information about installing the CC9600 chassis. The equipment should
be installed only by a qualified service person.

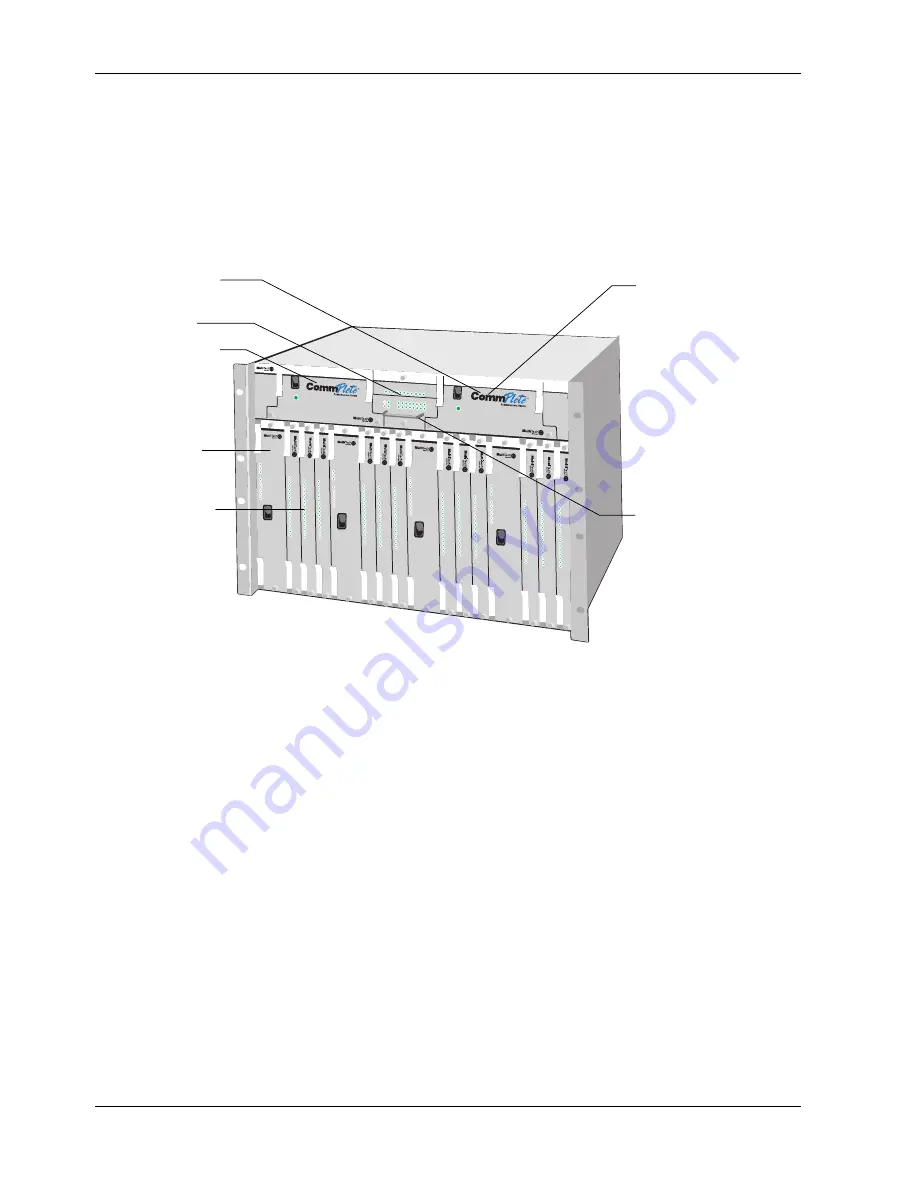
The CC9600 is designed to be installed in a standard 19-inch-wide rack cabinet. Figure 1 shows a fully
loaded chassis with one controller card, two power supplies, and a full complement of RASCards and
modem cards.

I

0

I

0

I

0

I

0

I

0

I

0

Figure 1. A fully-loaded CC9600 chassis.

Pre-Installation Notes


Unpack hardware carefully.


Perform a visual inspection of the hardware. If you are concerned about the condition of the chassis,
call Technical Support.


All installation must be done by a qualified service person.


Consult the manuals for your other components (PS9600, MR9600, MTRAS96, and MTxxxxHD8)
before they are installed into the CC9600.


To reduce emissions, be sure to use blanking plates to cover empty slots in the CC9600 chassis.


Only connect like circuits. In other words, connect SELV (Secondary Extra Low Voltage) circuits to
SELV circuits and TN (Telecommunications Network) circuits to TN circuits.

Power Supply

Power Supply

Controller

RASCard
server (4×)

Modem cards
(12×)

The chassis can work with
one or two PS9600 power
supplies. The second power
supply is redundant. If any
of the outputs on either
supply is low or fails, the
other supply takes over with
no switchover period,
producing all the power
required to run the system.
(Both power supplies must
be turned on; when both
supplies are operating, they
share the load.)

The controller module
contains a processor and
memory for intelligent
operation of the rack, plus
an integrated Ethernet
concentrator.

Summary of Contents for CommPlete CC9600

Page 1: ...CC9600 Chassis User Guide ...

Page 2: ...thout obligation of Multi Tech Systems Inc to notify any person or organization of such revisions or changes Revision Date Description A B 3 31 97 5 27 97 Manual released Manual updated C 11 17 97 Manual revised to include new FCC information and removal of service information Multi Tech CommPlete RASExpress MultiExpress MultiExpress Fax MultiModem MultiModemZDX MultiModemManager and the Multi Tec...

Page 3: ...Service Order Code connecting arrangement for this equipment is shown If applicable the facility interface codes FIC and service order codes SOC are shown A FCC compliant telephone cord and modular plug is provided with this equipment This equipment is designed to be connected to the telephone network or premises wiring using a compatible modular jack which is Part 68 compliant See installation in...

Page 4: ...2205 Woodale Drive Mounds View MN 55112 612 785 3500 Fax 612 785 9874 FCC Fax Warning The Telephone Consumer Protection Act of 1991 makes it unlawful for any person to use a computer or other electronic device to send any message via a telephone fax machine unless such message clearly contains in a margin at the top or bottom of each page or the first page of the transmission the date and time it ...

Page 5: ...the user to disconnect the equipment Users should ensure for their own protection that the electrical ground connections of the power utility telephone lines and internal metallic water pipe system if present are connected together This precaution may be particularly important in rural areas Caution Users should not attempt to make such connections themselves but should contact the appropriate ele...

Page 6: ... déconnexion Les prises d alimentation doyent être installées près de l équipement et doyent être faciles d accès Afin de réduire les risques de choc toutes les ouvertures doivent être couvertes pendant le fonctionnement normal de l équipement Advertencias de Seguridad No son necesarios ajustes manuales del equipo para la conexión a la corriente de la red dentro del voltaje y frecuencia establecid...

Page 7: ...gsledningen er beregnet til at fungere som afbryder Stikkontakten skal installeres nær ved udstyret og skal være let tilgængelig Nedsæt risikoen for stød ved at tildække alle udstyrets åbninger under normal drift Power Requirements AC 100 240 V 50 60 Hz 8 A Alimentation Requise AC 100 240V 50 60 Hz 8 A Requisitos de potencia AC 100 240V 50 60 Hz 8 A Stromaufnahme AC 100 240V 50 60 Hz 8 A Strømfors...

Page 8: ...viii CommPlete Communications Server ...

Page 9: ...lation Notes 6 Installation 7 Safety Warnings 7 Connections 8 Appendix Appendix A Installing 3rd Party Software 10 Installing Citrix WinFrame Software on the CommPlete 10 Installing Microsoft Windows NT Software on the CommPlete 12 Installing SCO UNIX Software on the CommPlete 13 Installing USL Novell UNIXWare Software on the CommPlete 14 Installing BSD UNIX Software on the CommPlete 15 ...

Page 10: ...x CommPlete Communications Server ...

Page 11: ...CommPlete Communications Server 1 1 1 Introduction ...

Page 12: ...ator Key Features Four independent segments for any combination of T1 Starter or PRI Starter segment kits Data bus eliminates serial cables Ethernet bus reduces network cables to one T1 bus works with T1 card to eliminate the need for a channel bank Control bus delivers management reporting and control information to the controller Side venting cooling fans and a heat sensor with built in reportin...

Page 13: ...odel Number CC9600 Number of Slots 16 Number of Fans 6 External Connectors Two AC power receptacles Environmental Temperature range 0 40 C 32 104 F Humidity range 0 95 noncondensing Dimensions 31 1 48 3 36 8 cm 12 25 19 14 5 in H W D Weight 11 kg 25 lb Limited Warranty Two years ...

Page 14: ...CC9600 Chassis User Guide 4 CommPlete Communications Server ...

Page 15: ...CommPlete Communications Server 5 2 Installation ...

Page 16: ...Consult the manuals for your other components PS9600 MR9600 MTRAS96 and MTxxxxHD8 before they are installed into the CC9600 To reduce emissions be sure to use blanking plates to cover empty slots in the CC9600 chassis Only connect like circuits In other words connect SELV Secondary Extra Low Voltage circuits to SELV circuits and TN Telecommunications Network circuits to TN circuits Power Supply Po...

Page 17: ... hazardous condition such as loading heavy equipment in the rack unevenly When connecting the equipment to the supply circuit be sure to check equipment nameplate ratings to avoid overloading ciruits which may cause damage to over current protection devices and supply wiring Be sure to maintain reliable earthing for rack mounted equipment Pay particular attention to supply connections other than d...

Page 18: ...l power from the chassis The power supplies are connected in parallel so that both power supplies supply power to all power busses in the chassis To remove all power from the left power supply disconnect the left power cord to remove all power from the right power supply disconnect the right power cord 10BaseT Ethernet connector to external concentrator SELV 10Base T Ethernet connector to server N...

Page 19: ...CommPlete Communications Server 9 Appendix ...

Page 20: ...I608 driver disk to the root directory of the CommPlete s hard drive 4 Install any software that you need which requires the CD ROM drive or the floppy drive 5 Remove the IDE CD ROM from the system At the main menu select Winframe setup Under Options select Add Remove SCSI devices Highlight IDE CD ROM drive and click on Remove 6 At the Control panel select Devices Highlight the atdisk device Selec...

Page 21: ...0 for the IRQ for the first card Enter I O address 220 and IRQ 11 for the second card Enter I O address 230 and IRQ 12 for the third card 17 Leave the port numbers at the default settings unless you have a good reason to change them 18 Start setting up your WinStations refer to the Citrix WinFrame documentation ...

Page 22: ...k on Remove 6 At the Control panel select Devices Highlight the atdisk device Select the Startup button and click on BOOT This will put a circle in the boot section 7 Exit the menus and shutdown the CommPlete system 8 Remove the RASCard MT3334HD8 modems and remove the DA9600 card and cables 9 Re install the RASCard and MT3334HD8 modem cards 10 Restart the CommPlete system 11 Install the ISI608 dri...

Page 23: ...SCO UNIX Software on the CommPlete This procedure steps you through the process of installing SCO UNIX software from The Santa Cruz Operation Inc on the CommPlete system This procedure can be performed only by using the optional DA96002 load card Procedure to be added at a later date ...

Page 24: ...L Novell UNIXWare Software on the CommPlete This procedure steps you through the process of installing UNIXWare software from USL Novell on the CommPlete system This procedure can be performed only by using the optional DA96002 load card Procedure to be added at a later date ...

Page 25: ...UNIX Software on the CommPlete This procedure steps you through the process of installing BSD UNIX software from the University of California Berkely on the CommPlete system This procedure can be performed only by using the optional DA96002 load card Procedure to be added at a later date ...

Page 26: ...CC9600 Chassis User Guide 16 CommPlete Communications Server ...

Reviews: