TalkAnytime User Guide
Expansion Cards
221
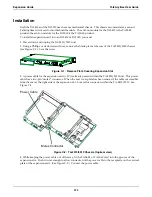
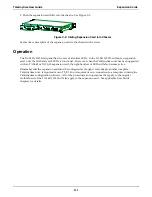
5. Push the expansion card fully into the chassis. See Figure C-3.
Figure C-3: Sliding Expansion Card into Chassis
Secure the vertical plate of the expansion card to the chassis with a screw.
Operation
The TA-2410/3010 front panel has two sets of identical LEDs. In the TA-2410/3010 without an expansion
card, only the left-hand set of LEDs is functional. However, when the TalkAnytime unit has been upgraded
with an TA24-48 or TA30-60 expansion card, the right-hand set of LEDs will also become active.
Remember that the expansion card must be configured as though it were simply another complete
TalkAnytime unit: it requires its own T1/E1 line; it requires its own connection to a computer running the
TalkAnytime configuration software. All of the procedures and operations that apply to the original
motherboard of the TA-2410/3010 will also apply to the expansion card. See applicable User Guide
chapters for details.
Summary of Contents for TalkAnytime TA2410
Page 6: ...6 Chapter 1 Overview ...
Page 20: ...20 Chapter 2 Quick Start Instructions ...
Page 48: ...48 Chapter 3 Mechanical Installation and Cabling ...
Page 56: ...56 Chapter 4 Software Installation ...
Page 65: ...65 Chapter 5 Technical Configuration ...
Page 116: ...Technical Configuration TalkAnytime User Guide 116 ...
Page 123: ...123 Chapter 6 Phonebook and URL Configuration ...
Page 143: ...143 ...
Page 144: ...144 Chapter 7 Operation and Maintenance ...
Page 205: ...205 Chapter 8 Warranty Service and Tech Support ...
Page 208: ...208 Chapter 9 Regulatory Information ...
Page 213: ...213 Appendix A Cable Pinouts ...
Page 217: ...217 Appendix B TCP UDP Port Assignments ...
Page 219: ...219 Appendix C Expansion Card Installation TA24 48 TA30 60 ...
Page 234: ......
Page 235: ...235 S000424A ...


