6. Machine adjustment and use
6.1. Rendering the machine to the transport position
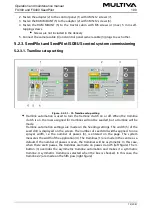
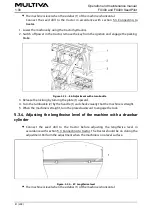
1. Fold the working platform stairs up.
Figure. 6.1. - 91. Working platform stairs
When raised, the stairs (1) will be at an approximately 40 degree angle to the
working platform.
2. Raise the machine with the tractor hydraulics.
3. If the machine is equipped with a SeedPilot or SeedPilot ISOBUS control system, switch
on the STOP ALL function in accordance with section 6.3.1. Using the STOP ALL function.
4. If the machine is equipped with middle markers, ensure that they have settled into their
transport position and their ball valves are closed, in accordance with section 3.4. Using
the middle marker ball valves.
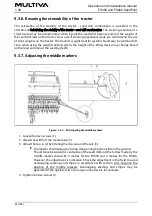
5. Close the machine lifting circuit ball valve in accordance with the instructions in
section 5.3.5. Using the machine lifting circuit ball valve.
6. Check the tyre pressure in accordance with section 7.1.3. Checking tyre pressure.
7. Ensure that the machine is clean.
If necessary, clean the machine according to the instructions in section 7.3.
8. Visually check that the bolts of the transport wheels are tight in accordance with
section 7.1.2.1. Checking the tightness of the wheel bolts of the transport wheels and
tighten if necessary.
9. Check that the bolts of the bearings are tight in accordance with section 7.1.2.2. Checking
the tightness of the bolts in the ange bearings of the transport wheels and tighten if
necessary.
10. If the machine is equipped with a standard drawbar, visually check that the bolts of the
towing device are tight in accordance with section 7.1.2.6. Checking the tightness of the
towing eye bolts and tighten if necessary.
Operation and maintenance manual
FX300 and FX400 SeedPilot
1.00
84 (208)
Summary of Contents for FX300 SeedPilot
Page 200: ...Hydraulic schematics FX300 and FX400 1 Hydraulic schematics FX300...
Page 201: ...Hydraulic schematics FX300 and FX400 2...
Page 202: ...Hydraulic schematics FX300 and FX400 3 Hydraulic schematics FX400...
Page 203: ...Hydraulic schematics FX300 and FX400 4...
Page 204: ...Electrical schematics FX300 and FX400 1 Electrical schematics...


