background image

  Getting Started   |

  Getting Started

5

  Important Information   |         

4


WARNING:


• For safety, total contents placed in organizer should 

not exceed 25 lbs (11.3 kg). 

• This product is not a toy.
• The Nursery Essentials Organizer is intended for storage only.
• Do not place child on top of this product. It is not designed 

to support the weight of a child.

• It is not intended to be used as a child carrier or changing table.
• Never leave child unattended. 

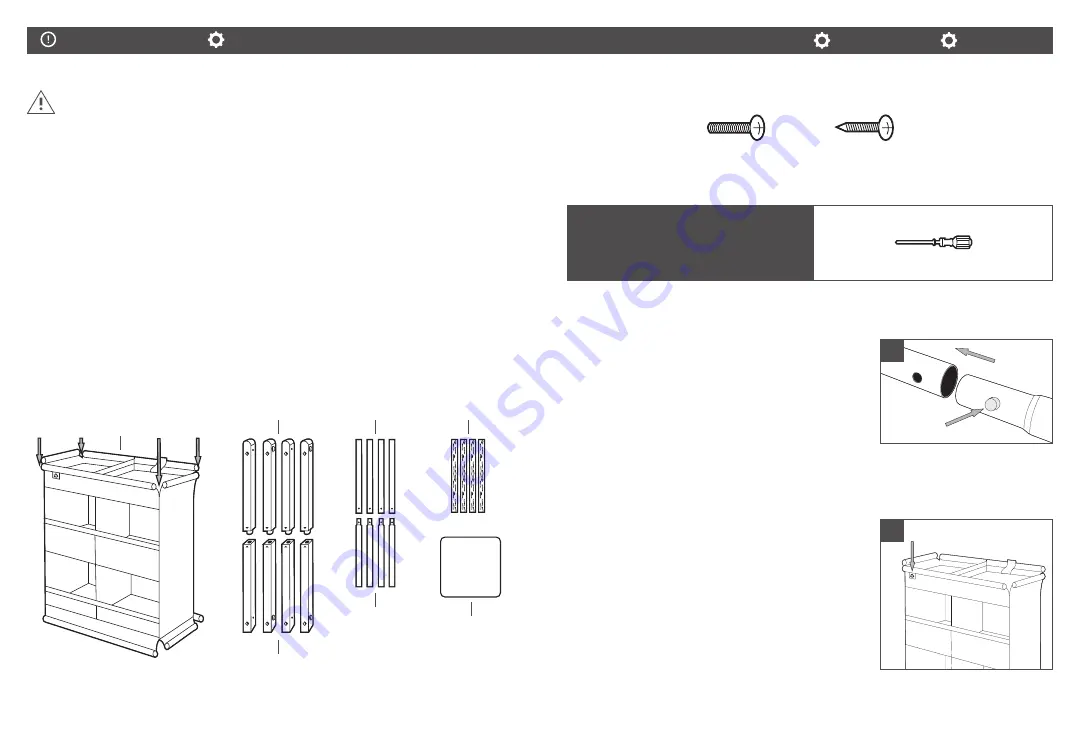
INCLUDED PARTS

If any parts are missing or damaged, please contact our Customer Satisfaction Team  
at 

1-800-344-2229

.  

A

A

B

B

C

C

A

B

C

D

D

D


STEP 1: ASSEMBLE METAL TUBES (4)

1. 

Press down on button on metal tube and slide 
into metal tube with hole. Make sure to align the 
button to the hole. Slide until you hear the button 
click into the hole. 

2. 

Repeat for the 3 remaining sets of tubes. 


STEP 2: INSERT METAL TUBES AND WOODEN DOWELS 

INTO SLEEVES

1. 

Locate logo to identify the top of the fabric 
body. Logo is located front top left corner.

1

1

TOOLS NEEDED:


• Phillips-head screwdriver

A

A

B

B

C

C

D

D

A

B

C

D

Self-Tapping 

Screw (X4)

Flat-Bottom

Screw (X8)

Wood

Screw (X8)

Fabric (x1) 

Top Leg (x4) 

Metal Tube With 

Hole (X4)

Wooden 

Dowel (x4) 

Bottom Leg (x4) 

Shelf Support 

Panel (x6)

Metal Tube With 

Button (X4)

  How To Install

Flat-Bottom 

Screw (x8) 

Wood 

Screw (x8)

A

A

B

B

C

C

D

D

A

B

C

D

Self-Tapping 

Screw (X4)

Flat-Bottom

Screw (X8)

Wood

Screw (X8)

A

A

B

B

C

C

D

D

A

B

C

D

Self-Tapping 

Screw (X4)

Flat-Bottom

Screw (X8)

Wood

Screw (X8)

Summary of Contents for Nursery Essentials Organizer

Page 1: ...Please read the instructions carefully before using this product Adult assembly required GUARDE PARA FUTURA REFERENCIA Lea las instrucciones detenidamente antes de usar este producto Requiere ser ens...

Page 2: ...met licos 4 12 Paso 2 Inserte los tubos met licos y las clavijas de madera en las mangas 12 Paso 3 Sujete las patas superiores a las esquinas 13 Paso 4 Sujete las patas inferiores a las esquinas 15 P...

Page 3: ...ASSEMBLE METAL TUBES 4 1 Press down on button on metal tube and slide into metal tube with hole Make sure to align the button to the hole Slide until you hear the button click into the hole 2 Repeat f...

Page 4: ...the upper hole of the leg then secure from the other side with a flat bottom screw Hold the metal tube firmly to secure in place Tighten using a Phillips head screwdriver 2b Insert the wooden dowel in...

Page 5: ...tal tube with a flat bottom screw and secure the dowel with a wood screw Tighten using a Phillips head screwdriver STEP 5 LAY SHELF SUPPORT PANELS 1 Lay a support panel in each shelf square A A B C D...

Page 6: ...a al ni o encima de este producto No est dise ado para soportar el peso de un ni o Tampoco ha sido dise ado para usarse como un portabeb s ni como un cambiador Nunca deje al ni o solo PIEZAS INCLUIDAS...

Page 7: ...ubicado en el frente en la esquina superior izquierda Tornillos de base plana 8 Tornillos de punta 8 Self Tapping Screw X4 Flat Bottom Screw X8 Wood Screw X8 Self Tapping Screw X4 Flat Bottom Screw X8...

Page 8: ...r necesario ajuste la tela para enderezar el organizador 2a Inserte el tubo met lico en el orificio superior de la pata luego aseg relo desde el otro lado con un tornillo de base plana Sostenga el tub...

Page 9: ...e preguntas o desea enviar comentarios sobre este producto comuniquese con nuestro Equipo de Satisfaccion del Cliente llamando al 1 800 344 2229 Lu a Vi 8 00am 5 00pm PST o visite nuestro sitio web en...

Page 10: ...AL 1 Appuyez sur le bouton du tube en m tal et enfoncez le tube dans le tube en m tal comportant le trou Veillez mettre le bouton en face du trou Enfoncez le tube jusqu ce que le bouton produise un cl...

Page 11: ...nevis cruciforme Forcer un peu si n cessaire R p ter l tape 3 pour fixer les pattes sup rieures B C et D aux autres coins 2a 2b CONSEIL Il peut tre n cessaire de forcer un peu pour serrer les vis Pour...

Page 12: ...OINS 1 Accrocher la patte inf rieure A la patte sup rieure A et mettre les lettres en face l une de l autre R p ter l op ration pour accrocher les pattes inf rieures B C et D aux autres coins 2 Introd...

Page 13: ...HE HEART LOGO AND IT S THE LITTLE THINGS ARE TRADEMARKS OR REGISTERED TRADEMARKS OF MUNCHKIN INC 7835 GLORIA AVE VAN NUYS CA 91406 MUNCHKIN BABY CANADA LTD 50 PRECIDIO CT UNIT A BRAMPTON ON L6S 6E3 MA...

Reviews: