background image


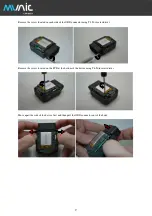
Remove the screw located on each side of the OBD connector using T4 Torx screwdriver 


Remove the screw located on the PCB at the bottom of the device using T6 Torx screwdriver 


Move apart the side of the device first and then pull the OBD connector out of the body. 


Summary of Contents for C4D-4G4USAA V8+

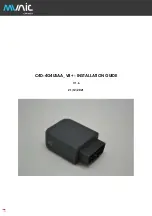
Page 1: ...C4D 4G4USAA_V8 INSTALLATION GUIDE V 1 6 21 12 2021...

Page 2: ...SAR 3 1 Hardware features 5 2 Hardware description 6 2 1 External view 6 2 2 Internal view 6 2 3 OBD connector pin out 7 2 4 OBD adapter wires 7 3 Preparing installing the device 8 3 1 Open the devic...

Page 3: ...f explosion if the battery is replaced by a wrong battery type Please discard empty battery according to local regulations Dispose of used batteries according to the instructions Battery Warning a Do...

Page 4: ...cations not expressly approved by the party responsible for compliance could void the user s authority to operate the equipment FCC RF Exposure Information SAR This device is designed and manufactured...

Page 5: ...est reported SAR value for usage on extremity is 3 30 W kg While there may be differences between the SAR levels of various devices and at various positions they all meet the government requirement SA...

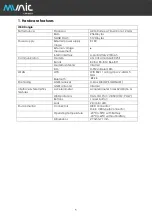
Page 6: ...B71 Modem antenna Internal SIM MFF2 soldered SIM WLAN WiFi WiFi 802 11 a b g n ac 2 4GHz 5 GHz Bluetooth Positioning GNSS receiver U blox M8 GPS GLONASS GNSS antenna Internal Interface Telematics fea...

Page 7: ...USB connector 3 signal bicolor led 4 power bicolor led 2 micro USB connector 5 Modem antenna 6 GNSS antenna 7 nano SIM holder 8 Internal battery SIM holder can be absent if device have eSIM chip Pleas...

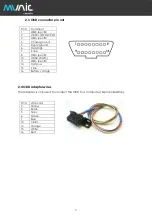
Page 8: ...Signal ground 6 CAN High 7 K line 8 OEM specific 10 J1850 PWM 11 OEM specific 14 CAN low 15 L line 16 Battery voltage 2 4 OBD adapter wires This adapter is only used to connect the OBD to a computer...

Page 9: ...rx screwdriver for the external screw T6 Torx screwdriver for the internal screw Small slotted screwdriver to remove the cover Thin tweezers to insert remove the SIM card 3 1 Open the device Insert sl...

Page 10: ...side of the OBD connector using T4 Torx screwdriver Remove the screw located on the PCB at the bottom of the device using T6 Torx screwdriver Move apart the side of the device first and then pull the...

Page 11: ...10 Device is now open...

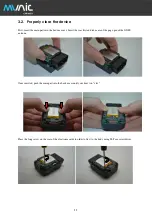
Page 12: ...om cover Insert the rear first and take care of the pogo pin of the GNSS antenna Once inserted push the main part into the back cover until your hear two clac Place the long screw on the rear of the e...

Page 13: ...the screw on each side of the OBD connector to fix it to the body using T4 Torx screwdriver Insert the top cover beginning with the rear Finally push the top cover down until you hear the clac Device...

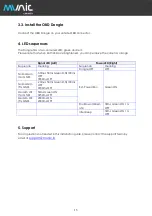
Page 14: ...nce Meaning Sequence Meaning Dongle OFF OFF No Modem No GNSS 3 times 50ms Green ON 100ms OFF 3550ms OFF Ext Power Run Green ON No Modem Fix GNSS 2 times 50ms Green ON 100ms OFF 3700ms OFF Modem OK No...

Reviews: