background image

User’s Guide

3301 East Plano Parkway, Suite 100
Plano, Texas 75074

Muratec America, Inc.

http://www.muratec.com

©2012 MURATA MACHINERY, LTD.

Printed in China
Part Number: DD1-90010-62
MAI Order Number: OMMFX3510

Preparation

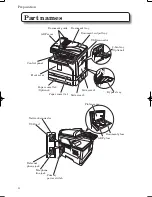
Part names ..........................................................4
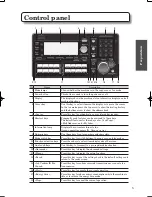
Control panel .......................................................5
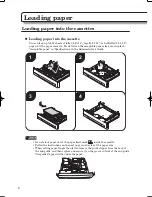
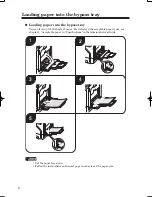
Loading paper......................................................6
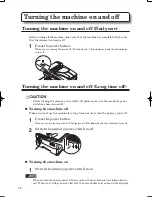
Turning the machine on and off .........................12
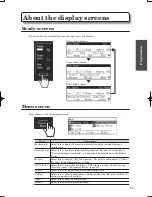
About the display screens .................................13

Operation

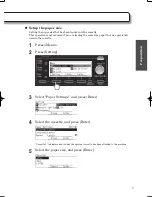
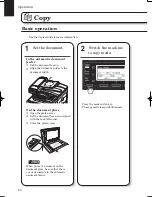
Copy..................................................................14
Scan ..................................................................16
Fax.....................................................................22
Print ...................................................................28
Using OfficeBridge ............................................32
Replacing the consumables ..............................38

Troubleshooting

Clearing paper jams ..........................................40
Clearing document jams....................................42
If an error occurs ...............................................43
Troubleshooting .................................................44

Appendix

Regulatory information ......................................46
Limited warranty................................................48
How to read PDF manuals ................................50
Consumables and options  ................................51
Index..................................................................52

Summary of Contents for MFX-3510

Page 1: ...names 4 Control panel 5 Loading paper 6 Turning the machine on and off 12 About the display screens 13 Operation Copy 14 Scan 16 Fax 22 Print 28 Using OfficeBridge 32 Replacing the consumables 38 Troubleshooting Clearing paper jams 40 Clearing document jams 42 If an error occurs 43 Troubleshooting 44 Appendix Regulatory information 46 Limited warranty 48 How to read PDF manuals 50 Consumables and ...

Page 2: ...ons carefully Notes a caution to protect yourself and others from personal injury or damage to properties if you handle the machine incorrectly For safe operation please follow instructions carefully IMPORTANT Describes important conditions or restrictions you should carefully observe to avoid problems caused by incorrect operations NOTE Describes reference information and additional notes for ope...

Page 3: ...ignes de sécurité Sicherheitshinweise EN DE FR Información sobre seguridad ES 安全使用须知 中文 安全にご使用いただくために 日本語 1 Check the contents attached to your machine User s Guide 2 Remove all the shipping materials 3 Attach the document tray 4 Load paper When you load paper other than letter size refer to the User s Guide and set the paper size on the control panel Installation Guide 5 Plug the power code and t...

Page 4: ...Copy Fax Print OfficeBridge Scan Telephone line Powerful document solution using the page 32 page 28 page 14 page 22 page 16 ...

Page 5: ...X 3510 is a multifunction product that can copy scan fax and print It produces letter legal size output the most common office docu ment sizes and enables users to quickly scan and deliver docu ments directly to their workstation ...

Page 6: ...2 bin tray Optional Paper cassette 1 Side cover 2 USB connector Bypass tray Document guide Document tray Document output tray Side cover 1 Network connector External phone jack Telephone line jack Primary power switch Platen cover Document glass ADF glass USB port Preparation ...

Page 7: ...n lamp Displays the current machine status Green operating normally Orange error 8 Numeric keys Use these keys to enter numbers and characters 9 Mode switch key Press this key to switch between the copy scan and fax modes 10 Function selection keys Press these keys to select items displayed on the screen 11 One touch keys Use this key to transmit to a pre registered destination 12 Advanced Press t...

Page 8: ... Acceptable paper in Specifications in the Administrator s Guide 1 3 2 4 NOTE Do not stack paper above the paper limit mark inside the cassette Follow the instructions on the next page in order to set the paper size When setting paper longer than letter remove the guide stopper from the back of the end guide and then replace and secure it on the groove in front of the end guide the guide stopper w...

Page 9: ...quired if you are loading the same size paper that was previously used in the cassette 1 Press Menu 2 Press Setting 3 Select Paper Settings and press Enter 4 Select the cassette and press Enter Cassette 2 is displayed only when the optional cassette has been attached to the machine 5 Select the paper size and press Enter ...

Page 10: ...y You can load up to 100 sheets of paper For details on the acceptable paper types see chapter 5 Acceptable paper in Specifications in the Administrator s Guide 1 3 2 4 5 NOTE Set the paper face down Follow the instructions on the next page in order to set the paper size ...

Page 11: ...ed into the bypass tray This operation is not required if you are loading the same size paper that was previously used in the bypass tray 1 Press Menu 2 Press Setting 3 Select Paper Settings and press Enter 4 Select Bypass and press Enter 5 Select the paper size and press Enter ...

Page 12: ...er unit than the switches Doing so may cause burns IMPORTANT When you have finished printing or copying envelopes be sure to return the switch es to their original positions If you fail to do this the print quality may decrease Do not touch the terminals inside the machine or feeder roller This could cause defects in the print quality 1 Open the side cover 2 Pull up the switches on both sides of t...

Page 13: ...nvelope 5 Print or copy 6 Open the side cover and return the switches to their original positions Pull them down until they snap into place 7 Close the side cover NOTE When printing is finished the following screen will be displayed This screen will disappear either when you press Close or when you open the side cover Be sure to return the switches to their original positions ...

Page 14: ...secondary power switch has been turned off Turning the machine off When you do not use the machine for a long time be sure to turn the primary power off 1 Press the power button When you are turning the power off Shutting down will be displayed and then the display turns off 2 Switch the primary power switch to off Turning the machine on 1 Switch the primary power switch to on NOTE When you turn t...

Page 15: ... documents securely in Various printing methods in the Printer Guide My Jobs Select this to execute a My Jobs process For details see chapter 1 Using My Jobs in the Administrator s Guide USB to Print Select this to print a file located on a USB memory device For details see Printing from a USB memory device page 31 On Line Select this to toggle between online and offline status Setting Select this ...

Page 16: ... Set the document face down aligned with the back left corner Close the platen cover NOTE When you set a document on the document glass be sure that there are no documents in the automatic document feeder Operation Copy Basic operation See the Copier Guide for more information 2 Switch the machine to copy mode Press the mode switch key The copy mode lamp will illuminate ...

Page 17: ... number of copies using the numeric keys Press Advanced to set advanced settings 4 Press Start Press Stop to stop the copy job Advanced settings Here are a few examples of useful copy settings See the Copier Guide for more information Combined copy Card copy Sorting 4 3 2 1 3 4 1 2 3 4 1 2 ...

Page 18: ...st be connected to the network using a LAN cable or directly to a computer using a USB cable The machine has been assigned an e mail address to use the scan to e mail function Shared folders have been registered to the machine to use the scan to folder function FTP server information has been registered to the machine to use the scan to FTP function The TWAIN driver has been installed on the compu...

Page 19: ...the document glass Open the platen cover Set the document face down aligned with the back left corner Close the platen cover NOTE When you set a document on the document glass be sure that there are no documents in the automatic document feeder 17 2 Switch the machine to scan mode Press the mode switch key The scan mode lamp will illuminate ...

Page 20: ...y pressing the one touch key in which the desired e mail address has been registered In this case this concludes the procedure Select e mail and press Enter Scan to Folder Scan to FTP Press Select Address Select Folder or FTP and press Enter Scan to USB Press Select Address Select Scan to USB and press Enter ...

Page 21: ...and press Select If the user ID and password are required enter them and press Enter At scan to folder press Subfolder to select a sub folder Press Select Connect the USB memory device to the control panel 19 4 Press Start If the document was set on the document glass Set next document will be displayed once the scan has been completed Press Scanning End to complete the operation or set the next d...

Page 22: ...d 3 Select File Name and press Enter 4 Enter the file name using the numeric keys and press Enter Press Clear to clear the entered characters Press to switch the entry mode from lower case to upper case and numbers then to lower case again Press to display the following menu CharMode Press this button to switch characters from lower case upper case or numbers Space Press this button to enter a spa...

Page 23: ...at as the factory default You can also convert images into TIFF format when scanning monochrome documents or JPEG format when scanning color documents 1 Switch the machine to scan mode 2 Press Advanced 3 Select File Format and press Enter 4 Select Mono or Color and press Enter You can only select from the file formats available after selecting whether to scan in either monochrome or color 5 Select...

Page 24: ...ommunication For details see chapter 7 Initial setup User Install in the Scanner and Fax Guide 1 Set the document In the automatic document feeder Set the document face up Align the document guides to the document width On the document glass Open the platen cover Set the document face down aligned with the back left corner Close the platen cover NOTE When you set a document on the document glass b...

Page 25: ...he one touch key in which the desired fax number has been registered In this case this concludes the procedure To use the one touch keys the fax number should be registered in advance For details see Registering e mail and fax destinations page 34 2 Switch the machine to fax mode Press the mode switch key The fax mode lamp will illuminate ...

Page 26: ...adcast to ON before specifying the destinations When you specify destinations using the numeric keys Broadcast setting will be turned ON automatically when you enter a destination How to confirm destinations When you have selected multiple destinations you can confirm the destinations using the following operation 1 When all destinations have been selected press Advanced 2 Select Location using th...

Page 27: ...nfirm Fax Cancel 2 Press Delete When you have scheduled a broadcast you can remove a destination from the transmission by pressing Detail Select the destination to delete and press Delete NOTE For details on canceling a delayed transmission see chapter 3 Canceling Checking faxes in Basic faxing in the Scanner and Fax Guide ...

Page 28: ...are on the same segment of the network The fax driver has been installed on the computer For details on installing the driver see chapter 1 Installing the driver in the Printer Guide 1 Create or edit the document on your computer 2 Select Print from menu According to the application software you are using the command name may be something other than print 3 Select the Muratec fax driver from the p...

Page 29: ... Address Book Personal Address Book or Direct Input When you have selected Shared Address Book or Personal Address Book select the desired address When you have selected Direct Input enter your desired fax number to the Fax Number column Then click Add 27 6 Click Send ...

Page 30: ...s been installed on the computer For details on installing the drivers see chapter 1 Installing the driver in the Printer Guide 1 Select Print from the menu According to the application software you are using the command name may be something other than print 2 Select the Muratec printer driver Click Preferences to change the settings as needed Print Basic operation See the Printer Guide for more ...

Page 31: ...e preferences as needed 4 Click Print Advanced settings Here are a few examples of the advanced print settings See the Printer Guide for more information Duplex printing Sorting 4 3 2 1 3 4 1 2 3 4 1 2 Printing water mark ...

Page 32: ...ancel it on the machine Canceling printing on the computer 1 Double click the printer icon on the computer 2 Right click on the print job you wish to cancel and click Cancel Canceling printing on the machine 1 Press Menu 2 Select On Line and press Enter 3 Select OFF and press Enter 4 Select the file to cancel and press Delete 5 Press Yes ...

Page 33: ...of the USB memory device can be printed 5 Press Print To change settings such as numbers of sets paper source or sorting select the item you wish to change and press Enter After you have changed the desired settings press Print to initiate printing 6 When printing is finished disconnect the USB memory device NOTE Not all files located on a USB memory device can be printed using this operation For ...

Page 34: ...1 On the web browser enter the machine IP address and press the enter key We are using Internet Explorer for this example If a shortcut to OfficeBridge has been created on the desktop double click it 2 Click User Login Using OfficeBridge Accessing OfficeBridge When the machine is connected to the network you can operate it using the web browser on your computer See the OfficeBridge Guide for more i...

Page 35: ...user has not been registered this step is not necessary To access OfficeBridge as a guest click Guest User Login When the user list is displayed on the right you can enter the user ID by selecting your user name on the list Now you can access the machine using OfficeBridge ...

Page 36: ...chapter 4 Setting user policies in the OfficeBridge Guide 2 Click Address Book 3 Click Add To add a destination to your personal address book select Personal from the drop down box located to the left of the Add button Personal address books may not be available based on the administrator settings or authentication rules Registering e mail and fax destinations See the OfficeBridge Guide for more i...

Page 37: ...nstructions on entering the dialing options E mail Address Enter the e mail address PIN If your phone line requires entering a personal identify number PIN prior to completing a phone call enter that number here Super G3 Set whether to transmit with Super G3 Table for dialing options Dialing options How to enter Example Hyphen 111 1111 1111 Pause P 2 P222 2222 2222 Tone T 3 T333 3333 3333 Prefix N...

Page 38: ...E According to the user policy you cannot edit the shortcut For details on the user policy see chapter 4 Setting user policies in the OfficeBridge Guide 2 Click Shortcut 3 Click Folder Short cut or FTP Short cut 4 Click Add Registering a folder or FTP destination See the OfficeBridge Guide for more information ...

Page 39: ...he folder if needed Auto Login Check ON to enable log in using the saved user name and password Details for FTP shortcut Shortcut Number The lowest available number will be displayed You can change it to any available number between 1 20 Shortcut Name Enter the shortcut name within 24 characters Host Name Enter the host name within 126 characters Folder Path Enter the path to the folder Enter the ...

Page 40: ...ntly shake it to distribute the toner evenly inside the cartridge When you have changed the toner cartridge clean the charge needle by pulling the charging needle cleaning rod Making sure it fully extends and then return the rod to its original position Perform this several times When you have replaced the toner cartridge the following screen will be displayed Press Yes to use the new toner cartri...

Page 41: ...39 Operation Replacing the drum cartridge 1 3 2 4 5 6 NOTE When you have replaced the drum cartridge the following screen will be displayed Press Yes to use the new drum cartridge ...

Page 42: ... jam occurs during printing the toner will not be fused to the paper Be careful not to stain your hands or clothes with the toner If your hands or clothes get stained wash them immediately with cold water The stains may become permanent if washed using warm water Carefully remove the jammed paper so as not to leave fragments of paper inside the machine Do not touch the terminals inside the machine...

Page 43: ...41 Troubleshooting Clearing paper jams in the optional second cassette Clearing paper jams in the optional 2 bin tray ...

Page 44: ...ng message appears after you have cleared the jam you can restart scanning from the continuous page of the document Press Yes and set the document from the page listed on the display Then press Start When you press No the job will be canceled Clearing document jams ...

Page 45: ...Stop In this case clear the error by following the instructions on the display 3 Follow the message and clear the error NOTE Errors you can clear by pressing Stop include communication errors and memory over flows When a paper cassette is empty a paper or document has jammed the toner is empty or a cover has been left open you cannot clear the error by simply pressing Stop In these cases clear the ...

Page 46: ...er properly Set the paper guides so that they fit the paper Set the paper size For details see Setup the paper size page 7 and page 9 Is the cassette loaded correctly Make sure that the cassette is pushed all way in Does the paper meet the specification of the machine Use paper that meets the specification for the machine See chapter 5 Acceptable paper in Specifications in the Administrator s Guide Th...

Page 47: ...e Cannot send or receive fax Cannot install the printer drivers Chapter 6 Troubleshooting in the Printer Guide Cannot print Cannot use OfficeBridge Chapter 6 Troubleshooting in the OfficeBridge Guide If you cannot solve the problem If you have a problem with your machine that you cannot solve with the information provided in these manuals contact your authorized Muratec dealer or call the Muratec Cu...

Page 48: ...se you of your right to file a complaint with the FCC if you believe it is necessary The telephone company may make changes in its facilities equipment operations or procedures that could affect the operation of the product If this happens the telephone company will provide advance notice in order for you to make necessary modifications to maintain uninterrupted service If trouble is experienced w...

Page 49: ...ng antenna Increase the separation between the equipment and receiver Connect the equipment into an outlet on a circuit different from that to which the receiver is connected Consult the dealer or an experienced radio TV technician for help FCC CAUTION Changes or modifications not expressly approved by the party responsible for compliance could void the user s authority to operate the equipment So...

Page 50: ...c from the United States call 1 469 429 3350 from Canada check your in box materials for the number to call 2 During the warranty period the Customer must notify Muratec by telephone of any defective product material and or workmanship 3 Transportation including prepayment of freight and insurance charges of the product to and from an authorized service center designated by Muratec is the responsi...

Page 51: ...ness for a particular purpose and any warranty arising from course of dealing or usage of trade and Muratec expressly disclaims all warranties not stated herein in the event the product is not free from defects as warranted above the customer s sole remedy shall be repair or replacement as provided above under no circumstances shall Muratec be liable to the customer or to any user for any damages ...

Page 52: ...he installer will start automatically If the installation screen is not displayed double click the InstMenu exe file on the disk When the User Account Control screen is displayed enter an administrator password or provide confirmation 2 Click Manual 3 Click on the manual you would like to view NOTE In order to access or print PDF manuals your computer needs to have Adobe Acrobat Reader installed Y...

Page 53: ... please contact your authorized Muratec dealer Items Description 500 sheet paper cassette You can attach an additional paper cassette to enable increased paper storage or to hold a variety of paper sizes types 2 bin tray You can sort the output to a second tray Mechanical counter This counts the number of printed pages PostScript Enabler This enables printing from Mac OS Barcode Font Enabler This ...

Page 54: ... Mode lamps 5 N Network connector 4 O OfficeBridge 32 Options 51 P Paper size setting Bypass tray 9 Cassette 7 PC Fax 26 Print Basic operation 28 Cancel a print job 30 R Ready screens 13 Registering destinations e mail and fax destination 34 Folder or FTP shortcut 36 Regulatory information 46 Reset key 5 S Scan Basic operation 16 Color scan 21 Entering a file name 20 Selecting the file format 21 T...

Reviews: