background image

IMPORTANT

This fixture is intended to dispense water that has been lowered in temperature, but otherwise remains 
unchanged by the materials in the drinking fountain. 

NOTICE

A dielectric coupling must be used to connect the drinking fountain to the water supply . A nonmetallic coupler is 
furnished with this water cooler to meet this requirement.

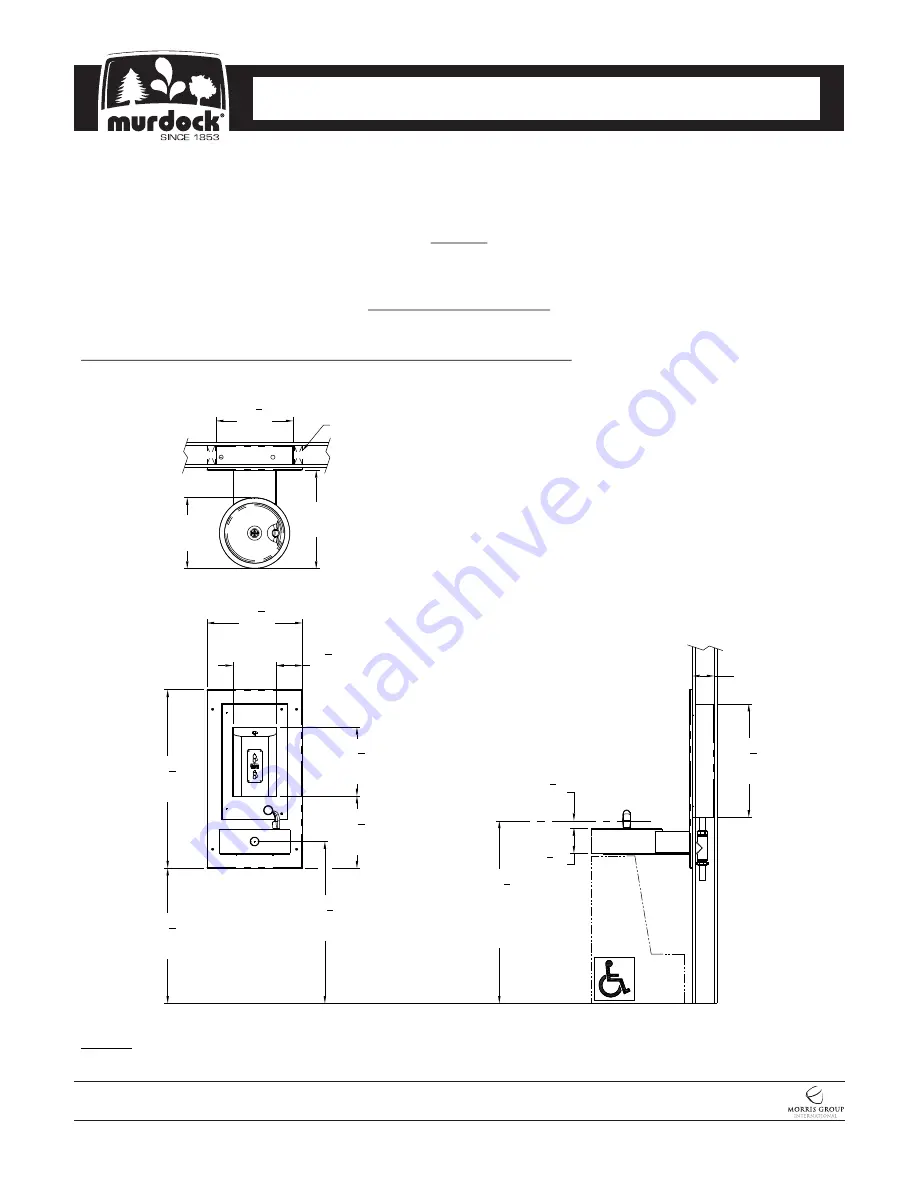
DIMENSIONAL DRAWING

Prior to roughing in, consult with local, state, and federal codes for proper mounting height.

M-OBR4-GRC Recessed Outdoor Bottle Filler with Drinking Fountain

NOTES: 

Dimensions shown for Adult ADA compliant installation. For Child ADA compliant parallel approach installation, 

decrease height of installation by 3 inches. Provide clear floor space as required. Adjust vertical dimensions as required to 
comply with federal, state, and local codes.

I N S TA L L AT I O N / M A I N T E N A N C E  I N S T R U C T I O N S

CONTEMPORARY WATER COOLERS


I N S TA L L AT I O N / M A I N T E N A N C E  I N S T R U C T I O N S


M-OBR4-GRC

Page 2 of 16

New: 12

/19/17

7020-963-001

MURDOCK  MFG.  • 

15125  Proctor  Avenue  •  City  of  Industry,  CA  91746  USA 

Phone  800-453-7465  or  626-333-2543  •  Fax  626-855-4860  •  www.murdockmfg.com

Member of

General Notes:
 1. All dimensions are in inches [MM]
*2. Dimensions shown are for recommended adult 

height. Adjust vertical dimensions as necessary to 
comply with Federal, State & Local Codes

 3. Stop Valve not provided

 OUTDOOR BOTTLE FILLERS


Shown with
2x4 Stud Wall

32

5
8

"

[829]

17

1

2

"

[445]

12

5
8

"

[321]

13

1
4

"

[337]

  8"

[203]

29

5
8

"

[752]

18"

[457]

*33

3
8

"

[848]

Orifice

Height

4"

[102]

20

3
4

"

[527]

14

1

8

"

[359]

24

3
4

"

[629]

13"

[330]

4

3
4

"

[121]

4

5
8

"

[117]

1

3
8

"

[35]

Summary of Contents for M-OBR4-GRC Series

Page 1: ... and does not apply to materials which have been damaged by other causes such as mishandling or improper care or abnormal use The repair or replacement of the defective materials shall constitute the sole remedy of the Buyer and the sole remedy of Murdock under this warranty Murdock shall not be liable under any circumstances for incidental consequential or direct charges caused by defects in the ...

Page 2: ...e clear floor space as required Adjust vertical dimensions as required to comply with federal state and local codes I N S TA L L AT I O N M A I N T E N A N C E I N S T R U C T I O N S CONTEMPORARY WATER COOLERS I N S TA L L AT I O N M A I N T E N A N C E I N S T R U C T I O N S M OBR4 GRC Page 2 of 16 New 12 19 17 7020 963 001 MURDOCK MFG 15125 Proctor Avenue City of Industry CA 91746 USA Phone 80...

Page 3: ...ough in details 5 Completely flush water Supply Lines of all foreign debris before connecting to the fixture DRINKING FOUNTAIN START UP 1 Before connecting Power Supply but after thoroughly flushing the Supply Line and connecting it to the Cooler turn on the building Water Supply and check all connections for leaks 2 Air within the Drinking Fountain System or the Structure Supply Piping will cause...

Page 4: ...C Page 4 of 16 New 12 19 17 7020 963 001 MURDOCK MFG 15125 Proctor Avenue City of Industry CA 91746 USA Phone 800 453 7465 or 626 333 2543 Fax 626 855 4860 www murdockmfg com Member of OUTDOOR BOTTLE FILLERS 1 1 4 O D Bottle Filler Drinking Fountain Waste 1 2 281 2 321 8 41 2 16 Stud Frame Wall Spacing Ø1 1 2 2 5 8 4 1 4 2 41 2 1 21 143 8 1 4 O D Drinking Fountain Supply Inlet 3 1 4 Anchoring Hard...

Page 5: ...ixture Panel Bottle Filler Box Mounting Plate and 10 32 x 1 4 Screws from packaging careful to avoid damage to fixtures and fixture sub assemblies 5 4 1 2 3 Finished Floor 17 267 8 1 281 2 3 Supporting Mounting Plate against wall align Bottle Filler opening and Mounting Plate Ø1 4 Anchoring holes with structural support before fixing to wall with installer provided Anchoring Hardware 2 3 4 Bottle ...

Page 6: ...nd secure with 10 32 x 1 4 Phillips Head Screws Note Cutoff 2 1 2 of material from the tailpiece See Detail A 2 Position Bottle Filler Panel and center to Mounting Plate and secure with 10 32 x 1 2 Stainless Steel Flat Head Center Reject Hex Screw 3 With Bottle Filler Panel installed open Bottle Filler Remove the 10 32 x 3 4 Flat Head Center Reject Screws and swing open Bottle Filler 1 2 3 2 4 3 1...

Page 7: ...the Bottle Filler Panel and into the Mounting Plate so that a minimum of 1 1 4 of thread projects beyond Bottle Filler Panel 3 Align threaded studs with drinking fountain mounting openings and slide fixtures to panel and secure with nuts and washers 2 Remove the Drinking Fountain bottom Access Panel by removing the Access Panel Vandal Resistant Screws Be sure to safeguard drain Access Panel screws...

Page 8: ...utlet 1 2 3 3 8 Shut Off Valve For Ref Only 3 8 Water Supply Tubing For Ref Only 1 2 2 Multiple Water Supply connections are required from the Building Water Supply Line to connect to the 1 4 NCT x 1 4 OD Push In Y Strainer and 1 4 NPT Male Fitting for the Bottle Filler Supply Line See Steps 3 and 4 DO NOT SOLDER Soldering will damage strainer O Ring preventing a watertight seal Layout shown for r...

Page 9: ...the Drinking Fountain To increase or decrease flow use slotted screwdriver Re install Access Panel with screws 4 Connect the last Multiple Water Supply Connection to the 1 4 OD Tube x 1 4 NPT Male Fitting Note An adapter is required to connect the Main Water Supply Line to the 1 4 Male NPT Fitting Connect the blue 1 4 OD Tube to Bottle Filler Spout Ø 3 16 Hole Slotted Screwdriver Decrease Flow Inc...

Page 10: ...e the 1 1 4 Tee Assembly with compressions and the 1 1 4 x 4 Brass Tubing from packaging 2 From the interior of the building install Tee Assembly with Compression to Drinking Fountain and Bottle Filler Cut to fit Drinking Fountain Tailpiece 21 4 4 Install P Trap to Waste outlet P Trap is provided by others P Trap by others 1 1 4 Waste Outlet Tailpiece Bottle Filler 1 2 3 1 1 4 Bottle Filler Tailpi...

Page 11: ...r counterclockwise to remove 3 Remove and replace the cartridge turning clockwise to secure 4 Turn Shut Off Valve Knob a 1 4 turn counterclockwise to open the water supply 5 Test for leaks and proper operation before closing the Bottle Filler Access Door and re fastening the 10 32 Screws Water Filter Cartridge Replacement Instructions M OBR4 GRC Page 11 of 16 New 12 19 17 7020 963 001 MURDOCK MFG ...

Page 12: ...n solenoid valve outlet elbow clogged remove clean h No power to transformer connections loose or wires cut 3 WATER DRIPS OR WILL NOT SHUT OFF a Open fixture Loosen nuts holding valve bracket assembly to bottom of fixture but do not remove Move complete valve bracket assembly further back from the front push pad and tighten to lock in place b Replace valve cartridge SENSOR TROUBLE SHOOTING 4 IF LI...

Page 13: ... coated units 5 Stainless steel should be kept clean at all times If a coating of stainless steel cleaner polish is maintained stainless steel surfaces will retain their new clean polished appearance indefinitely DRINKING FOUNTAIN CARTRIDGE REPLACEMENT STRAINER MAINTENANCE Note Use the universal maintenance tool to perform the following 1 Strainer plug must be removed before cartridge replacement ...

Page 14: ...FG 15125 Proctor Avenue City of Industry CA 91746 USA Phone 800 453 7465 or 626 333 2543 Fax 626 855 4860 www murdockmfg com Member of OUTDOOR BOTTLE FILLERS ITEM PART NUMBER DESCRIPTION ITEM PART NUMBER DESCRIPTION 1 7000 050 001 Valve Cartridge 7 7000 021 001 Y Strainer 2 7000 068 001 Retaining Ring and Button 8 0112 002 000 Center Reject Allen Button Head 3 7000 065 001 Recessed Pushbutton Valv...

Page 15: ... 001 MURDOCK MFG 15125 Proctor Avenue City of Industry CA 91746 USA Phone 800 453 7465 or 626 333 2543 Fax 626 855 4860 www murdockmfg com Member of OUTDOOR BOTTLE FILLERS 1 4 5 9 2 3 6 7 8 ITEM PART NUMBER DESCRIPTION ITEM PART NUMBER DESCRIPTION 1 7007 081 001 Wall Mounted Drinking Fountain 6 0116 004 000 10 32 x 1 4 Round Head Screw 2 JSMBF495 001 Cover Plate Assembly 7 JSMBF494 001 Water and A...

Page 16: ...hbutton Assembly 2 0152 006 000 10 32 x 3 4 Hex Flat Head Screw 3 JSMBF479 199 Bottom Screen 4 JSMBF480 199 Alcove Screen Plate 5 0302 005 000 1 4 20 UNC Stn Stl Hex Nut 6 2566 050 002 Back Outlet Pushbutton Assembly 7 2566 022 000 Escutcheon Retainer 8 2566 001 000 Air Trol Diaphragm 9 2566 056 199 Diaphragm Retainer Back Outlet 10 1895 450 000 1 8 OD Nylon Compression Nut 11 7013 010 199 Nano Se...

Reviews: