background image

Ver: 10/14/2004                                                        9 


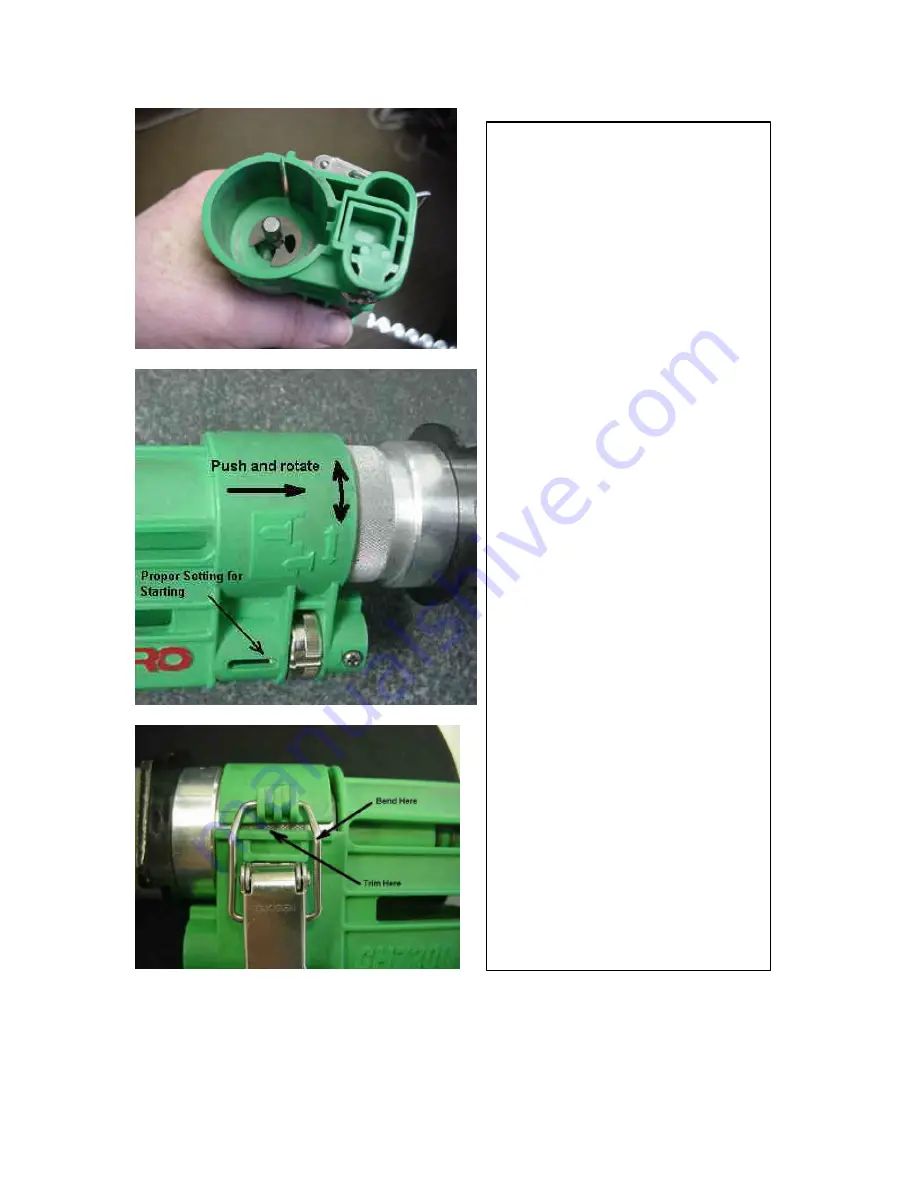
When the bit and clip are 
assembled into the CH7260, it may 
then be attached to the driver tool.  
Rotate the attachment to allow the 
small hex end of the bit to mate 
with the driver.  Once mated, push 
the attachment fully onto the 
aluminum adaptor.  Latch the hasp.  
 
 
.  (Tip: if more latching force is 
required after a period of use, the 
wire part of the hasp can be bent 
with pliers to re-tension the clasp. If 
very badly worn, the plastic sides 
may touch and some plastic must 
be removed from the metal clip side 
with a blade to provide clearance 
for clamping.)    
 
For Wood applications set the 
screw gun torque to Max and set 
the starting depth control on the 
attachment to the middle of the 
adjust range and adjust attachment 
depth adjustment to suit. 
 
Hex screws are normally seated 
using the torque control of the 
screw gun to prevent “stripping 
out” or fastener breakage. Set 
starting torque per chart and adjust 
torque until it seats consistently.  
The depth control on the attachment 
is set to “deep” to allow this per 
middle photo. 


Summary of Contents for VISLIDER CH7260 METAL PRO

Page 1: ...ational guide and safety instructions WARNING Read and understand all instructions Failure to follow all instructions listed below may result in electric shock fire and or serious personal injury SAVE THESE INSTRUCTIONS Keep your tool clean remove dust and dirt by vacuuming or carefully blowing out regularly Other tool service must be performed only by qualified repair personnel Service or mainten...

Page 2: ...ed for the CH7260 metal pro tool only if the tip of the screw is more than 3 8 of an inch from the metal being driven For proper application versions of the metal pro tool with a shortened screw guide or additional chip clearance are available to provide a custom tailored solution for your application see CH7260 Series page 13 The MK6827 or HITACHI W8VB driver is recommended to work with the CH726...

Page 3: ... into the CH7260 with the Plastic strip facing outwards per the diagram on the side of the screwdriver The strips must be inserted as shown to work properly i e only one way works if inserted backwards they will jam Generally the correct end of the strip will be longer Check that the free end of the strip fits into the strip guide Latch hook the first screw with the feed latch Photo 2 The strip gu...

Page 4: ...frees the screw from the feed latch 3 Then pull the strip towards you and then out of the tool as shown in Photo 5 This action will push over the strip tensioner spring to allow the strip to be removed easily It should be noted that fasteners with large heads might not directly latch into the screw guide easily If this happens push the feed lever over with your finger while inserting the strip of ...

Page 5: ...4 2004 5 After freeing the feed latch pull the strip towards you and then out of the tool as shown in Photo 5 This action will push over the strip tensioner spring to allow the strip to be removed easily 4 5 1 ...

Page 6: ...ossible watch to see screw is turning increase force once the drill point of the fastener hits the metal push firmly until you hear the clutch disengage and release Firm pressure is a must for drilling self drilling screws do not yield pressure until you hear the clutch release buzz for a second Sparks red hot glow or unusual noises all indicate a possible problem If any problem occurs flip tool a...

Page 7: ...of the tool in action The clutch buzzes when the clutch releases this should occur for only a second at the point when the screw seats down properly If short buzzing intermittently is heard while driving but the screw still seats properly the torque setting should be increased further The clutch is releasing probably while threading which normally requires more torque than drilling If you drive a ...

Page 8: ...able Push slowly and firmly to engage clip This clip is important as is prevents the hex bit from accidentally hitting the feed latch as well as reducing problems if the bit happens to stick to a screw Please insure that it always installed on the bit before use Carefully cycle the tool against table again to remove the bit change tool to prevent damage Changing the Hex Bit Cont d The Bit Retainin...

Page 9: ...very badly worn the plastic sides may touch and some plastic must be removed from the metal clip side with a blade to provide clearance for clamping For Wood applications set the screw gun torque to Max and set the starting depth control on the attachment to the middle of the adjust range and adjust attachment depth adjustment to suit Hex screws are normally seated using the torque control of the ...

Page 10: ...y measures reduce the risk of starting the tool accidentally Avoid body contact with grounded surfaces such as pipes radiators ranges and refrigerators There is an increased risk of electric shock if your body is grounded Do not expose power tools to rain or wet conditions Water entering a power tool will increase the risk of electric shock Do not abuse the cord Never use the cord to carry the too...

Page 11: ...Ver 10 14 2004 11 ...

Page 12: ...10 2 18 163 11070 Dowel Pin 5x20 1 19 163 11080 Spring Pin A type 2x6 1 20 163 11090 Spring Pin A type 2x18 1 21 163 11100 Stainless Snap Fastener 1 22 165 10200 Feed lever for CH7260 1 23 170 10180 Latch Spring for CH tool 1 24 170 11110 Flange Bushing for CH tool 2 25 20 10401 Tape Support for CH7260 1 26 20 10501 Feed latch for CH7260 Hex Tool 1 27 20 10801 Strip control spring CH7260 1 28 20 1...

Page 13: ...also vertical wall hex apps where chips can fall clear Special Wood to Metal for dedicated 1 1 4 Inches also vertical wall hex Wood to Metal apps 3 4 to 1 Inches long minimized marring also vertical wall hex where chips can fall clear Metal applications to 1 Inches long with clearance for metal chips Stitching General Hex tool Special Metal apps to 3 4 Inches long Clearance for metal chips Metal a...

Reviews: