background image

Musicmakers

14525 61st ST CT N

Stillwater, MN 55082

HARP WHEELS KIT

Assembly Instructions

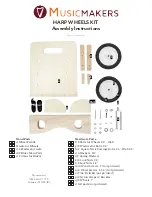
Wood Parts:

a) Wheel Paddle
b) Axle for Wheels
c) 2 Fenders for Axle
d) 2 Brake Main Parts
e) 2 Cams for Brakes

Hardware Parts:

f) 2 Bolts for Wheels 1/2” - 13x5”
g) 2 Washers for Bolts, 1/2”
h) 2 Square Neck Carriage Bolts, 1/4”-20x2-1/2”
i) 6 Washers, #12
j) 2 Spring Washers
k) 2 Lock Nuts, 1/2”
l) 2 Lock Nuts, 1/4”
m) 9 Wood Screws, 1” (not pictured)
n) 4 Wood Screws, 1-1/4” (not pictured)
o) 7/64” Drill Bit (not pictured)
p) 2 Nylon Straps w/ Buckles
q) 2 Wheels, 7” 
r) felt pads (not pictured)

A

B

C

D

E

F

G

H

I

J

K

L

P&Q

Updated August 2020

Summary of Contents for HARP WHEELS KIT

Page 1: ...s Hardware Parts f 2 Bolts for Wheels 1 2 13x5 g 2 Washers for Bolts 1 2 h 2 Square Neck Carriage Bolts 1 4 20x2 1 2 i 6 Washers 12 j 2 Spring Washers k 2 Lock Nuts 1 2 l 2 Lock Nuts 1 4 m 9 Wood Screws 1 not pictured n 4 Wood Screws 1 1 4 not pictured o 7 64 Drill Bit not pictured p 2 Nylon Straps w Buckles q 2 Wheels 7 r felt pads not pictured A B C D E F G H I J K L P Q Updated August 2020 ...

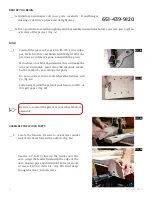
Page 2: ...ander this will make the job easy and quick Sand away the machine marks but be careful to not reshape the parts Do not sand over ends of axle where the fenders will go fig 1A Soften edges with the palm of your hand and 150 or 180 grit paper fig 1B ____2 Locate the fenders Be sure to orient the counter sink of the holes toward the outside fig 2A FIG 1A p Be sure to sand all the pieces of your wheel...

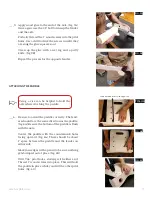
Page 3: ... same direction as the paddle fig 4A Be sure the bottom of the paddle is flush with the axle Center the paddle with the countersunk holes facing upward fig 4A There should be about 1 space between the paddle and the fender on either side Mark your edges with a pencil to be sure nothing gets bumped out of place fig 4B Drill 7 64 pilot holes starting with either end Thread 1 wood screws into place T...

Page 4: ...oats of finish The thicker the finish the better FIG 9A FIG 9B ____7 The wood in this kit is all raw and unfinished You can take this opportunity to add stain to the wood if you d like Choose the color you like and begin customizing your wheels Be aware that if the wood is stained it will show wear and tear a little more than if just finished in a clear coat p Here are some finishing options along...

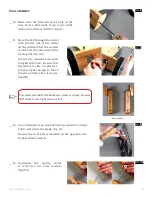
Page 5: ...enches or sockets to tighten the bolt Be sure that the wheel is able to spin free ly but is tight enough so that it doesn t wobble when it moves fig 11B ____11 FIG 11 B A ____12 Use a solid surface as a foundation to pound the carriage bolt to seat it into the brake fig 12 Be sure the next bolt is installed on the opposite side Double check yourself p You must assemble the brakes in a mirror image...

Page 6: ...e brake aligned and use a 7 64 drill bit to bore a pilot hole in the top hole Then insert the 1 1 4 wood screw into the pilot hole you just drilled Do not tighten the screw all the way down Repeat process for the the lower hole Be sure the brake stays aligned for this step Once both screws have been inserted you can tight en them down all the way fig 14B Repeat this process for the other brake FIG...

Page 7: ...on the bottom you can still use the wheels with your gig bag This might require some extra materials like bungee cords etc You need to find a way to hold wheel platform to the bottom of the case so that when you tilt the harp back the paddle rises with the case allow ing you to move around freely We have a video on our website with some help ful tips Set your harp on the wheels and install the adh...

Page 8: ...K The strap in front should be enough to lift the platform up when you tilt the harp back Pull the straps tight for the best results A little wobble won t hurt but the more secure your harp is attached to the wheels the better control you will have as you move your harp around Once the harp is secured to the wheels make sure the brakes are off tilt your harp back and you are off to the races fig I...

Reviews: