background image

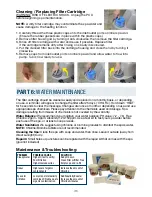
Cleaning / Replacing Filter Cartridge

WARNING: RISK OF ELECTRIC SHOCK. Unplug the PCU 

before beginning spa maintenance.

NOTE:

 A dirty filter cartridge may contaminate the spa water and 

cause damage to the heating function.

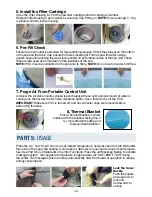
1. Carefully thread the three plastic caps onto the inlet/outlet ports on inner spa wall. 

  (Ensure the rubber gaskets are in place within the plastic caps)

2. Remove filter housing lid by turning it anti-clockwise, then remove the filter cartridge.

3. Rinse off filter cartridge with water and reuse if possible. Replace filter 

  if the cartridge remains dirty after rinsing or is badly discoloured.

4. Put the cleaned filter back into the cartridge housing and close the lid by turning it  


 clockwise.

5. Remove caps from inlet/outlet ports on inner spa wall and allow water to flow into  


  pump. Tub is now ready for use. 

 PART 6:

 WATER MAINTENANCE

The filter cartridge should be cleaned weekly and replaced on a monthly basis, or depending 

on use. A reminder will appear to change the filter after 25 days (‘CHG FIL’). Hold down ‘HEAT’ 

for 5 seconds to clear the message. Change water once a month or depending on use and use 

appropriate spa chemicals. Please pay attention to the chemicals used and dosage. Spa 

damage resulting from misuse of chemicals is not covered by the warranty.

Water Balance:

 We recommend you maintain your water balance: PH value: 7.2 - 7.6;  Free 

Chlorine: 2ppm - 3ppm; Alkalinity: 120-150ppm. Use a test kit to test your spa water before 

each use of the spa, or at least once per week. 

Water Sanitation:

 We suggest using chlorine or bromine granules to disinfect the spa’s water.   

NOTE: 

Chlorine/Bromine tablets are not recommended. 

Cleaning the Spa:

 Clean the spa with soap and water, then rinse. Leave it outside (away from 

direct sunlight) to dry.

Repairs:

 Small holes or punctures can be repaired with the repair kit that comes with the spa 

(glue not included)

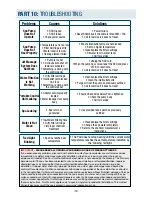
Maintenance & Troubleshooting:

PROBLEM

Cloudy water

Odour

Eye skin/

irritation

POSSIBLE CAUSE

High pH (test to verify)

Poor filtration

High dissolved solids

High level of organic 

contaminants

Low pH and/or alkalinity

combined Chlorine due to 

organic contamination

SOLUTION

Add pH down

Clean filter w/Filter Free

Empty spa and re-fill

Increase the amount of  

Chlorine

Add Alkalinity Booster

Increase the amount of 

Chlorine Granules

(11)

Summary of Contents for CA17534GB

Page 1: ...n a d i a n S p a c o m p a n y c o m Instruction Manual 220 240V 50Hz 13A Read this manual before operation c a n a d i a n s p a c o m p a n y c o m Muskoka Portable Foam Wall Spa Muskoka Spa P O R...

Page 2: ...ING Make sure the home fixed connection box is more than 3 5m away from the spa WARNING RISK OF ELECTRIC SHOCK DO NOT BURY CORD Ensure the electrical cord is located away from lawn mowers hedge trimme...

Page 3: ...o warrants the vinyl finish against defects in material and workmanship and specifically against blistering cracking or de lamination for the period of one 1 year from the original purchase date to th...

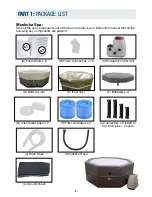
Page 4: ...at all the following key components are present 4 E Inner liner H Filter cartridges x 2 C Portable Control Unit B Foam Connectors x 16 F Inflatable Lid K Inflation Hose D Bottom Liner G Inlet Outlet C...

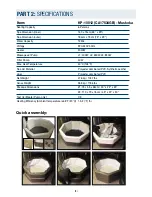
Page 5: ...eight Package Dimensions Test Certificate Pump only Heating Efficiency Ambient temperature is 68 F 20 C KP 10012 CA17534GB Muskoka 6 Persons 160 x 73cm 63 x 29 184cm x 73cm 73 x 29 1230L 220 240V 50Hz...

Page 6: ...er Temperature Mode Button Press this button to change from Celsius to Fahrenheit JETS Button Press the JETS button to activate the Jet Massage System on the spa Pressing once will start the lowest sp...

Page 7: ...er will not resume until spa water drops 4 5 degrees below set temperature for maximum efficiency You can also manually restart the heater by pressing HEAT when heater is turned off This spa is equipp...

Page 8: ...ng it a small wiggle can help guide it in if it gets stuck Ensure to insert the top and bottom wall connectors as you assemble the foam wall 2 Position Foam Panel 1 with holes see fig a aligning it ex...

Page 9: ...he three holes fig b fig c 9 4 Connect the Portable Control Unit to the Spa Position the PCU next to the spa remove the In ation Hose and align the Connection Hoses to the spa Use slight force to even...

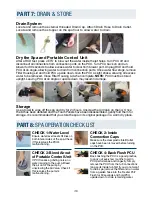
Page 10: ...tlet is extended for future draining access Check the stopper on the bottom of the spa and the Drain Cap ensure both are closed tight Fill the spa with water using a garden hose until reaching the wat...

Page 11: ...o clear the message Change water once a month or depending on use and use appropriate spa chemicals Please pay attention to the chemicals used and dosage Spa damage resulting from misuse of chemicals...

Page 12: ...Valve on the lid Once the lid has been deflated and the Foam Panels have been disassembled gently fold them for storage It is recommended that you store the spa in its original package in a warm dry...

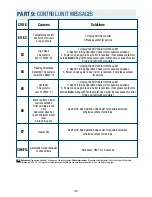
Page 13: ...utlet 2 See Part 8 Spa Operation Check List for possible solutions 3 Power on spa again to see if error is resolved if not please contact for service Note filling with hot tap water upon initial fill...

Page 14: ...ompletely Refer to the chemical manufacturer s instructions Red Light Blinking Spa has reached set temperature The PCU does not stop heating until the current water temperature reaches the set tempera...

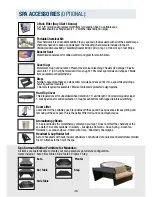
Page 15: ...tion Tough mesh bottom with rugged reinforced stitching Step Simple to assemble these spa steps allow for quick and easy entry into a spa while providing a non slip surface for safety No tools require...

Page 16: ...Disclaimer Canadian Spa Co or any of its authorized service technicians shall not be held liable for injury inconvenience loss of use chemical or water damage transportation costs continent liabilitie...

Reviews: