background image

16

17

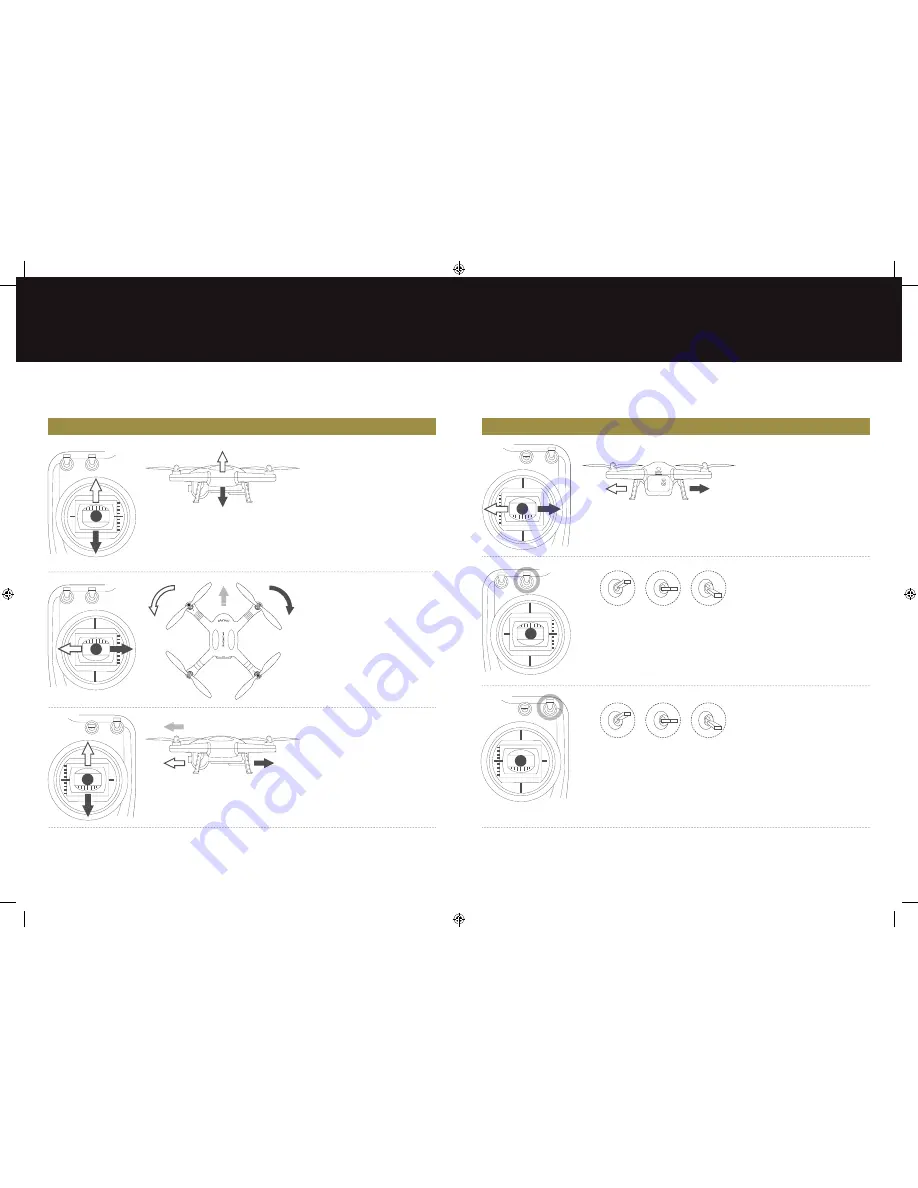
5.3 Controller operati ng instructi ons

  Controller 

X-Drone Directi on 

Control Method


 The left  joysti ck controls the X-Drone 
elevati on. 


 Push the left  joysti ck upwards over the 
centre positi on to make the X-Drone take 
off  from the ground. (Please push the left  
joysti ck slowly to prevent the X-Drone 
from suddenly and unexpectedly rising).


 Push the joysti ck up, the X-Drone rises. 
Pull the joysti ck down, the X-Drone 
descends. Keep the joysti ck at the centre 
positi on and the X-Drone will hover at that 
parti cular height. 


 The left  joysti ck also controls the 
X-Drone rotati on. 


 Push the joysti ck left  and the X-Drone 
rotates counterclockwise. Push the joysti ck 
right and the X-Drone rotates clockwise. 
If the joysti ck is centred, the X-Drone will 
fl y in the same directi on without rotati ng.


 The joysti ck controls the rotati ng angular 
velocity of the X-Drone. Move the 
joysti ck to increase X-Drone rotati on 
velocity.


 The right joysti ck controls the X-Drone’s 
front & back ti lt. 


 Push the joysti ck up and the X-Drone 
will ti lt and fl y forward. Pull the joysti ck 
down and the X-Drone will ti lt and fl y 
backwards. The X-Drone will keep level 
and straight if the joysti ck is centred. 


 Move the joysti ck faster to increase the 
ti lt angle (maximum is 30 degrees) and 
for faster fl ight velocity.

  Controller 

X-Drone Directi on 

Control Method


 The right joysti ck also controls the 
X-Drone left  & right ti lt. 


 Push the joysti ck left  and the X-Drone 
will ti lt and fl y left . Push the joysti ck right 
and the X-Drone will ti lt and fl y right. The 
X-Drone will keep level and straight if the 
joysti ck is centred.


 Move the joysti ck faster to increase the 
ti lt angle (maximum is 30 degrees) and 
faster fl ight velocity.


 S2is used to calibrate the left  and right 
joysti cks. 


 Move S2 to positi on 3, and turn on the 
controller. Then move both joysti cks 
clockwise and counterclockwise twice, 
ensuring each rotati on reaches the 
maximum degrees. Aft erwards, release 
the joysti cks and move S2 to positi on 1. 


 The video recording indicator (green) 
will light up for 3 seconds to indicate 
the completi on of the calibrati on.


 S4 switch is the fl ight mode toggle 
switch.


Positi on 1 - GPS mode


Positi on 2 - NRM (normal) mode


 Positi on 3 - NULL is reserved functi on


 S2is used to calibrate the left  and right 


 Move S2 to positi on 3, and turn on the 


 S4 switch is the fl ight mode toggle 


Positi on 1 - GPS mode


 The right joysti ck controls the X-Drone’s 


 The left  joysti ck also controls the 


 Push the joysti ck left  and the X-Drone 

Positi on 1

Positi on 1

Positi on 2

Positi on 2

Positi on 3

Positi on 3

X-Drone Manual.indd   16-17

22/07/2015   14:28

Summary of Contents for X-drone VXD-001-B

Page 1: ...User Manual VXD 001 B X Drone Manual indd 1 22 07 2015 14 28 ...

Page 2: ...troller antenna 5 3 Controller operating instructions 5 4 Pairing the controller and the X Drone s receiver 6 X Drone smartphone range extender 19 6 1 Guide to the smartphone range extender 6 2 WiFi indicator 6 3 Power indicator 6 4 Pairing 6 5 Charging the smartphone range extender 7 Flying the X Drone 21 7 1 Compass calibration 7 2 Starting stopping the motor 7 3 Basic flight 7 3 Basic flight 7 ...

Page 3: ...1 6 Smartphone Mount x1 7 X Drone Battery x1 8 X Drone Battery Charger x1 9 Smartphone Range Extender Adapter x1 10 Tool Set Screwdriver and Wrench x1 11 Screw for Smartphone Range Extender x1 12 M3x12 Screws x8 13 Controller Strap x1 14 USB Cable x1 1 2 9 3 4 5 6 7 8 10 11 13 14 12 X Drone Manual indd 5 22 07 2015 14 28 ...

Page 4: ...battery Ensuring that the X Drone is switched off insert the battery into the battery compartment on the X Drone and lock the battery into position If the battery lock is not fastened the battery may not connect correctly which may affect flight safety or stop the X Drone from taking off 2 4 Battery precautions Do not pull out the battery whilst the X Drone is switched on as it may damage the unit...

Page 5: ... 1s intervals Barometer abnormal state Solid on Slow flash once every 3s GPS abnormal state Solid on Fast and slow flash at 3s intervals Compass abnormal state Fast flash Solid on Compass needs calibration Slow flash Solid on Accelerometer abnormal state Fast flash Fast flash Accelerometer needs calibration Switches on off then permanently on Switches on off then permanently on Gyro abnormal state...

Page 6: ...Image resolution 4608x3456 Video format MOV H 264 compression Storage microSD microSDHC up to 32GB Photo modes Single shot and fast shot Camera function keys on controller Start video recording Photo capture Stop video recording Status indicators on controller There are three status indicators on the controller Controller power indicator Red LED Solid on when the controller is switched on Photo ca...

Page 7: ...plied wrench hold and rotate the propeller in the unlocking direction see above 4 3 Precautions Before each flight check that the propellers are correctly and firmly installed Ensure all propellers are intact before each flight Keep your distance from rotating propellers and the motors to avoid cuts and injury Only use propellers that have been provided by Veho to ensure optimal performance 4 4 Pr...

Page 8: ...er will make a sound to indicate low power Please remove the batteries if you do not intend to use the controller for a long time 5 2 Controller antenna To maintain a strong communication between the controller antenna and the X Drone receiver antenna please keep the controller antenna pointing towards the sky and ensure that there are no obstacles between the controller antenna and the X Drone re...

Page 9: ...oystick faster to increase the tilt angle maximum is 30 degrees and for faster flight velocity Controller X Drone Direction Control Method The right joystick also controls the X Drone left right tilt Push the joystick left and the X Drone will tilt and fly left Push the joystick right and the X Drone will tilt and fly right The X Drone will keep level and straight if the joystick is centred Move t...

Page 10: ...r has been successfully established The X Drone smartphone range extender is a wireless communication device that works in the 2 4GHz frequency band and is used to increase the effective communication distance between the smartphone and the X Drone The communication distance is affected by the surrounding environment such as blockages due to trees signal reflection by buildings interference by oth...

Page 11: ...tphone range extender is ready Before each flight check that the smartphone range extender has sufficient charge Turn the smartphone range extender on then press the pairing button once Power indicator flashes once Range extender has over 80 charge remaining Power indicator flashes twice Range extender has over 50 charge remaining Power indicator flashes three times Range extender is low on charge...

Page 12: ...ks as shown below to start the motor This is known as Combination Joysticks Command CJC After the motors have started release the joysticks immediately PLEASE NOTE When the S4 switch is in GPS mode the motors cannot turn on until the GPS is ready There are two ways to stop the motors on the X Drone 1 After the X Drone lands toggle the throttle left joystick then perform CJC The motors will immedia...

Page 13: ...he controller signal is lost The home point is the X Drone s position where the X Drone successfully scanned and connected to the satellite To ensure that the X Drone successfully flies back to the home point if it enters failsafe mode please only take off after the X Drone s GPS has successfully connected to the satellite If you lose control of the X Drone during flight the X Drone will automatic...

Page 14: ...afe mode and start to automatically land When in level 2 alarm condition please return and land the X Drone as safely as possible and do not push the throttle hard or make big movements during flight During low power automatic landing you can regain control of the X Drone by switching the flight mode S4 switch However do not do so repeatedly as it may reduce the battery life or the X Drone may cra...

Page 15: ...ke a photo by pressing the operation button 8 4 Fast shot photo capture Make sure that you are in fast shot capture mode by pressing the Fast Shot button The Fast Shot button will turn blue to indicate that it is in fast shot capture mode Take several photos in one second by pressing the operation button 8 5 Maximise the preview screen On iOS devices you can maximise the preview screen in Video Ph...

Page 16: ...n of firmware that you have Type Shows the model number of your X Drone X Drone Battery 5300 mAh LiPo Weight 1 4kg 3 09lbs Hover Accuracy Horizontal 2 5m 8 2ft Vertical 0 8m 2 62ft Maximum tilt angle 30 Maximum climb descent speed Climb 6 m s 19 69ft s Descend 4 m s 13 12ft s Maximum flight speed 20m s 65 62ft s Not recommended Wheelbase 450mm 1 48ft Flight time 20 25 minutes 31 Camera Ambient ope...

Page 17: ...www veho world com X Drone Manual indd 32 22 07 2015 14 28 ...

Reviews: