background image

17 

User  Manual 

MX

HM44 

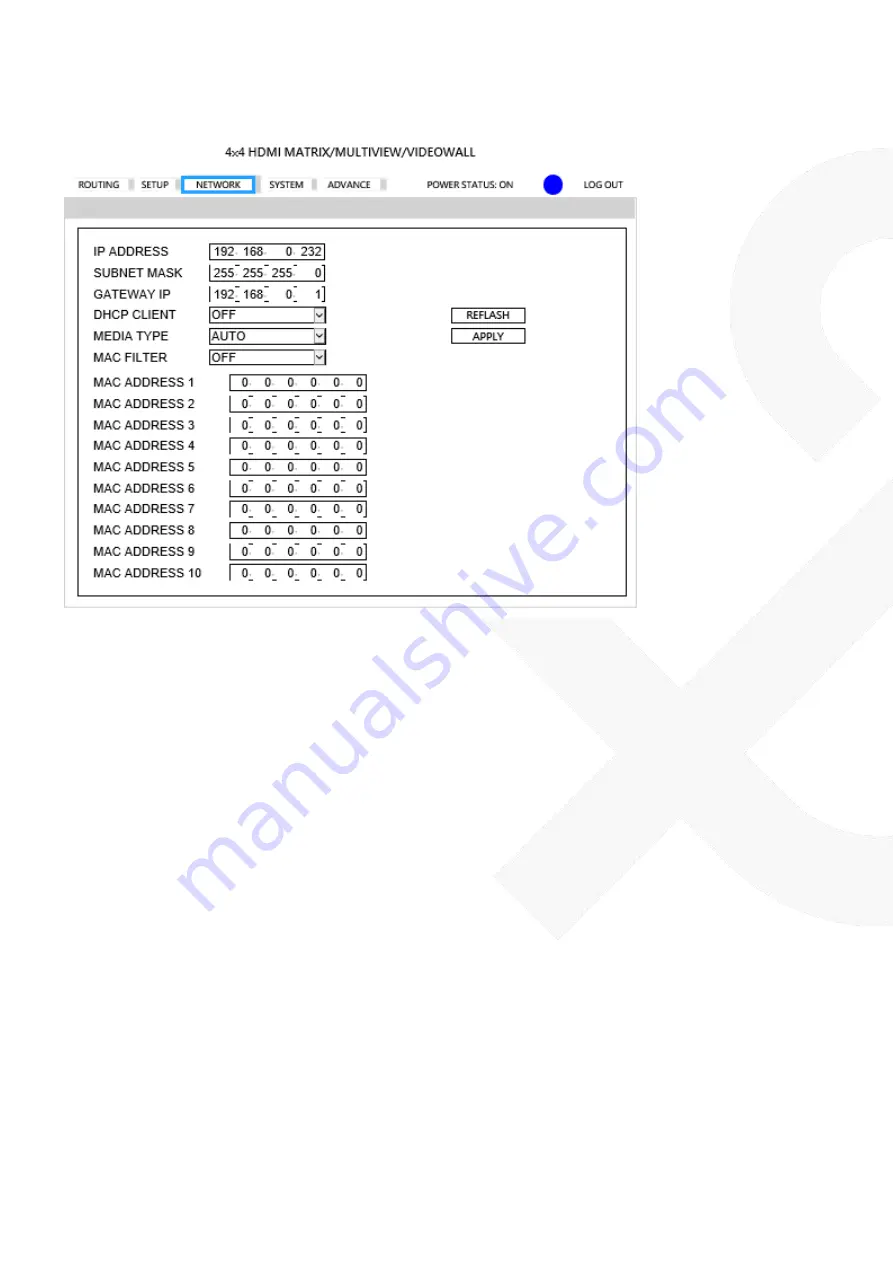
Network 

IP ADDRESS: Set IP address, 

Default 192.168.0.200

SUBNET MASK: Set Subnet mask, 

Default 255.255.255.0

GATEWAY: Set gateway address, 

Default 192.168.0.1

DHCP CLIENT:
ON: Get IP Address, Subnet Mask, Gateway from existing DHCP server
OFF: Set IP Address, Subnet Mask, Gateway by WebGUI or OSD menu manually, 

Default OFF

MEDIA TYPE: Set link speed of Ethernet port to 10 / 100 / Auto detect, 

Default AUTO

MAC FILTER:


Add up to 10 registered MAC Address, only the MAC address which is in the list can be

able to connect host by Ethernet,


Default OFF

.

REFRESH

Refresh the information of host

APPLY

Apply changes

Summary of Contents for HM44

Page 1: ...V1 0_2007060 HDMI Matrix Switcher User Manual Model MXHM44 4 X 4 HDMI Multiviewer Seamless Matrix Switcher Suppport Video wall ...

Page 2: ... venues that require multiple contents to be routed and need instant video switching Features Resolution up to 1080p 60Hz and 1920 x 1200 WUXGA Supports 2 x 2 Video Wall with 4 selectable input sources Supports seamless switching Supports video scaler Support PiP Picture in Picture function allowing you to watch videos in a floating window Supports OSD menu setting Firmware upgradable through web ...

Page 3: ...2 User Manual MXHM44 Video Wall Mode Panel view HM44 ...

Page 4: ...FF Turn off the selected output not available for videowall mode LOAD Load layout source in Multiview and Matrix mode from scene 1 8 Load screen position in VIDEOWALL mode from scene 1 4 SAVE Save current layout source in Multiview and Matrix mode to scene 1 8 Save screen position in VIDEOWALL mode to scene 2 4 FUNCTION Switch different PIP POP layout in Multiview Mode Bezel correction adjust scre...

Page 5: ...n 2 Press INPUT OUTPUT 1 4 to save current windows layout and source of windows 3 Press ENTER to confirm Load scene 1 Press LOAD button 2 Press INPUT OUTPUT 1 4 to load saved layout source 3 Press ENTER to confirm Matrix mode Output input selection 1 Press OUTPUT 1 4 buttons to select the desired output monitor button LED will light on You could select multiple OUTPUT at the same time 2 Press INPU...

Page 6: ...4 to select the monitor to adjust screen position shift depends on input resolution 4 Press UP DOWN LEFT or RIGHT button to shift the screen 5 Press ENTER to quit the position adjustment Save scene 1 Press SAVE button 2 Press INPUT 2 4 to save current position of each screen 3 Press ENTER to confirm Load scene 1 Press LOAD button 2 Press INPUT 1 4 to load saved position of each screen 1 is factory...

Page 7: ...then press button 0 to complete the setting for example Remote Control Button Function Symbol Function Name Description POWER Power on standby UP Move menu function up in OSD DOWN Move menu function down in OSD LEFT Move menu function left in OSD RIGHT Move menu function right in OSD ENTER Execution selected function MENU Enter OSD menu Back to upper level of menu Quick output input selection Pres...

Page 8: ...0P 1366x768 576P 1440x900 720P50 1600x1200 720P60 1680x1050 1080P24 1920x1200 1080P50 BACK 1080P60 Default EXIT 1024x768 1280x800 1280x1024 PICTURE SETTING OUT SELECT OUT1 OUT4 Default OUT1 CONTRAST 0 100 Default 50 BRIGHTNESS 0 100 Default 50 SATURATION 0 100 Default 50 HUE 0 100 Default 50 RESET BACK EXIT OSD SETTING MENU TIMEOUT 0 100 Default 20 INFO TIMEOUT 0 100 Default 5 INFO POSITION RIGHT ...

Page 9: ...H Default 1080P MLT OUTPUT 1 OUTPUT 2 OUTPUT 3 OUTPUT 4 INPUT4 EDID 1080P 2CH Default 1080P MLT OUTPUT 1 OUTPUT 2 OUTPUT 3 OUTPUT 4 INPUT ALL 1080P 2CH Default 1080P MLT OUTPUT 1 OUTPUT 2 OUTPUT 3 OUTPUT 4 BACK EXIT HDCP HDCP FOLLOW INPUT Default ALWAYS ON BACK EXIT AUDIO MULTIVIEW MODE OUTPUT1 AUDIO IN 1 Default IN 2 IN 3 IN 4 OFF OUTPUT 2 AUDIO IN 1 IN 2 Default IN 3 IN 4 OFF OUTPUT 3 AUDIO IN 1...

Page 10: ...PUT1 AUDIO IN 1 IN 2 IN 3 IN 4 FOLLOW Default OFF OUTPUT 2 AUDIO IN 1 IN 2 IN 3 IN 4 FOLLOW Default OFF OUTPUT 3 AUDIO IN 1 IN 2 IN 3 IN 4 FOLLOW Default OFF OUTPUT 4 AUDIO IN 1 IN 2 IN 3 IN 4 FOLLOW Default OFF BACK EXIT VIDEO WALL OUTPUT 1 AUDIO IN 1 IN 2 IN 3 IN 4 FOLLOW Default OFF OUTPUT 2 AUDIO IN 1 IN 2 IN 3 IN 4 ...

Page 11: ...efault OFF BACK EXIT BACK EXIT BACK EXIT NETWORK IP ADDRESS BYTE 1 192 BYTE 2 168 BYTE 3 0 BYTE 4 200 BACK EXIT SUBNET MASK BYTE 1 255 BYTE 2 255 BYTE 3 255 BYTE 4 0 BACK EXIT GATEWAY IP BYTE 1 192 BYTE 2 168 BYTE 3 0 BYTE 4 1 BACK EXIT DHCP CLIENT DHCP CLIENT ON OFF Default BACK EXIT MEDIA TYPE MEDIA TYPE 10M 100M AUTO Default BACK EXIT ...

Page 12: ...AC FILTER ON OFF Default BACK EXIT BACK EXIT SYSTEM DEVICE ID DEVICE ID 0 99 Default 0 BACK EXIT REMOTE ID REMOTE ID 0 9 Default 0 BACK EXIT FACTORY DEFAULT FACTORY DEFAULT REBOOT REBOOT INFORMATION FIRMARE V1 00 WEB V1 0 BACK EXIT EXIT ...

Page 13: ...d you could link to the web page of host 3 Browser support Internet Explorer 9 Chrome 42 0 2311 135 m Firefox 31 0 and higher WebGUI Operating Login USERNAME admin PASSWORD 123 Main Page ROUTING Include MULTIVIEW MATRIX VIDEOWALL three mode SETUP OUTPUT RESOLUTION HDCP SETTING ID SETTING PICTURE SETTING OSD SETTING NETWORK IP ADDRESS SUBNET MASK GATEWAY DHCP CLIENT MEDIA TYPE MAC FILTER SYSTEM cha...

Page 14: ... A D to input 1 4 or off AUDIO SETTING Select audio source of output 1 4 from input 1 4 or off WINDOW LAYOUT Select windows layout from default 1 4 or user define 1 4 MULTIVIEW SCENCE Select SCENCE 1 8 to load or save REFRESH Refresh the information of host APPLY Apply changes ...

Page 15: ...Select video source of output 1 4 to input 1 4 off or follow AUDIO SETTING Select audio source of output 1 4 from input 1 4 off or follow MATRIX SCENCE Select SCENCE 1 8 to load or save REFRESH Refresh the information of host APPLY Apply changes ...

Page 16: ...NG Display video wall block of output 1 4 AUDIO SETTING Select audio source of output 1 4 from input 1 4 off or follow Video SCENCE Select SCENCE 1 4 to load REFRESH Refresh the information of host APPLY Apply changes SCENCE 1 is factory default ...
Page 17: ...0x1050 1920x1200 HDCP SETTING Set HDCP always on or follow input ID SETTING Set DEVICE ID Default 0 REMOTE ID Default 0 PICTURE SETTING Set CONTRAST BRIGHTNESS SATURATION HUE of output 1 4 Default 50 OSD SETTING Set MENU TIMEOUT Default 20s INFO TIMEOUT Default 5s INFO POSITION Default LEFT TOP INFO DISPLAY Default ON REFRESH Refresh the information of host APPLY Apply changes ...
Page 18: ... Subnet Mask Gateway from existing DHCP server OFF Set IP Address Subnet Mask Gateway by WebGUI or OSD menu manually Default OFF MEDIA TYPE Set link speed of Ethernet port to 10 100 Auto detect Default AUTO MAC FILTER Add up to 10 registered MAC Address only the MAC address which is in the list can be able to connect host by Ethernet Default OFF REFRESH Refresh the information of host APPLY Apply ...

Page 19: ...18 User Manual MXHM44 System PASSWORD Enter old password Default 123 NEW PASSWORD Enter new password CONFIRM PASSWORD Enter new password again to confirm APPLY Apply changes ...

Page 20: ...Set the priority of windows 1 is top and 4 is bottom BORDER Select YES to show border of window select NO to disable COLOR Set color of border WINDOW LAYOUT Select windows layout from user define 1 4 to load or save LOAD Select windows layout from user define 1 4 to modify SAVE Save windows layout to user define 1 4 after change the value ...

Page 21: ...rom input n in seamless matrix SMADOOUTALL n All output audio source from input n in seamless matrix MVWINA n Window A from input n in multiview MVWINB n Window B from input n in multiview MVWINC n Window C from input n in multiview MVWIND n Window D from input n in multiview MVWINALL n Set all windows from input n in multiview MVADOOUT1 n Output 1 audio source from input n in multiview MVADOOUT12...

Page 22: ...ter n 0 OFF 1 INPUT1 2 INPUT2 3 INPUT3 4 INPUT4 y 00 OFF 01 ON z 00 10Mbps 01 100Mbps 02 Auto x x x x Ethernet parameter 0 255 EX 192 168 0 1 or 255 255 255 0 Example SMADOOUT1 03 Set output 1 switch to input 3 in MATRIX mode MVADOOUT3 04 Set output 3 switch to input 4 in MULTIVIEW mode VDWALLADOOUT3 02 Set audio output from input 2 in VIDEOWALL mode Commands are case insensitive The host will rep...

Page 23: ...m Requirement iOS version 10 3 or later Android version 5 0 or later Size 3 8M Size 2 8M App Store Download Link https itunes apple com us app 4x4 multiviewer control id1420804403 l zh ls 1 mt 8 Google Play Download Link https play google com store apps details id com sct hm44test App Store Download QR code Google Play Download QR code ...

Page 24: ...ys to get the IP address of matrix 1 Use APP function Scan Device to get the IP address 2 Use panel button or IR remote control by press MENU select to NETWORK function and press ENTER to enter IP ADDRESS function than press ENTER it will show IP Address in the LCD panel of matrix Main Page When first time enter the APP will see the main page Touch icon to add matrix Scan Device Touch bottom left ...

Page 25: ...will show all matrixes in the list Touch the IP in list to enter Add Device page Enter the name of matrix then touch Add Device to finish setting Notice Name should be unique not allow duplicate It will show icon in front of the IP address when finished ...

Page 26: ...25 User Manual MXHM44 Return to main screen you will see the matrix which just add ...

Page 27: ...ch Matrix Set input for each output then touch APPLY Touch LOAD to load scene Touch SAVE to save current setting to scene Touch REFRESH to update status Multiview Set input for each window then touch APPLY Touch LOAD to load scene Touch SAVE to save current setting to scene Touch REFRESH to update status ...

Page 28: ...ideo wall and audio source for each output then touch APPLY Touch REFRESH to update status Setup Set Contrast Brightness Saturation Hue for each output Set Output Resolution HDCP ID and OSD for matrix then touch APPLY Touch REFRESH to update status ...

Page 29: ...ch windows then touch PREVIEW Touch LOAD to load previous user define setting Touch SAVE to save current status to user define setting Device Name Modification For iOS please touch top right icon For Android please press the device in the list to pop up message Please select the item you want to perform then touch modification for Android ...

Page 30: ... the name then touch Save Delete Device For iOS please touch top right Edit For Android please press the device in the list to pop up message Please select the item you want to perform Touch icon for iOS Touch delete for android ...

Page 31: ...30 User Manual MXHM44 Touch Delete to confirm ...

Page 32: ...RS232 Baud Rate 9600bps IR Support 45 5M Ports Interfaces Video Input 4 x HDMI Type A Video Output 4 x HDMI Type A Ethernet Interface 1 x RJ45 RS232 Interface Console 1 x DB9 Female Power Power Supply DC 12V 4 16A Power Consumption 2A Max Ambient Temperature Operation 0 to 55 Storage 20 to 85 Humidity up to 95 Physical Characteristics Dimensions 483 x 177 x 44mm Weight 2300g ...

Reviews: