20
M1.2.TPT820.NLFREN 21112017
FR
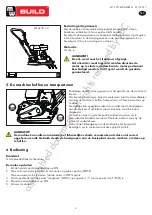
ATTENTION !
La machine peut tomber et causer des dommages matériels ou corporels si elle est levée de
manière incorrecte. Ne la levez que par le crochet de levage.
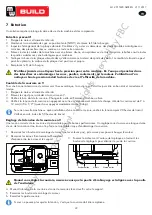
6 Utilisation
Carburant
Remplissez le réservoir d’essence.
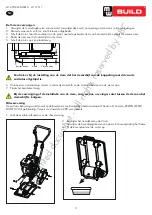
Démarrage du moteur
1. Mettez le levier du robinet de carburant sur ON.
2. Pour faire démarrer un moteur à froid, mettez le starter en position fermée (CLOSE).
Pour faire démarrer un moteur déjà chaud, laissez le starter en position ouverte (OPEN).
3. Éloignez la commande des gaz de la position lente (SLOW), à environ 1/3 vers la position rapide (FAST).
4. Tournez l’interrupteur du moteur sur ON.
5. Activez le démarreur.
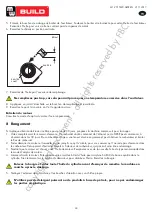
5 Levage et transport
Consultez les données techniques pour connaître le poids de la
machine.
Pour éviter tout risque de brûlures ou d’incendie, laissez refroidir
le moteur avant de lever/transporter la machine ou de la ranger à
l’intérieur.
La machine peut être levée au moyen des poignées à l’avant ou à
l’arrière, comme illustré ci-contre.
La machine doit être transportée en position verticale pour éviter les
débordements d’essence. Ne mettez jamais la machine sur le côté ou
à l’envers.
Pendant le transport, utilisez la poignée de levage pour fixer la
machine, pour l’empêcher de glisser ou de se renverser.
Engine maintenance
Refer to the
Engine Manual
included in your plate
compactor for the information on engine
maintenance. Your engine manual provides detailed
information for performing the tasks.
1. Drain the fuel tank completely. Stored fuel
containing ethanol or MTBE can start to go stale
in 30 days. Stale fuel has high gum content and
can clog the carburetor and restrict fuel flow.
2. Start the engine and allo
w
it to run until it stops.
This ensures no fuel is left in the carburetor. Run
the engine until it stops. This helps prevent
deposits from forming inside the carburetor and
possible engine damage.
3. While the engine is still
w
arm, drain the oil from
the engine. R
efil
l
wit
h fresh oil of the grade
recommended in the Engine Manual.
4. Allo
w
the engine to cool. Remove the spark plug
and put 60 ml of SAE-30 of high quality motor
oil into the cylinder. Pull the starter rope
slow
ly
to distribute the oil. Replace the spark plug.
STORAGE
If the plate compactor
wil
l not be used for a period
longer than 30 days,
followi
ng the steps belo
w
to
prepare your unit for storage.
5. Use clean cloths to clean off the outside of the
compactor and to keep the air vents free of
obstructions.
6. Carefully fold the upper handle
down
. Do not
allo
w
control cables to become pinched or bent.
Remove the spark plug and drain all of
the oil from the cylinder before
attempting to start the unit after storage.
Do not use strong detergents or
petroleum
based
cleaners when
cleaning plastic parts. Chemicals can
damage plastics.
13
Vibratory Plate Compactor
7. Store your plate compactor in upright position
in a clean, dry building that has good ventilation.
Do not store compactor with fuel in a
non-ventilated area where fuel fumes
may reach
fl
ame, sparks, pilot lights
or any ignition sources .
Use only approved fuel containers.
8.
8.
See technical data for the
wei
ght of the machine.
To avoid burns or
fir
e hazards, let engine cool
before lifting / transporting machine or storing
indoors.
LIFTING / TRANSPORTING
Apply pipe sealant to pipe plug and reinstall
into top of exciter housing.
Reinstall deck, V-belt(s) and belt guard.
Do not over
fil
l – over
fil
ling can result
in excessive temperatures in the exciter.
9.
The unit can be lifted by the handles in front and
back of the unit as shown.
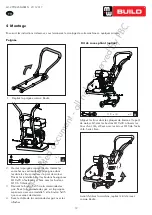
Kit de pavage (en option)
Le tapis amortisseur en caoutchouc transparent permet de compacter des
dalles de béton, des pierres, des briques et des blocs, en silence et en
douceur.
Fixez le tapis amortisseur sur la plaque de base comme illustré. Alignez
les trous dans la plaque de base, le tapis amortisseur et la plaque de
fixation, et fixez le tout avec 2 boulons, rondelles et écrous.
Huile de moteur
Mettez de l’huile.
ATTENTION !
L’huile a été enlevée pour le transport.
Le carter d’huile doit être rempli avant de mettre
le moteur en marche, sinon le moteur peut être
endommagé de façon irréversible. Dans ce cas, la
garantie est annulée.
Add oil according to
Engine
Manual packed
separately with your compactor.
Engine oil
Oil has been drained for shipping.
Failure t
o fill engine
sump with oil
before starting engine will result in
permanent damage and will void
engine warranty.
7
Vibratory Plate Compactor
Paving Pad Kit (Optional)
The transparent rubber Paving Pad allows to
compact concrete paving slabs, stones, bricks and
blocks silently and gently.
Attach the Paving Pad onto the Base Plate as
shown. Align the holes in the Base Plate, Paving
Pad and Clamp Plates, and secure it with 3 bolts
and lock washers. (Only 2 bolts, lock washers and
nuts for #29140.)
C
M10 x 30 (29140) x2
M10 x 20 (29142) x3
M10 x 25 (29155) x3
M10x30 x 2
copyrighted
document
- all
rights
reserved
by
FBC


