background image

How to use the product

9

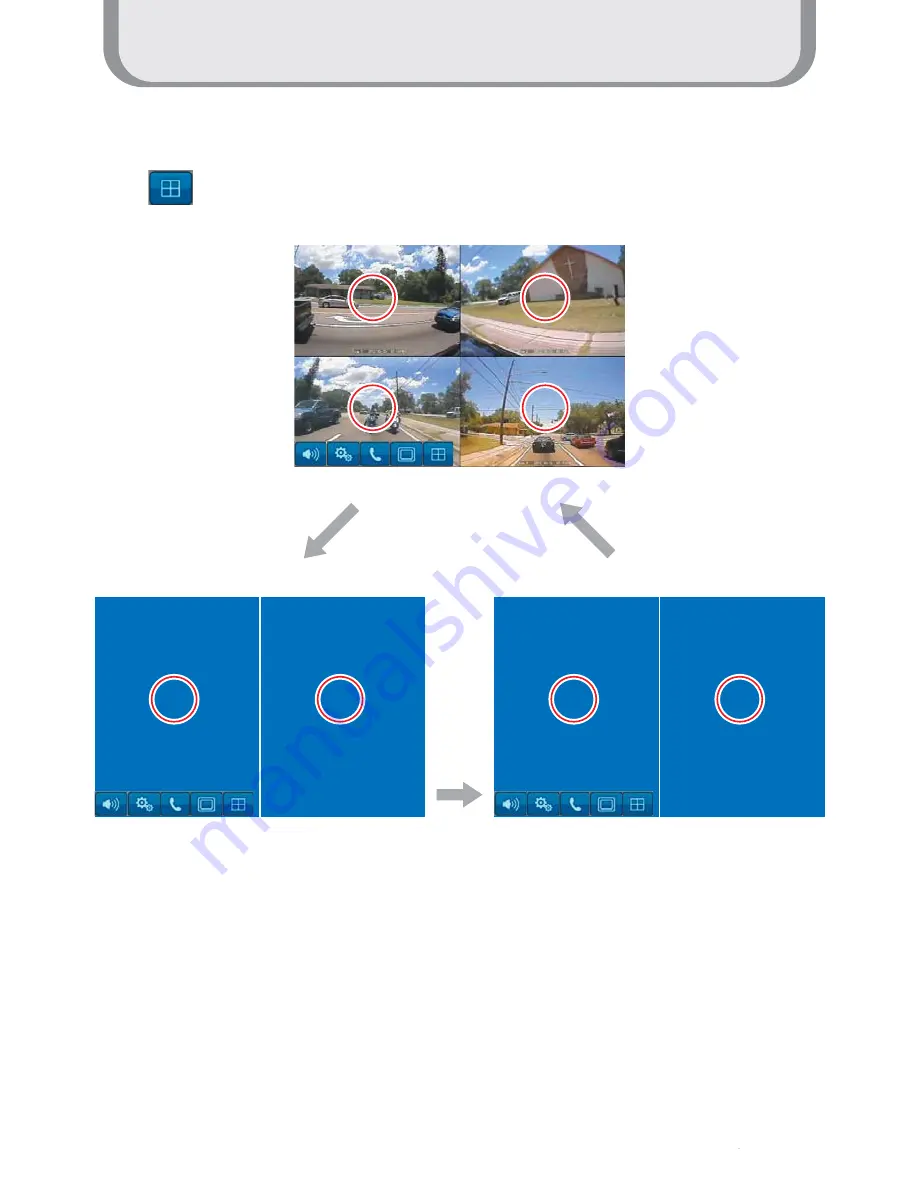
Multi screen

Press multi screen
button once:
Cam1,Cam2

Press multi screen button twice: Cam3,Cam4

Press multi screen
button 3 times:
Cam1,2,3,4

1

1

2

2

3

3

4

4

1

1

2

2

3

3

4

4

Press the multi screen button to divide the screen.

Summary of Contents for 7DDT

Page 1: ...OWNER S MANUAL R 2 DIN 7 Touch screen vehicle monitor for allround vision Model MXN 7DDT Design and Specifications are subject to change without notice ...

Page 2: ...use the product 4 How to install the product 5 Specification Thank you for purchasing our touchscreen vehicle monitor Please read this manual before you use the product The product may be different than described in the manual depending on renewal and or upgrade of S W version and performance it can be altered without notice ...

Page 3: ...d It might be damaged by hard pressure Do not drop or give shock It might cause breakdown or damage Do not dismantle the product arbitrarily We do not supply free after service for an arbitrarily dismantled product Touching the power with a wet hand causes electric shock Caution required For accessories or cables to connect with the product it is recommended to use proper goods from our company We...

Page 4: ...control the equipment or to change the settings Power On Off Press the Power button for 0 5 seconds to turn on the screen Press the Power button for 0 5 seconds to turn off the screen when it is tuned on illuminance Sensor Behind this window a sensor detects the actual light conditions in the area around the screen When activated via the menu settings this sensor automatically controls the brightn...

Page 5: ...nect the optional microphone right side terminal Please check that you have the correct contents before using this product If any items are missing please contact your dealer Package Contents Monitor Trim Bracket Deco Plate A Dimensions 187 6 x 121 4mm Sunvisor Deco Plate B Dimensions 187 6 x 115 4mm Deco Plate C Optional Dimensions 190 4x 124mm Cable Bracket 2EA Power Cable Speaker Cable Ejection...

Page 6: ...mall windows on the multi screen are touched the channel is enlarged into full screen mode One more touch returns it back to the multi screen mode Controls volume of the speaker Settings menu Run the Bluetooth Phone Optional function Change Input signal Multi screen mode When the small window is touched it is enlarged ...

Page 7: ...How to use the product 7 Volume Control Press the button to display Volume Pop up 1 1 2 3 2 3 Press the button to mute Press the button to increase the volume Press the button to decrease the volume ...

Page 8: ...How to use the product 8 Input selection Press the Input button to change Input Press input button once AUX1 Press input button twice AUX2 Press input button 3 times Cam ...

Page 9: ...9 Multi screen Press multi screen button once Cam1 Cam2 Press multi screen button twice Cam3 Cam4 Press multi screen button 3 times Cam1 2 3 4 1 1 2 2 3 3 4 4 1 1 2 2 3 3 4 4 Press the multi screen button to divide the screen ...

Page 10: ...How to use the product 10 Setting Mode Press the setting menu button to open the Setting screen CAM Adjust brightness of Camera input screen AUX Adjust brightness of AUX screen ...

Page 11: ...How to use the product 11 Display Input the name into each channel Mirror Mirror image or normal image Up Change up and down of the screen Shutter Enable to operate Shutter Heater Camera ...

Page 12: ...Trigger Mirror Mirror image or normal image Up Change up and down of the screen Shutter Enable to operate Shutter Heater Camera Caution Cam1and AUX1 cannot be setup at the same time Cam2 and AUX2 cannot be setup at the same time The screen will be showed screen by each Trigger set if input Trigger ...

Page 13: ...How to use the product 13 Display Display the full screen according to each channel setup when setting up On Display the dividing lines of the screen ...

Page 14: ...How to use the product 14 Display Adjust Parking line of each Trigger Trig 1 Calibration Front Rear ...

Page 15: ... The screen is turned ON automatically when starting the vehicle Sensitivity of automatic brightness adjustment level 0 to 10 controlled by actual light conditions Day Night Automatic brightness adjustment by sensor in the front housing ...

Page 16: ...Keep Trigger activated during setup time after Trigger off in order to bridge temporary powerloss e g from vehicle s turnlight signal Re adjust center Point of Touch panel STEP 1 of 3 Click on center of icon for Touch screen calibration ...

Page 17: ...How to use the product 17 Function Detect speed of a vehicle from 10 to 200 Hz To switch automatically into the screen ON mode by detecting a speed signal tacho signal ...

Page 18: ...How to use the product 18 System Set time displaying the Menu screen Set time displayed on the screen The screen is turned off when there is no input like touching it or so during setting up time ...

Page 19: ...How to use the product 19 System Set a password to lock the Menu button Support languages for each country Option ...

Page 20: ...How to use the product 20 System Initializing set points of Menu Display Firmware Version and Model name ...

Page 21: ...d Displays call lists during absence Displays phone call lists received Displays phone call lists sent Use for making a call dialing numbers Displays a Phonebook list Setup of Bluetooth Finishes Bluetooth Bluetooth Phone Optional Press the button to start Bluetooth Screen of Bluetooth start ...

Page 22: ...ssing the button 1 Pairing mode is set by pressing the button 2 Connect Bluetooth to a cell phone you want searching Bluetooth device Enter the Pin code depending on type of cell phones 3 Message is displayed when it is connected as below 4 Return to the start up screen of Bluetooth by pressing the button ...

Page 23: ...ays devices Paired Displays devices paired up to 8 devices Displays devices paired Deletes devices connected by the button Connects devices by pressing the button Deletes all devices by pressing the button Devices paired are connected automatically in order ...

Page 24: ...How to use the product 24 Bluetooth Phone Optional Down load phonebook list after pairing succeed Call after press the number in the list ...

Page 25: ...re Installation Please make sure to disassemble the monitor and trim bracket before installation 1 Insert the ejection keys into the monitor along the guides on either sides 2 Pull the monitor out from the trim bracket ...

Page 26: ...Installation 26 Installation Installation Overview 1 3 5 1 2 Deco Plate Trim Bracket Sunvisor 4 Power Cable Cable Bracket Cameras Monitor Deco Plate Trim Bracket Dash Board ...

Page 27: ...n 2 Trim Bracket Dash Board a Insert trim bracket into dash board b Fix trim bracket firmly with the supplied screw top and bottom c Bend the taps right and left 3 Sunvisor Monitor Trim Bracket Dash Board Trim Bracket Screw a b c ...

Page 28: ...tallation 4 Power Cable Cable Bracket Cameras 5 Monitor Trim Bracket Monitor Cable Bracket Monitor Screw Please make a connection for power cable camera cables cable bracket before installation of monitor and trim bracket ...

Page 29: ...Installation 29 Disassemble 1 Total Ass y Sunvisor 2 Total Ass y Ejection Key Please disassemble the unit in reverse of installation ...

Page 30: ... via direction light etc Trigger5 9 30V DC via direction light etc Ground Trigger2 9 30V DC via direction light etc Trigger4 9 30V DC via direction light etc Speed Pulse via tachograph 10 200 Hz AUDIO IN OUT CAMERA1 EXT Speaker Power Cable 2M 100mm EXT MIC CAMERA2 CAMERA3 CAMERA4 AUDIO 1 5 2 3 4 6 7 8 1 B3 RED CAM AUDIO B2 BLUE CAM 9V B4 YEL CAM VCC B1 WHT CAM VIDEO B5 GND SHX2 No Wire Color Label...

Page 31: ...BS 1 Ch 1 Vp p 75 NTSC PAL Audio Output 1Ch RCA External speaker Output 2pin Max 3 1V 8 Ohm Speaker Video input AUX1 AUX2 RCA 5 Trigger inputs Cable Input 12 24V ALS Sensor Night Daytime Brightness detection Power 12 30Vdc 12Vdc 1 3A Operating Temp 20 60 Storage Temp 30 85 Dimensions W x H x D 178mm x 110mm x 44 6mm Weight appx 640g ...

Reviews: