background image

page 7

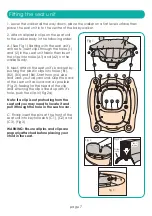
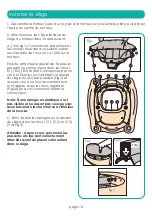
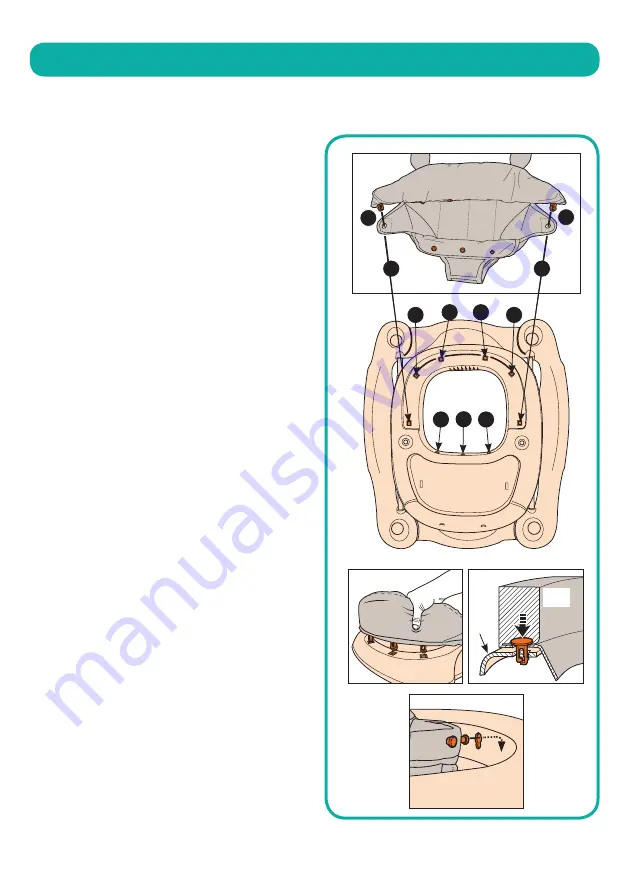
1. Lower the walker all the way down, place the walker on a flat level surface then 

place the seat unit in to the centre of the baby walker.

2. Attach all plastic clips on the seat unit 

to the walker body in the following order: 

A. (See Fig 1) Starting with the seat unit’s 

arm rests, insert clips through the holes (1) 

and (2) in the seat unit fabric then insert 

the clips into holes (A1) and (A2) on the 

walker body.

B. Next, attach the seat unit’s backrest by 

pushing the plastic clips into holes (B1), 

(B2), (B3) and (B4). Start from one side 

and work your way around. Grip the back 

of the seat unit as low down as possible 

(Fig 2), feeling for the head of the clip 

and ensuring the clip is lined up with it’s 

hole, push the clip in (Fig 2a).

Note: If a clip is not protruding from the 

seat unit you may need to locate it and 

pull it through the hole in the seat cover.

C. Finally insert the pins at the front of the 

seat unit into keyhole slots (C1), (C2) and 

(C3). (Fig 3)

WARNING: Ensure all pins and clips are 

properly attached before placing your 

child in the seat.

Fig 1

Fig 3

Fig 2a

Walker 

body

Seat 

fabric

Fig 2

1

2

C1 C2 C3

B1

B2

B3

B4

A2

A1

Fitting the seat unit

Summary of Contents for IM-151122-V3

Page 1: ...and until it is able to walk by itself or weighs more than 12 kg BS EN 1273 2020 IMPORTANT LIRE ATTENTIVEMENT ET CONSERVER POUR REFERENCE FUTURE Ce produit est uniquement destin aux enfants pouvant s...

Page 2: ...Do not treat batteries old or new as household waste Never dispose of batteries in a fire this may cause them to explode Batteries old or new should be disposed of by taking them to a designated coll...

Page 3: ...e Removable fabric covers and trims may be cleaned using warm water with a household soap or a mild detergent Allow it to dry fully preferably away from direct sunlight If the wheels squeak use a sili...

Page 4: ...e part xings checklist below Do not discard any packaging until you are sure that you have all the parts WARNING Assembly by an adult Keep away from children until fully assembled Keep children clear...

Page 5: ...t of the walker and at the same time turn and pull the locking mechanism forward and lower the upper part of the walker all the way down 3 To adjust the height The simplest method to adjust the height...

Page 6: ...the baby walker still upside down and fully folded down insert both front wheels fully into each round hole on either corner at the front of the walker 1 Attaching the anti fall blocks With the baby w...

Page 7: ...stic clips into holes B1 B2 B3 and B4 Start from one side and work your way around Grip the back of the seat unit as low down as possible Fig 2 feeling for the head of the clip and ensuring the clip i...

Page 8: ...child to move about in the walker mode Attach using the six clips on the footpad and hook over the side bars on either side of the base 1 Working on one side at a time pull up both locking knobs A AT...

Page 9: ...the opposite side and check that both sides of the base are locked in position To convert back Pull both locking knobs A and turn the base 90 degrees downwards into the walker mode Repeat on the oppos...

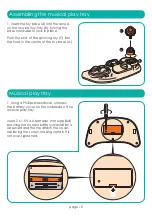
Page 10: ...the centre of the toy base A Assembling the musical play tray A B C Musical play tray 1 Using a Phillips screwdriver unscrew the battery cover on the underside of the musical play tray Insert 2 x 1 5...

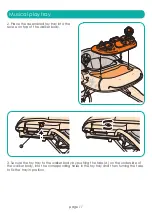
Page 11: ...oy tray into the recess on top of the walker body 3 Secure the toy tray to the walker body by pushing the tabs A on the underside of the walker body into the corresponding holes in the toy tray and th...

Page 12: ...page 12...

Page 13: ...de bouger plus rapidement lorsqu il sera dans le trotteur S curiser l acc s aux escaliers marches et surfaces irr guli res Eloigner de toutes sources de chaleurs radiateurs et appareils de cuisine Pr...

Page 14: ...e ou en t l phonant au 44 161335 2508 Entretien et maintenance Pour prolonger la vie de votre produit garder le propre et ne l exposer pas la lumi re direct du soleil pendant de longues p riodes La ho...

Page 15: ...les pi ces de leur packaging tant que vous n tes pas s r d avoir toutes les pi ces ATTENTION Doit tre assembl par un adulte Garder les enfants loign s tant que le produit n est pas compl tement assemb...

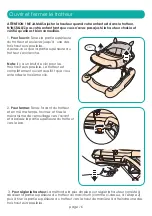
Page 16: ...e temps tournez et tirez le m canisme de verrouillage vers l avant et abaissez la partie sup rieure du trotteur vers le bas 3 Pour r gler la hauteur La m thode la plus simple pour r gler la hauteur co...

Page 17: ...staller les roues avant Avec le trotteur l envers et pli ins rer les deux roues avant dans chaque trou pr vu cet effet dans les coins l avant du trotteur 1 Installer les support anti chute Avec le tro...

Page 18: ...t faite le tour Maintenir le dossier du si ge au plus bas possible Fig 2 et assurez vous que tous les connecteurs sont align s avec les trous regarder Fig2A pour voir comment ins rer le connecteur Not...

Page 19: ...ace contrairement au mode trotteur Attacher en utilisant les six clips du repose pied et accrochez les autour des barres sur les c t s de la base 1 En travaillant sur un c t la fois retirer les bouton...

Page 20: ...R p tez l op ration du c t oppos et v rifiez que les deux c t s de la base sont bien verrouill s Pour basculer de mode Tirez les deux boutons de verrouillage A et tournez la base de 90 degr s vers le...

Page 21: ...ouet en rotation C dans le trou cet effet au centre de la base du jouet A Montage du plateau musical Tablette musicale 1 En utilisant un tournevis cruciforme d visser le cache des piles sous la tablet...

Page 22: ...et dans l emplacement pr vu au dessus du trotteur 3 Fixez le plateau jouet au trotteur en accrochant les languettes A situ es sous le trotteur dans les trous correspondants du plateau jouet puis en to...

Page 23: ...page 23...
Page 24: ...Customerservice kooltrade co uk Imported by Kooltrade Ltd M34 3QA Tel 0161 335 2508 www mychild co uk...

Reviews: