background image


OPERATING


&


INSTALLATION


INSTRUCTIONS


FOR


INBUILT


WOOD


HEATERS


17


4.3.6


BUILDING


DIFFERENT


FIRES


FOR


DIFFERENT


NEEDS


Using


the


air


control


is


not


the


only


way


to


match


the


wood


inbuilt’s


heat


output


to


the


heat


demand.


Your


house


will


need


far


less


heat


in


January


than


in


May


to


be


kept


at


a


comfortable


temperature.


If


you


fill


the


firebox


full


in


fall


weather,


you


will


either


overheat


the


space


or


turn


the


wood


inbuilt


down


so


much


that


the


fire


will


be


smoky


and


inefficient.


Here


are


some


suggestions


for


building


fires


to


match


different


heat


demand.


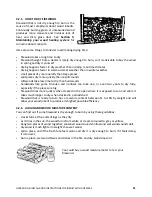
4.3.6.1


Small


Fires


to


Take


the


Chill


Off


the


House


To


build


a


small


fire


that


will


produce


a


low


heat


output,


use


small


pieces


of


firewood


and


load


them


crisscross


in


the


firebox.


The


pieces


should


be


only


75


mm


to


100


mm


in


diameter.


After


raking


the


coals,


you


can


lay


two


pieces


parallel


to


each


other


corner


to


corner


in


the


firebox


and


lay


two


more


across


them


in


the


other


direction.


Open


the


air


control


fully


and


only


reduce


the


air


after


the


wood


is


fully


flaming.


This


kind


of


fire


is


good


for


mild


weather


when


you


are


around


to


tend


the


wood


inbuilt


and


should


provide


enough


heat


for


four


hours


or


more.


Small


fires


like


this


are


a


good


time


to


use


softer


wood


species


so


there


will


be


less


chance


of


overheating


the


house.


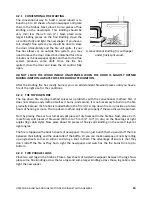
4.3.6.2


Long


Lasting


Low


Output


Fires


Sometimes


you


will


want


to


build


a


fire


to


last


up


to


eight


hours,


but


don’t


need


intense


heat.


In


this


case


use


smaller


pieces


of


hardwood


and


place


the


logs


compactly


in


the


firebox


so


the


pieces


are


packed


tightly


together.


You


will


need


to


fire


the


load


hot


for


long


enough


to


fully


char


the


log


surfaces


before


you


can


turn


the


air


down.


Make


sure


the


fire


is


flaming


brightly


before


leaving


the


fire


to


burn.


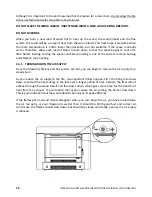
4.3.6.3


High


Output


Fires


for


Cold


Weather


When


the


heat


demand


is


high


during


cold


weather,


you’ll


need


a


fire


that


burns


steadily


and


brightly.


This


is


the


time


to


use


your


biggest


pieces


of


hardwood


fuel


if


you


have


it.


Put


the


biggest


pieces


at


the


back


of


the


firebox


and


place


the


rest


of


the


pieces


compactly.


A


densely


built


fire


like


this


will


produce


the


longest


burn


your


wood


inbuilt


is


capable


of.


You


will


need


to


be


cautious


when


building


fires


like


this


because


if


the


air


is


turned


down


too


much,


the


fire


could


smoulder.


Make


sure


the


wood


is


flaming


brightly


before


leaving


the


fire


to


burn.


The


wood


should


be


positioned


in


a


north/south


fashion,


that


is,


from


the


front


to


the


back


of


the


firebox.


4.3.6.4


Maximum


Burn


Cycle


Times


The


burn


cycle


time


is


the


period


between


loading


wood


on


a


coal


bed


and


the


consumption


of


that


wood


back


to


a


coal


bed


of


the


same


size.


The


flaming


phase


of


the


fire


lasts


for


roughly


the


first


half


of


the


burn


cycle


and


the


second


half


is


the


coal


bed


phase


during


which


there


is


little


or


no


flame.


The


length


of


burn


you


can


expect


from


your


wood


inbuilt,


including


both


the


flaming


and


coal


bed


phases,


will


be


affected


by


a


number


of


things,


such


as:


firebox


size,


the


amount


of


wood


loaded,


the


species


of


wood


you


burn,


the


wood


moisture


content,


the


size


of


the


space


to


be


heated,


the


climate


zone


you


live


in,


and


the


time


of


year.


Summary of Contents for Classic EC00021

Page 1: ...WARRANTY Distributed by My Fireplace Australia Pty Ltd Factory 2 5 7 Hogan Court Pakenham Victoria 3810 Australia Ph 03 59 415 008 Fax 03 59 415 975 Email info myfirplaceproducts com au www myfireplac...

Page 2: ...ith AS NZS 2918 2001 standard Please read this entire manual before you install and use your new wood inbuilt Failure to follow instructions may result in property damage bodily injury or even death I...

Page 3: ...o Prepare or Buy Good Firewood 10 3 2 1 What is Good Firewood 10 3 2 2 Tree Species 10 3 2 3 Log Length 10 3 2 4 Piece Size 10 3 2 5 How to Dry Firewood 11 3 2 6 Judging Firewood Moisture Content 11 4...

Page 4: ...24 7 1 Summary of Installation Cautions and Warnings 24 7 2 Regulations Covering Wood inbuilt Installation 25 8 Clearances to Heat Sensitive Materials 26 8 1 Location of the Certification Label 26 8 2...

Page 5: ...N ONLY DURING LIGHTING PROCEDURES OR RELOADING DO NOT LEAVE THE STOVE UNATTENDED WHEN THE DOOR IS SLIGHTLY OPENED DURING IGNITION ALWAYS CLOSE THE DOOR AFTER IGNITION NEVER USE GASOLINE GASOLINE TYPE...

Page 6: ...lia 1 6 g kg Approximate Burn Time 5 to 6 hours Color Metallic black Flue Spigot Diameter 155 mm Flue system Triple skin flue system or stainless liner approved for masonry fireplace Minimum Flue Heig...

Page 7: ...OPERATING INSTALLATION INSTRUCTIONS FOR INBUILT WOOD HEATERS 7...

Page 8: ...e a conventional oil gas or electric heating system to provide backup heating Your success with zone heating will depend on several factors including the correct sizing and location of the wood inbuil...

Page 9: ...o known as silica a product processed from a mined mineral It is most commonly found in nature in the form of sand and clay Disposal at a landfill is recommended The door and glass gaskets are fibregl...

Page 10: ...ur home by using less wood and give the forest a break at the same time 3 2 3 LOG LENGTH Logs should be cut about 25 mm shorter than the firebox so they fit in easily Pieces that are slightly too long...

Page 11: ...an hardwoods hardwoods like gums Manuka and ironbark can take one or even two years to dry fully especially if the pieces are big firewood dries more quickly when stacked in the open where it is expos...

Page 12: ...they do smell bad Fresh paint fumes can also cause false alarms in smoke detectors So when you first light your wood inbuilt be prepared by opening doors and or windows to ventilate the house As you...

Page 13: ...ions 4 2 2 THE TOP DOWN FIRE The top down fire starting method solves two problems with the conventional method first it does not collapse and smother itself as it burns and second it is not necessary...

Page 14: ...an be cooler when you are active such as when doing housework or cooking and it can be warmer when you are inactive such as when reading or watching television Wood burns best in cycles A cycle starts...

Page 15: ...OAL Rekindle the fire when you notice that the room temperature has fallen You will find most of the remaining charcoal at the back of the firebox furthest from the door Rake these coals towards the d...

Page 16: ...he secrets to clean burning and effective zone heating 4 3 5 TURNING DOWN THE AIR SUPPLY Once the firewood firebox and flue system are hot you can begin to reduce the air supply for a steady burn As y...

Page 17: ...rdwood and place the logs compactly in the firebox so the pieces are packed tightly together You will need to fire the load hot for long enough to fully char the log surfaces before you can turn the a...

Page 18: ...hour before turning on the blower since increased airflow from the blower will remove heat and affect the start up combustion efficiency BLOWER SWITCH 3 Speed 4 Position rotary Off Low Medium High NOT...

Page 19: ...is run at lower temperatures you may see some light brown stains forming especially at the lower corners of the glass This indicates that the fire has been smoky and some of the smoke has condensed o...

Page 20: ...heating dealer The diameter and density of the gasket is important to getting a good seal Place the door face down on something soft like a cushion of rags or piece of carpet Remove the old gasket fro...

Page 21: ...the glass in a U shape all around the glass Reinstall the glass being careful to centre the glass carefully in the door Do not over tighten the screws Note that the two main causes of broken door gla...

Page 22: ...creosote forms slowly in your system the flue system should be cleaned and inspected at least once each year Contact your local municipal or provincial fire authority for information on how to handle...

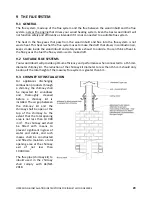
Page 23: ...flue system caps must have provision for regular cleaning or the mesh should be removed to eliminate the potential of plugging 3 ADJACENT COMBUSTIBLES The fireplace should be inspected to make sure th...

Page 24: ...ECT THIS WOOD INBUILT ONLY TO AN APPROVED CHIMNEY KIT FOR USE WITH SOLID FUEL TO BE INSTALLED INTO AN EXISTING MASONRY FIREPLACE TO NATIONAL AND LOCAL BUILDING CODES USE SMOKE DETECTORS IN THE ROOM WH...

Page 25: ...ANT BUILDING CODE OR CODES WARNING APPLIANCES INSTALLED IN ACCORDANCE WITH THIS STANDARD SHALL COMPLY WITH THE REQUIREMENTS OF AS NZS 4012 4013 1999 WHERE REQUIRED BY THE REGULATORY AUTHORITY I E THE...

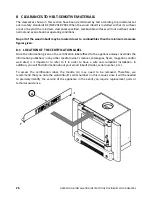
Page 26: ...nce figures given 8 1 LOCATION OF THE CERTIFICATION LABEL Since the information given on the certification label affixed to the appliance always overrides the information published in any other media...

Page 27: ...OPERATING INSTALLATION INSTRUCTIONS FOR INBUILT WOOD HEATERS 27 8 2 MINIMUM MASONRY OPENING CLEARANCES TO COMBUSTIBLES AND FLOOR PROTECTOR...

Page 28: ...40 mm P 40 mm FLOOR PROTECTION B 500 mm Note 1 L 930 mm For a 250 mm mantel shelf Note 1 From door opening Note 2 A min 80 mm air gap between the flue outer casing and the first timber stud above the...

Page 29: ...FLUE SYSTEMS Your wood inbuilt will provide optimum efficiency and performance when connected to a 155 mm diameter chimney kit The reduction of the chimney kit diameter to less than 155 mm should only...

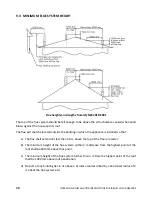
Page 30: ...building in which the appliance is installed so that a The flue shall extend not less than 4 6 m above the top of the floor protector b The minimum height of the flue system within 3 m distance from t...

Page 31: ...a flue system that is shorter than the warm space inside the house the slight negative pressure low in the house will compete against the desired upward flow in the flue system There are two reasons w...

Page 32: ...r rails at front rear of firebox and lower back of baffle to the base of the firebox 5 Take note of the position of the locating tabs to the side of the baffle plate make sure it goes in the same way...

Page 33: ...the HEPA Filters can be performed by blowing compressed air from the reverse direction or soaking in a light detergent bath DO NOT REPLACE INTO THE APPLIANCE WHEN WET DO NOT DISMANTLE THE FILTER ASSEM...

Page 34: ...STALLATION INSTRUCTIONS FOR INBUILT WOOD HEATERS APPENDIX 3 FIRE BRICKS Fire bricks must be sitting flat on bottom of fire box covering fire box base The firebricks keep heat away from the blower and...

Page 35: ...OPERATING INSTALLATION INSTRUCTIONS FOR INBUILT WOOD HEATERS 35 APPENDIX 4 EXPLODED DIAGRAM AND PARTS LIST Legend Premium model...

Page 36: ...ET 298MM X 505MM 1 11 AC06400 6 BLACK SELF ADHESIVE GLASS GASKET 1 12 SE68065 GLASS RETAINER ASSEMBLY 1 13 AC06500 SILICONE AND 5 8 X 8 BLACK DOR GASKET REPLACEMENT KIT 1 14 PL68013 BOTTOM FRONT COVER...

Page 37: ...3 37 30833 SPRING 3 38 30614 AIR CONTROL BUSHING 3 39 30846 SNAP RING 1 40 SE68050 AIR CONTROL MECHANISM 1 41 PL68083 MANTLE PREMIUM 1 41 PL68116 MANTLE CLASSIC 1 42 PL68046 ASH DEFLECTOR 1 43 PL36242...

Page 38: ...tches rheostat wiring and other controls paint peeling gasket insulation firebricks and ceramic fibre blankets 1 year 1 year This express warranty is personal to the first person who acquires an Ecoma...

Page 39: ...ct or b replace the relevant part of the Ecomaxx product with a product of identical specification or where the product is superseded or no longer in stock with a product of as close a specification a...

Page 40: ...TERNATIONAL INC 250 de Copenhague Saint Augustin de Desmaures Quebec Canada G3A 2H3 Tel 418 878 3040 Fax 418 878 3001 Distributed by My fireplace Australia ACN 127 126 550 Fact 2 5 7 Hogan Court PAKEN...

Reviews: