background image


mychefcooking.com 

PRODUCT MANUAL     COOK PRO   -     DT.MP.CP.2201.2 

10 


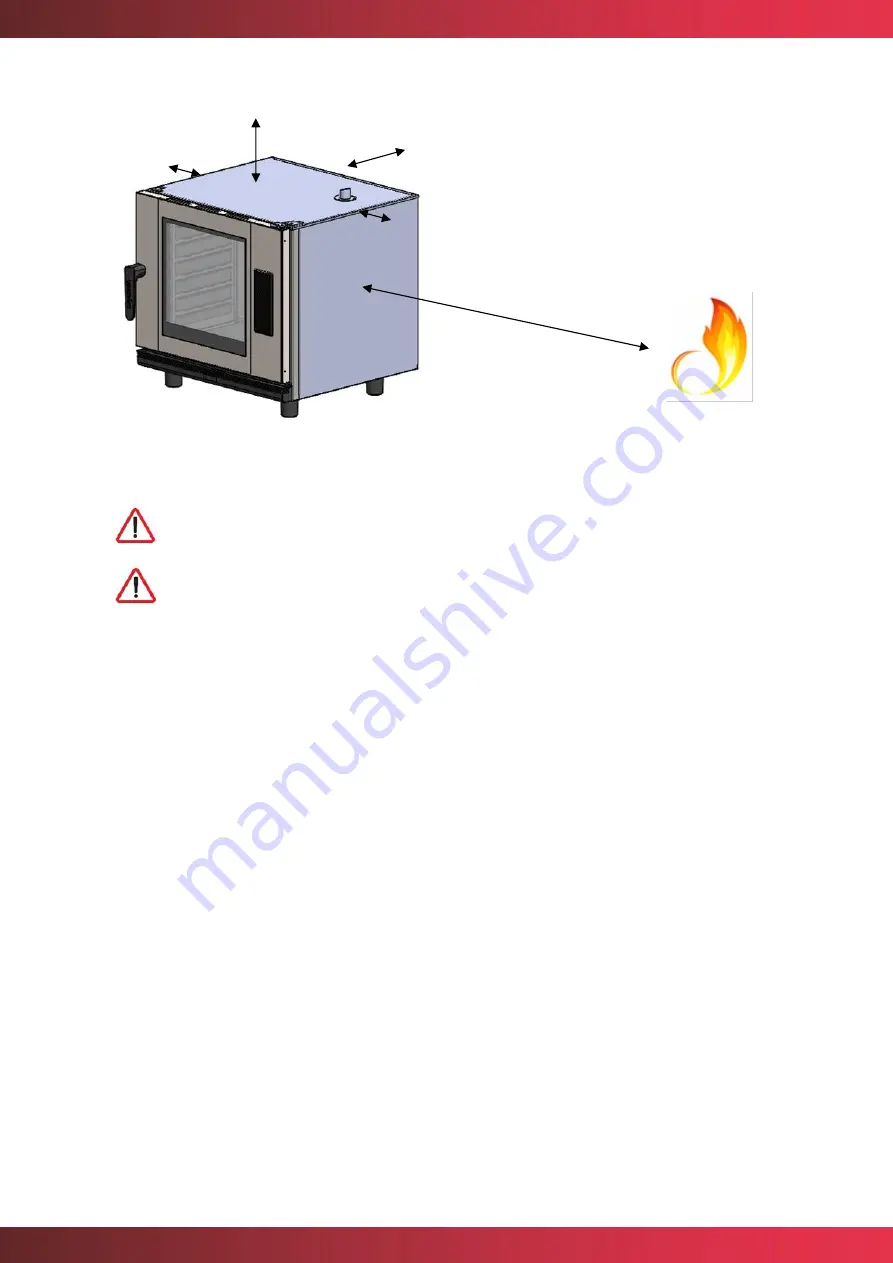
Figure 2. Example of a suitable installation place 


Be extremely careful with the cooling zones of the oven. If it draws in fumes 
or hot air, this can drastically reduce the life span of the components. 


For the installation of stacked Mychef ovens, please follow the instructions 
supplied with the stacking kit. 


1000mm 

50mm 

500m

50mm 

50mm 

Summary of Contents for Mychef Cook Pro 10 GN 1/1

Page 1: ...mychefcooking com PRODUCT MANUAL COOK PRO DT MP CP 2201 2 1 COOK PRO Product Manual Installation use and maintenance ...

Page 2: ...STALLATION 11 5 1 Electrical connection 11 5 1 1 Three phase connection 400V 3L N 12 5 1 2 Three phase connection 230V 3L 12 5 1 3 Single phase connection 230V L N 13 5 2 Water connection 13 5 2 1 Water inlet 13 5 2 2 Drainage 14 5 3 Steam condensation hood 15 6 USE 16 6 1 Control panel 16 6 1 1 Switching on the equipment 21 6 1 2 Cooking modes 22 6 1 3 Cooking control 24 Temperature and time cont...

Page 3: ...ration 43 7 2 1 Synchronisation of devices to Google Home 43 7 2 2 Voice commands for oven control 46 7 2 3 Adding automated routines 47 7 3 Support functionalities 51 7 3 1 Reset Wi Fi configuration 51 7 3 2 Show MAC address 51 7 3 3 Unlink service Mychef Control 51 7 3 4 Desktop application for smart control 52 7 4 Table of states 53 7 5 Recipes 53 8 MAINTENANCE 55 8 1 Cleaning 55 8 1 1 MyCare 5...

Page 4: ...personnel who have not received any training skills or experience necessary for the correct operation of the equipment Do not allow children to use or play with the equipment The owner of the equipment is obliged to have this manual read by the personnel in charge of its use and maintenance as well as to keep this manual in a safe place so that it can be used by all users of the equipment and for ...

Page 5: ...GN 1 1 10 GN 1 1 External measurements W x D x H mm 760x710x615 760x710x750 760x710x1022 Capacity 4 GN 1 1 6 GN 1 1 10 GN1 1 Distance between guides mm 65 65 65 Recommended for n servings per day 35 90 40 110 80 160 Table 1 Main characteristics of Mychef COOK PRO ovens The maximum recommended food load per GN 1 1 tray of 65mm is 5 Kg ...

Page 6: ... appliance to move while it is connected to the power supply in order to avoid possible damage to the wiring drainpipes or water inlet pipes If the appliance is to be moved or repositioned the wiring drain and water inlet pipes must be disconnected 3 3 Thermal hazard When the appliance is in operation the door must be opened slowly and carefully to avoid possible burns from steam or hot air escapi...

Page 7: ...rocess of the combi steamer and in case of formation of aerosols or mist during the handling of the cleaning products wear a mask with particle filter type P2 P3 goggles against splashes and or projections and chemical protection gloves The MyCare CleanDuo and DA21 cleaning products have been specially formulated for the proper cleaning and protection of Mychef ovens with automatic washing The pro...

Page 8: ...he point of installation to avoid damage as much as possible It is recommended to keep the original packaging until the equipment is properly installed and operational When moving the equipment and placing it in its workspace the following remarks should be taken into account The dimensions of the different models to pass through narrow places corridors doors narrow spaces See chapter 2 Handling m...

Page 9: ...ht sides o 50mm at the rear o 500mm from the top The equipment must be placed on a Mychef support table or wall bracket If there are sources of heat or steam near the equipment cooker grill griddle fryer pasta cooker kettle tilting frying pan etc these must be at a distance of more than 1 metre Check that the oven is not exposed to hot air or vapours in the areas where the cooling fans are located...

Page 10: ...allation place Be extremely careful with the cooling zones of the oven If it draws in fumes or hot air this can drastically reduce the life span of the components For the installation of stacked Mychef ovens please follow the instructions supplied with the stacking kit 1000mm 50mm 500m m 50mm 50mm ...

Page 11: ...ion point of the equipment The equipment must be connected to the mains via an all pole switch with a contact opening distance of more than 3mm Also install a class A residual current device and overcurrent protection Always ensure effective grounding Connect the device to an equipotential bonding system using the contact specially provided for this purpose see equipotential bonding sign on the bo...

Page 12: ...tion correspond to those of the equipment The following sub chapters show the possible connection types for Mychef ovens The voltage of each oven can be found on the oven identification sticker 5 1 1 Three phase connection 400V 3L N Colour Cable Brown L1 Black L2 Grey L3 Blue Neutral Green yellow Grounding Table 3 Three phase cable 400V 3L N 5 1 2 Three phase connection 230V 3L Colour Cable Brown ...

Page 13: ...d 8 5 Chlorides Cl less than 30 mg L Chlorine Cl2 less than 0 2 mg L Iron Fe less than 0 1 mg L Manganese Mn less than 0 05 mg L Copper Cu less than 0 05 mg L Conductivity less than 20uS cm Use of decalcifier and Mychef filter mandatory The use of water with characteristics other than those indicated may cause serious problems in the oven components such as corrosion in the cooking chamber or the ...

Page 14: ...e repeated each time work or repairs are carried out on the water system that feeds the oven 5 2 2 Drainage For the correct operation of the steam system of COOK ovens the equipment must be connected to a drainage system with a nominal diameter of 40 mm DN40 through a heat resistant siphon type pipe Mychef COOK PRO ovens incorporate an internal system to block odours that may come from the drain F...

Page 15: ... at least 5 The drain must be a maximum of 1 metre long have a larger diameter than the drain connection and be free of blockages 5 3 Steam condensation hood Refer to the installation manual supplied with the steam hood for installation The steam condensation hood is an accessory The hood can be installed after the oven has been installed ...

Page 16: ...ANUAL COOK PRO DT MP CP 2201 2 16 6 USE 6 1 Control panel The figure below shows the control panel of the Mychef COOK PRO ovens It consists of a central screen with displays indicators and buttons Figure 5 COOK PRO control panel ...

Page 17: ...mychefcooking com PRODUCT MANUAL COOK PRO DT MP CP 2201 2 17 The functionality of each is explained below Figure 6 Detail of the COOK PRO control panel A C E B D F H I J K G L M N P Q R O ...

Page 18: ...n button Convection mixed steam L Humidity button Humidity selection button M Temperature button Temperature selection button N Time or probe button for COOK PRO Time selection button or sous vide probe activation in the case of COOK PRO O Fan speed button Fan speed selection button p Quick Memory Button Block P1 P8 With a long press it saves the current parameters in a specified memory With a sho...

Page 19: ...e two digits on the right are the minutes Cooking can also be continuous In this case CONT appears on the display For continuous cooking press the Adjustment button until CONT appears on the display On COOK PRO ovens the fan speed is displayed with an F in the first digit If the convection fan is at high speed HI is displayed Otherwise if the convection fan is at a low speed LO is displayed If the...

Page 20: ...LOAD message indicates that the oven has reached the preheating temperature and the oven can now be loaded Closing the door will start the cooking cycle The message OFF indicates that the phase is disabled The phase number is displayed to the right of Ph after pressing the PHASE button To change the phase press the selectors During the phase cooking process the progress of the cooking process is s...

Page 21: ...git followed by the programme number Table 7 Description of central display messages 6 1 1 Switching on the equipment The equipment is switched on or off by pressing the START STOP button for two seconds In order to protect the oven from possible overheating some protection elements may operate even when the oven is switched off When the oven is at a safe temperature they will automatically switch...

Page 22: ...dding or removing steam from the cooking chamber The mixed convection mode allows you to intelligently regulate in a way that is controlled by the oven the removal or supply of humidity in the cooking chamber To do this press the humidity button and use the buttons to set the desired value This value is shown on the central display Figure 10 Humidity setting in mixed mode The steam mode saturates ...

Page 23: ...20 Steam 30ºC to 130ºC 100 Table 8 Cooking modes in Mychef ovens In order to prolong the life of your oven it is possible for the oven to automatically reduce the maximum temperature of the cooking chamber In all cooking modes it is possible to humidify the chamber at will To do this press the HUMIDITY button until the oven sprays water into the cooking chamber ...

Page 24: ...g on the value to be reached In the temperature and time control mode with temperature setting the temperature and time are set by adjusting the buttons after pressing the TEMPERATURE and TIME buttons respectively By pressing the START STOP button the oven will start preheating the chamber and will stop when it has reached a level determined by the oven according to the temperature requested by th...

Page 25: ... down the cooking time until it is finished At this point the time indicator will display the code word End the oven will beep for a few seconds until the user finishes cooking by lightly pressing the START STOP button Example of cooking at 90º for 10 minutes Figure 13 Example Cooking 90ºC for 10 minutes Figure 14 Oven temperature ...

Page 26: ...e is being displayed or that the phase is activated If the indicator of a particular phase is off it indicates that this phase is deactivated To configure a phase press PHASE The display will show the message Ph followed by the phase number To move between the different phases press the button Figure 16 Phase indicator Within each phase the cooking parameters are set During cooking its progress is...

Page 27: ...RT STOP button lightly to start the preheating process see 6 1 3 1 If preheating is not necessary the two central dots will flash every second indicating that the cooking process is in progress If a parameter other than time is selected on the display the last dot will flash to indicate that cooking is in progress Figure 18 Cooking indicator Oven temperature Temperature with Preheat Figure 19 Temp...

Page 28: ...s this status visually and acoustically Specifically A beep sounds The oven chamber light comes on The END keyword appears in the central display until the user finishes cooking To end cooking press START STOP 6 1 6 Speed selection In any cooking mode the user can select the convection fan speed that best suits his needs To do this press the fan speed button Then select the appropriate speed with ...

Page 29: ...or the handling of the products used in the process appropriate protection must be used Never touch the detergent with your hands The time required to perform the self cleaning programme is listed in the table below Programme Description Duration CLN ECO self cleaning programme 65 min Table 9 Self cleaning and rinsing programme Before starting any cleaning process make sure that the water supply t...

Page 30: ... elements are switched off In this particular case even if the oven door is opened the process will not stop and the fan will continue to rotate In this way with the door open the chamber temperature can be lowered in a few seconds Once in this mode the display alternately shows the cooking chamber temperature To exit the rapid cooling mode briefly press START STOP Please note that in this mode th...

Page 31: ...RT STOP key Place as many tablets as there are slots in your oven Figure 25 CleanDuo detergent holder Before starting any cleaning process check that no temperature adjustment of the cooking chamber is necessary To insert the detergent tablet into the chamber it is essential to stop the fan It is important not to insert the detergent while it is in operation in order to prevent the detergent from ...

Page 32: ... cleaning process there is a power failure the oven will resume the cleaning process from the beginning The oven will switch off automatically at the end of the wash only firmware 1 7 and higher 6 2 NightWatch NightWatch allows the oven to automatically continue cooking after a power failure This functionality is particularly useful for unattended cooking This function will only continue cooking i...

Page 33: ...URE PCB Overtemperature PCB Check that the cooling fans of the electronics are working properly that there is enough space between the back and the wall and that the ambient temperature is not excessive 4 ERROR COMMUNICATION Communication between boards is not responding Check the cable connecting the power board and the control board 5 EEPROM ERROR Processor and EEPROM communication does not work...

Page 34: ...NSOR NOT CONNECTED Reserved Not used 20 ERROR PROBE6 TEMP SENSOR SHORTED Reserved Not used 21 ERROR PROBE7 TEMP SENSOR NOT CONNECTED Reserved Not used 22 ERROR PROBE7 TEMP SENSOR SHORTED Reserved Not used 23 ERROR PROBE8 TEMP SENSOR NOT CONNECTED Chamber probe not connected Check probe and wiring 24 ERROR PROBE8 TEMP SENSOR SHORTED Short circuited chamber probe Check probe and wiring 25 ERROR PROG...

Page 35: ...re 28 Authentication panel Once in the authentication panel select Create account to create a new user account Note The password must be at least 6 characters long To link a device mobile phone tablet or computer it is first necessary to set up a Wi Fi connection in the oven The following section 7 1 2 Wi Fi connectivity explains in detail how to set up this configuration This web address has the ...

Page 36: ...hef and wait for a configuration2 web portal to open automatically In this configuration web portal you enter the details of your usual Wi Fi network and the network with which you wish to connect the oven to the Internet SSID In the field Mychef login email you must enter the username that was created earlier3 7 1 1 Creating a new user 1 It is possible to reset the Wi Fi network configuration at ...

Page 37: ... Address so that it can be pasted later Figure 30 Wi Fi network configuration screen from different devices Once all fields have been completed select the Save button to save the changes and start the connection It is important that you connect to a 2 4GHz frequency band Wi Fi network as 5GHz networks are not compatible with the Smart Control functionality 4 If the MAC address of the equipment has...

Page 38: ...ser created in section 7 1 1 and linked to the oven in the section 7 1 2 If you are pairing a device for the first time you will be presented with the button combination shown in the figure below Figure 31 To add a new device select the Add new device button and fill in the form in the Figure 32 form with a name for the device which will be used to identify it and the MAC address of the oven6 that...

Page 39: ...ange the different parameters that are configured in the linked equipment as well as the actual values of temperature humidity and cooking time It should be noted that when the user makes a modification in this control system there is a time delay between updating the database and sending the modification to the equipment 7 1 4 Control panel In the Figure 33 and Figure 34 you can see the control p...

Page 40: ... of block L and setting the temperature value to be reached by the probe The fan speed can be selected via the drop down menu in the P block The COOK PRO allows 4 speeds 1 2 3 and High Figure 33 Detail of the manual cooking panel Figure 34 Close up of the recipe cooking control panel A B C D E F G H I J K L M N O P Q W X AA AB AC AD Y T U V S ...

Page 41: ...ates it if it is disabled and displays the cooking parameters of this phase If the text on the button appears as if it is disabled it means that the phase is not active J Checkbox phase activation Deselect if you want to deactivate a phase Phase 1 is always active K Oven target temperature input indicator Set Point Allows you to enter the desired temperature value in the range 30 300 C for manual ...

Page 42: ... box N W More information button Opens a window with information about the device the user linked to the device the minutes of operation of the oven and the temperatures of the electronics of the device X Google Assistance Button Oven control via Google Home and voice assistance Y Activate Deactivate phase When the box is checked it indicates that the phase is enabled to disable it uncheck the box...

Page 43: ...e and download the Google Home and Google Assistant app Figure 35 Google applications needed Once the two applications are installed start Google Home and follow the steps below 1 On the home screen of the app select the plus sign and then Configure device Figure 36 Screenshots of the Google Home application 7 At the moment Mychef Smart Voice Control is only fully available in English so it is nec...

Page 44: ...he control web application 8 See section 7 3 3 It is possible that in some cases the server is busy or that a message appears informing that the synchronisation could not be carried out the message should be omitted if the linked ovens appear on the start screen if they do not appear repeat all the steps in this section Whenever an oven is added or removed in the control web application the Google...

Page 45: ...PRO DT MP CP 2201 2 45 Figure 38 Authentication server screen and messages appearing while validating and synchronising information Figure 38 Authentication server screen and messages appearing while validating and synchronising information ...

Page 46: ...mode What mode is Mychef set Is Mychef humidity X mode set Set all ovens mode to Humidity X TIME CONTROL X 0 99 hours 0 5940 minutes 0 356400 seconds Run Mychef for X Set Mychef timer to X Start Mychef for X How many minutes are left on Mychef Cancel Mychef timer How many minutes are left on ovens Increase Mychef timer X Decrease Mychef timer X FAN CONTROL X High Low Set Mychef fan speed to X Set ...

Page 47: ...om the Google Assistant app or via any device that supports the Google Assistant such as a Google Home speaker Figure 39 Different voice commands understood and executed by the Assistant 7 2 3 Adding automated routines It is also possible to add routines to Google Home so that different actions can be performed with a single voice command Below is an example where by simply saying Cook pizza Googl...

Page 48: ...efcooking com PRODUCT MANUAL COOK PRO DT MP CP 2201 2 48 Figure 40 Screenshot of Google Assistant application 2 Then manage routines and click on the add icon Figure 41 Screenshot Google Assistant Routines ...

Page 49: ... this routine that you want the oven to perform in this routine For this example they will be the following11 Turn Mychef on Set Mychef temperature to 260 Set Mychef mode to Humidity Low Start Mychef for 17 minutes Start Mychef Figure 42 Routine configuration in the Google Assistant application 11 In these commands the word Mychef appears to refer to the oven in question but this word can be subst...

Page 50: ...mychefcooking com PRODUCT MANUAL COOK PRO DT MP CP 2201 2 50 Figure 43 Execution of the configured routine by voice command in the Google Assistant application ...

Page 51: ... holding the START STOP button Once switched off press and hold the temperature icon on the front panel until you hear a Click The central display will show the digits of the MAC address two by two in order If the Wi Fi connection to the device has not yet been configured the MAC address can be seen in the name of the Wi Fi12 access point 7 3 3 Unlink service Mychef Control To unlink the Google ac...

Page 52: ...nd select the Open as window box and Create This creates a shortcut to our smart control that can be found in the start menu Figure 45 Pop up window to create the shortcut Mobile device Similarly on the mobile device go to the menu at the top right of Chrome select the option Add to home screen and add This creates a shortcut to our smart control that can be found on the home screen of the mobile ...

Page 53: ...g a washing program Error The device shows an error on the central display Connecting Attempts are being made to connect with the equipment Table 13 Different statuses that can be displayed on the control panel 7 5 Recipes The remote control allows you to enter an infinite number of recipes and these will be compatible and visible to all the ovens that can cook them To add a recipe just fill in th...

Page 54: ...L COOK PRO DT MP CP 2201 2 54 Figure 1 Recipe creation form If a recipe is selected the cooking parameter input fields will be locked with the values of the recipe in question to change the cooking values again select Manual cooking ...

Page 55: ...t of the equipment Frequency Inside the chamber Daily Compartment behind the suction plate Daily Door gasket Daily Equipment outer plates Daily Door water drain Weekly Inner outer door compartment Weekly Table 14 Cleaning frequencies in Mychef ovens Before starting any cleaning programme trays racks grids probes or other accessories inside the chamber must be removed 8 1 1 MyCare The MyCare self c...

Page 56: ... part has been removed cleaning can proceed either manually or automatically Use extreme caution when cleaning this part of the oven Leave the door ajar and wait until the chamber fan stops When this process has been completed the suction part of the chamber fan must be replaced in reverse order 8 1 3 Door gasket Once the cleaning of the chamber has been completed the washing process will continue...

Page 57: ...ol panel To clean the control panel use a cloth dampened with dishwashing soap and water Then rinse and dry Never use agents containing alcohols or solvents as they may attack the metals or plastics of the control panel 8 1 6 Front water drain This is the part that allows any water droplets that may fall from condensation from the steam from the inner door to run into the drain so it is important ...

Page 58: ...e you can proceed in the same way as for the other panes If there is a lot of dirt an automatic cleaning cycle can be used to remove the excess dirt Once cleaning is complete the inner door can be closed and secured with staples Cleaning the oven with a pressure washer is harmful to the equipment and could lead to breakage of the oven and will void the warranty of the equipment Do not use the hand...

Page 59: ...nto four types of overhauls A B C and D to be carried out approximately y every year or 2 000 working hours whichever comes first These periodic reviews should be carried out every 2 000 working hours or every year whichever comes first These periodic inspections must be carried out by an authorised service technician The following table shows the operations to be carried out on Mychef ovens in ea...

Page 60: ...odel X X X X X Temperature calibration X X X X X Adjustment of the inner bolts and nuts X X X X X Revision C Replacement of chimney and drainpipes X X Replacement of steam generation solenoid valve X X Change resistor contactor only models without TSC X X Revision D Engine change X Replacement of resistor and gasket X Replacement of internal seals X Regular maintenance ensures that your oven will ...

Reviews: