background image

PTP45 30

30

PTP45 50 

50

PTP45 20

20

32 Kg

52 Kg

90 Kg

PTP45 50M 

2.5

3.5

4

5.25

7

8

9.5

15

PTP45 30

PTP45 50

N.A.

6Kg/m²

9,5Kg/m²

PTP45 20

PTP45 30

PTP45 50

PTP 45 20

MAX m²

PTP45 30

PTP45 50

N.A.

12,5Kg/m²

PTP45 20

The PTP45 range is designed to automate blinds and awnings.

2.1 TECHNICAL FEATURES

1

2

2. DESCRIPTION AND INTENDED USE

PTP4520

Thrust

Motor Speed

Motor Power

Current

Weight

Length

PTP4530 PTP4550

PTP4550M

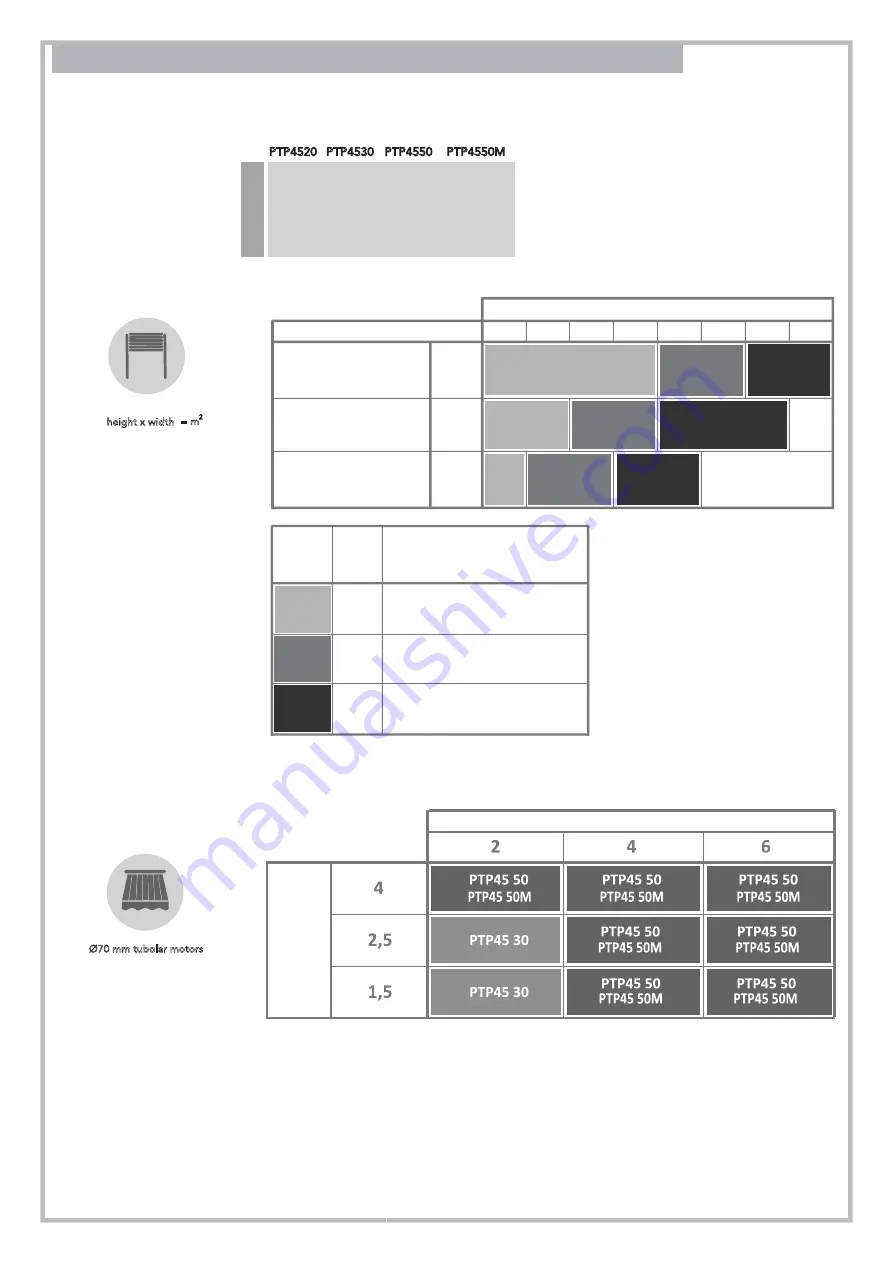
2.2 SELECTION GUIDE

       Surface calculation:


height x width  =


select the model according to
          the table below


m

2

Wood and armored Steel

P

V

C


and light Aluminium

Extruded Aluminium and Steel

MATERIAL

Mo

del 

N

m

Max Li�ing

Ø70 mm tubolar motors

Intersect the value of the extension

with the number of arms of the awning

EXTENSI

ON OF ARMS

N° ARMS

Noise 

level

50
13

244

1,06
3,30

620

50
13

244

1,06
2,40

480

30
17

226

0,95
2,35

480

20
17

155

0,68
2,30

440

Nm

rpm

W

A

Kg

mm

LpA ≤ 70 dB(A)

rev01_21

Summary of Contents for PTP45 Series

Page 1: ...PTP45 PTP45 20 PTP45 30 PTP45 50 PTP45 50M Automation for blinds and awnings Installation manual rev01_21...

Page 2: ...osing Limit switch in opening 2 4 Dimensions 3 3 3 2 1 3 2 2 SAFETY INSTRUCTIONS 3 1 3 2 Wiring Limit switch setting 4 WARRANTY 5 MAINTENANCE 6 DISPOSAL 2 2 Selection guide 7 ERROR MESSAGES 8 COMPLIAN...

Page 3: ...urrent regulations Use of the product must be restricted to its intended use Any other use is to be considered dangerous and therefore forbidden Keep any remote control device i e transmitters away fr...

Page 4: ...r Speed Motor Power Current Weight Length PTP4530 PTP4550 PTP4550M 2 2 SELECTION GUIDE Surface calculation height x width select the model according to the table below m 2 Wood and armored Steel PVC a...

Page 5: ...hout emergency release 1 2 3 4 5 6 7 PTP 45 M with emergency release 01 02 03 04 n 1 n 1 n 1 n 1 Tubular motor Limit switch adjuster wrench Split pin Wall fixing support 01 02 03 04 05 n 1 n 1 n 1 n 1...

Page 6: ...0mm 1 Low down the roller blind and disconnect it from the octagonal tubular Picture A 2 Remove the octagnal tubular Picture B RECOMMENDED TOOLS 4 3 INSTALLATION Make sure the command keys are posi on...

Page 7: ...order to check the correct posi on and to simulate the nal installa on lay temporarily the support to the wall as shown in the picture 5 Simulate the preassembled automa on respec ng the alignment be...

Page 8: ...motor at your right just switch the black wire with the brown It s always wise to double check the wiring if the rota on should not proper just switch the posi on between the black and the brown wires...

Page 9: ...ty system will remain a Proteco s property Use of the product must be restricted to its intended use Any other use shall be considered out of the warranty Installa on and maintenance are charged at th...

Page 10: ...They must thus be removed and turned into licensed rms for their disposal 8 7 ERROR MESSAGES THE MOTOR DOESN T WORKTHE MOTOR EFAULTROR CHSOLUTIONECK Double check the motor s wiringg Double check the m...

Page 11: ...of the EU Directives 2006 95 CE 2004 108 CE Low Voltage Directive Electromagnetic Compatibility Directive It also complies limited to the applicable parts with the following standards EN 55014 1 EN 55...

Reviews: