background image

10

2 - Machine Operation

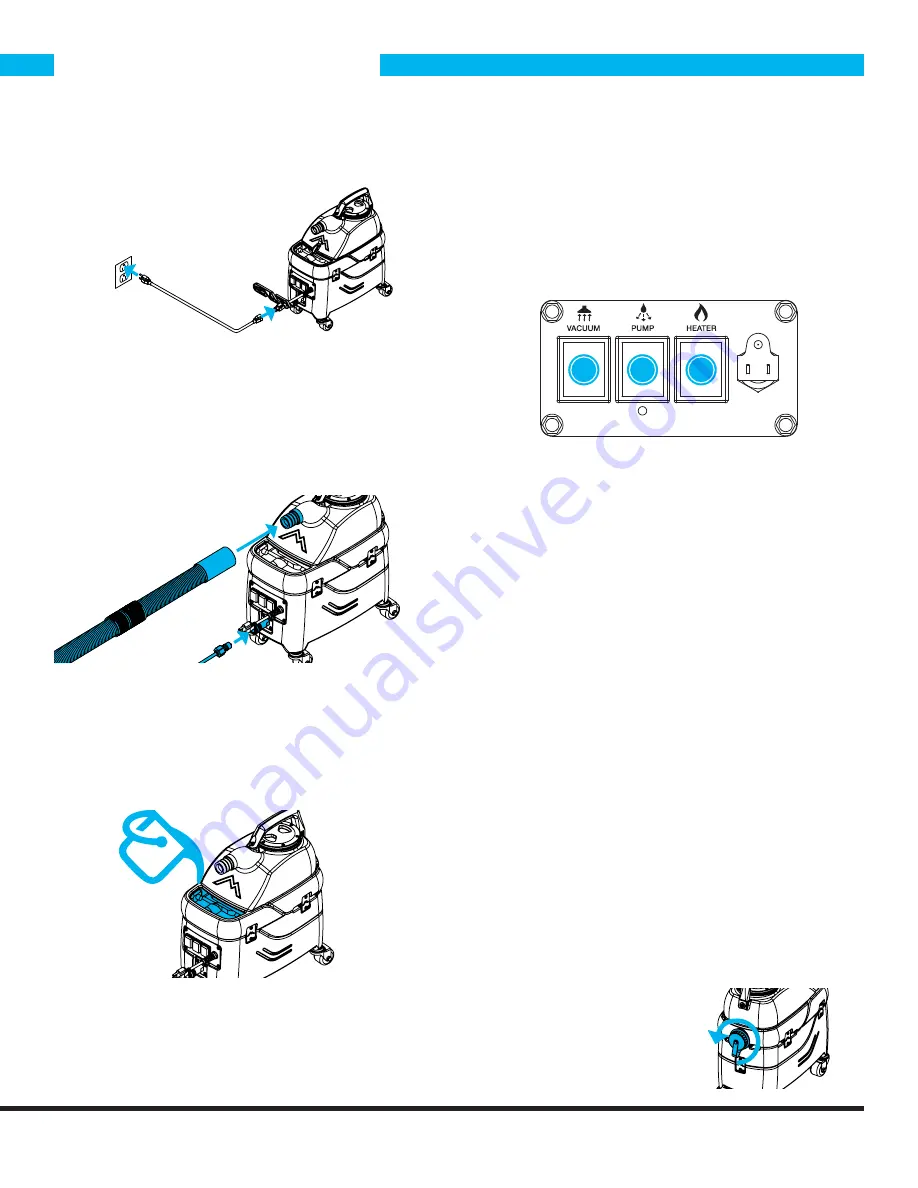
2.1 - Powering the Tempo™

To power the Tempo™, plug the female end of the includ-

ed extension cord into the pigtail and the male end into a 

20 amp wall outlet. 

2.2 - Connecting Hoses & Cleaning Tools

The Tempo™ features a 1 1/4” barbed vacuum hose con-

nection as well as a standard 1/4” quick disconnect fitting 

for solution hoses. 

2.3 - Filling the Solution Tank

The Tempo™ solution tank can be filled up from a pitcher 

or other water container via the opening. 


2.4 - Switching on the Tempo™

S-300 Tempo™

After a cleaning tool is connected and the solution tank is 

filled, switch on the vacuum and the pump in any order.

S-300H Tempo™ w/ Heat

In order to avoid vapor locking the unit, the Tempo’s™ 

components should be switched on by following the pro-

cedure below:

1. Turn pump switch on.

2. Pull the lever on the cleaning tool to release air in the 

line. Hold lever until a steady flow of water comes out of 

the wand.

3. Once pump is primed and there is pressure in the solu-

tion line, turn on heater switch and wait a few minutes for 

water to heat up. 

4. Once water is heated, turn on vacuum and begin 

cleaning.  

Note: When cleaning upholstery, always check manufac-

turer’s cleaning instructions. 

2.5 - Cleaning with the Tempo™

For best results when extracting, do one wet pass 

followed by two dry passes. This ensures you’re not 

over-soaking the material and also gives the heater  

time to catch up. 

2.6 - Emptying the Recovery Tank

The recovery tank drain is 

located on the back of the 

machine at the bottom of 

the recovery tank. 

1

3

2

IMPORTANT: Do not pull on hoses in 

order to move the unit. Only use the 

appropriate handles.

Summary of Contents for S-300 TEMPO

Page 1: ...Tempo Models S 300 S 300H Upholstery Spotter User Manual 13655 Stowe Dr Poway CA 92064 P 858 679 1191 F 858 726 6005 REV 5 2 19...

Page 2: ...r machine abusing it or not operating it properly can void its warranty and prevent the machine from performing to the quality and standard you d expect out of the Mytee Products line If you have any...

Page 3: ...Tempo Rear View 8 1 5 Switch Plate 9 Machine Operation 10 2 1 Powering the Tempo 10 2 2 Connecting Hoses Cleaning Tools 10 2 3 Filling the Solution Tank 10 2 4 Switching on the Tempo 10 2 5 Cleaning w...

Page 4: ...grounding pin DO NOT use extension cords Please Note for America use only Parts and Service Please contact a Mytee service personnel or Mytee authorized Service Center using Mytee original replace men...

Page 5: ...sary when used by or near children 11 Do not use in areas where flammable or combustible material may be present 12 Do not leave the unit exposed to harsh weather ele ments Temperatures below freezing...

Page 6: ...lbs Machine Dimensions 20 x 10 x 16 1 2 Power Cord Single 25 16 3 S 300H Tempo w Heat Solution Tank 1 Gallon Recovery Tank 1 Gallon Vacuum Single 2 Stage CFM 97 Water Lift 85 Pump PSI 55 Pump GPM 0 3...

Page 7: ...ce 1 Barbed vacuum hose connection 2 Recovery tank 3 Solution tank fill opening 4 Switch plate 5 Power cord pigtail 6 Quick connect fitting 7 Solution tank 8 Recovery tank lid 1 3 Tempo Front View 1 2...

Page 8: ...8 1 At a Glance 1 Carrying handle 2 Recovery tank drain cap 3 3 swivel casters 1 4 Tempo Rear View 1 2 3...

Page 9: ...9 1 At a Glance 1 5 Switch Plate 1 Vacuum Switch Activates the vacuum motor 2 Pump Switch Activates the solution pump 3 Heater Switch Activates the heater 1 2 3...

Page 10: ...ents should be switched on by following the pro cedure below 1 Turn pump switch on 2 Pull the lever on the cleaning tool to release air in the line Hold lever until a steady flow of water comes out of...

Page 11: ...tack in the recovery tank This filter should be checked and cleaned after each use 3 2 System Maintainer Weekly flushing of the solution system with Mytee System Maintainer helps keep lines clean and...

Page 12: ...12 4 Related Products 1500 Focus Vapor Steamer 8070 Mytee Lite Heated Carpet Extractor 8700 Crevice Tool 8400DX Mytee Dry Upholstery Tool...

Page 13: ...the drain valve cap Hose cuffs are loose and causing air leakage Tighten all hose cuffs reg ularly as may loosen over time Use a glue to prevent cuffs from coming loose optional Lid on tank is loose...

Page 14: ...ions The jet nozzle could be too large Replace the jet with one that has a smaller opening Pump doesn t stop running Possible Causes Solutions Leak somewhere in the line Disconnect the solution hose f...

Page 15: ...when using your machine it is rec ommended you do one wet pass followed by two dry passes This way you are not spraying as much and the hot water will last longer Jets being used are too large If you...

Page 16: ...Mytee Products Inc 13655 Stowe Dr Poway CA 92064 www mytee com 2019 Mytee Products Inc Printed in the USA Notes...

Reviews: