3
Pre-Operation
1. Vacuum carpet and upholstery and remove other debris.
2. Prespray if desired.
Setup
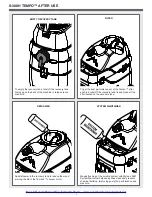
1. Fill solution tank with water or approved cleaning agent. For best results, fill
with warm water (140°). Replace vacuum tank.
Flammable materials can cause an explosion or fire. Do not use flammable
solutions or materials in tank(s).
FOR SAFETY: When using machine, follow mixing and handling instructions on
chemical containers.
ATTENTION: If using powdered cleaning chemicals, mix prior to adding.
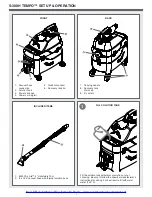
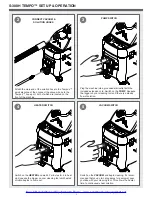
2. Attach solution hose to quick disconnect (located front of machine). NOTE:
Make sure the quick disconnect snaps together firmly. As you do this, always
inspect hoses for cracks or fraying. Do not use if hoses are damaged.
3. Attach vacuum hose to recovery tank.
4. Plug machine’s extension cord into the power cord pigtail and a grounded
wall outlet. FOR SAFETY: Do not operate machine unless cord is properly
grounded.
Operation
1. Turn pump switch on.
2. Prime the pump by pulling up on the tool’s lever to release air in the line. Hold
lever until a steady flow of solution comes out of the wand.
3. Once pump is primed and there is pressure in the solution line, turn on heater
switch and wait 5-7 minutes for water to heat up. Spray solution until heated
solution is coming out.
4. Turn on vacuum and begin cleaning. Do two dry passes for every wet pass.
NOTE: When cleaning upholstery, always check manufacturer’s cleaning
instructions.
5. Work away from outlet and power cord to prevent cord damage.
6. Use a recommended foam control solution in the recovery tank to prevent
vacuum motor damage. Periodically check for excessive foam buildup in
solution tank, and recovery tank.
7. To clean heavily soiled areas, repeat cleaning path from different direction.
8. Be sure to empty the recovery tank BEFORE refilling the solution tank. Failure to
drain the recovery tank appropriately will result in damage to the vacuum motor.
9. After cleaning, relieve water pressure from tool before disconnecting hose
Squeeze trigger for five seconds after turning main power switch off.
After Use
1. Unplug.
2. Empty solution tank and rinse it with clean water.
3. Inspect hoses and replace if damaged.
4. Empty the recovery tank.
5. Inspect solution filter. Clean or replace if damaged.
6. Store the machine in a clean, dry place.
7. Open recovery tank cover to promote air circulation.
8. Do not expose to rain. Store indoors.
9. Use Mytee System Maintainer to clean pump, heater, and solution lines and
remove build-up.
Maintenance Schedule
Maintenance item
Daily
Once a week
Clean and inspect Tanks
Clean and inspect Hoses
Check power supply cable
Clean machine with all purpose cleaner and cloth
Check spray nozzles
Flush solution system with Mytee system maintainer
Remove and clean float shut-off screen from tank
Inspect vacuum hoses for holes and loose cuffs
Inspect machine for water leaks and loose hardware
x
x
x
x
x
x
x
x
x
Troubleshooting
There is no power.
1. Plug machine in proper outlet.
2. Check circuit breaker; reset circuit breaker, other items should not run on the
same circuit as machine. Outlet must be a 20 amp circuit.
Pump does not work properly.
1. Snap quick disconnects firmly together.
2. Check solution tank; may be empty.
3. Jets clogged, remove jet and flush clean.
4. Filters clogged, remove filters and rinse clean with water.
5. If brass check valve is stuck replace valve.
6. Check pump wire. May need to reconnect wire.
7. Pump switch may need to be replaced.
8. If pump motor brushes are worn, replace pump.
Vacuum motor does not work properly.
1. Check that hose is tightly connected.
2. Make sure drain cap is tightened.
3. Check and clean foam filter located in recovery tank.
4. If water is coming out of vacuum motor, use a low foaming detergent.
5. Clean upholstery tool.
Machine Specifications
Solution Tank
1 gallon (approx.)
Recovery Tank
1 gallon (approx.)
Vacuum
Single 2-stage
CFM
97
Water Lift
85”
Pump PSI
55
Pump GPM
0.37
Heater
600W - 210° max.
Power
Consumption
12 amps @ 115V 60Hz
Machine Weight
27 lbs.
Machine
Dimensions
20” x 9” x 20.75”
Power Cord
25’ 12/3 extension cord
230V Configuration Information
Model Number
S300H-230
Power
Consumption
6 amps @ 230V 60Hz/50Hz
FAQs
Q: What comes standard with the S-300H?
A: The S-300H comes with an 8’ Hose-n-Hose™ vacuum & internal solution hose
and the 8400P Air Lite™ Upholstery Tool attached.
Q: Where do I plug the machine in?
A: The S-300H requires a 20 amp grounded circuit. Please note: GFI outlets may
trip before the breaker setting.
Q: Is there anything I can do to increase the expected life of my machine?
A: Running the vacuum motors with the tank empty and lid off will allow excess
moisture in the vacuums to dry off. You should also run Mytee’s 3601 System
Maintainer through the system weekly to keep the hoses, pump, and heater clean
and free of debris.
GENERAL INFORMATION
New & Reconditioned Equipment & Parts - www.southeasternequipment.net


