background image

2

1.800.228.7148   www.definitivetech.com

  1. Read these instructions.


2. Keep these instructions.


3. Heed all warnings.


4. Follow all instructions.


5. Do not use this apparatus near water.


6. Clean only with dry cloth.


7. Do not block any ventilation openings.

 Install in accordance  

with the manufacturer’s instructions.


8. Do not install near any heat sources

 such as radiators, heat registers,  

stoves, or other apparatus (including amplifiers) that produce heat.

  9. Do not defeat the safety purpose of the polarized or grounding plug.


A polarized plug has two blades with one wider than the other. A grounding  
plug has two blades and a third grounding prong. The wide blade or the third  
prong is provided for your safety. If the provided plug does not fit into your outlet, consult 
an electrician for replacement of the obsolete outlet.

  10. Protect the power cord from being walked on or pinched 

particularly at the plugs, 

convenience receptacles, and at the point where they exit from the apparatus.

  11. Only use attachments/accessories specified by the manufacturer.

  12. Use only with the cart, stand, tripod, bracket, or table specified


by the manufacturer, or sold with the apparatus. When a cart or rack  
is used, use caution when moving the cart/apparatus combination  
to avoid injury from tip-over.

  13. Unplug the apparatus during lightning storms

 or when unused  

for long periods of time.


14. Refer all servicing to qualified personnel.

 Servicing is required when the  

apparatus has been damaged in any way, such as when power supply cord  
or plug is damaged, liquid has been spilled or objects have fallen into the  
apparatus, or apparatus has been exposed to rain or moisture, does not  

CAUTION

ATTENTION: RISQUE DE CHOC ELECTRIQUE - NE PAS OUVRIR

RISK OF ELECTRIC SHOCK

DO NOT OPEN

operate normally, or has been dropped.

  15. WARNING:

 To reduce the risk of fire or electric shock, do not expose  

this apparatus to rain or moisture. The apparatus shall not be exposed  
to dripping or splashing and objects filled with liquids, such as vases,  
shall not be placed on apparatus.

  16. WARNING: 

The mains plug/appliance coupler is used as disconnect device;  

the disconnect device shall remain readily operable.

 17. 

Protective grounding terminal.

 The apparatus should be connected to a 

mains socket outlet with a protective grounding connection.

 18. 

Correct Disposal of this product. 

This marking indicates that this  

product should not be disposed with other household wastes  
throughout the EU. To prevent possible harm to the environment or  
human health from uncontrolled waste disposal, recycle it responsibly  

to promote the sustainable reuse of material resources. To return your  
used device, please use the return and collection systems or contact retailer 
where the product was purchased; they can take this product for environmental  
safe recycling.

  19. No naked flame sources,

 such as lighted candles, should be placed  

on the apparatus.

 20. 

This lightning flash with arrowhead symbol within an equilateral triangle 

is intended to alert the user to the presence of non-insulated “dangerous 

voltage” within the product’s enclosure that may be of sufficient magni

-

tude to constitute a risk of electric shock.

   Warning: 

To reduce the risk of electric shock, do not remove cover (or back) as 

Important Safety InStructIonS

Summary of Contents for ST-L

Page 1: ...Owner s Manual ...

Page 2: ...d liquid has been spilled or objects have fallen into the apparatus or apparatus has been exposed to rain or moisture does not CAUTION ATTENTION RISQUE DE CHOC ELECTRIQUE NE PAS OUVRIR RISK OF ELECTRIC SHOCK DO NOT OPEN operate normally or has been dropped 15 WARNING To reduce the risk of fire or electric shock do not expose this apparatus to rain or moisture The apparatus shall not be exposed to ...

Page 3: ...ified personnel The exclamation point within an equilateral triangle is intended to alert the user to the presence of important operating and maintenance instructions in the literature accompanying the appliance 21 The battery battery or batteries or battery pack shall not be exposed to excessive heat such as sunshine fire or the like ...

Page 4: ...os ST L Carton 3 Locating your Mythos ST L Super Towers 4 Aiming the loudspeakers into your listening area 4 5 1 Home Theater Configuration 5 Room Acoustics 5 Adjustable Gliders 6 Carpet Spikes 6 Connections 7 11 Subwoofer Tuning 11 Subwoofer Adjustment 12 Remote control 13 Fine Tuning 14 LED Indicators 15 Troubleshooting 17 Service 18 Technical Assistance 18 Warranty 19 Specifications 20 21 ...

Page 5: ...n fact a meticulous rethinking of the original high performance super tower Drivers tweeter amplifier and user interface all have been significantly developed to offer serious audio listeners elegant appearance greater convenience and exhilarating performance Improved mid and high frequency detail Overall higher output Lower harmonic and intermodulation distortion Flatter frequency response on and...

Page 6: ...m carefully Save all cartons and packing materials in case you move or need to ship your system Please record the serial numbers found on the back of your Mythos ST Ls in an appropriate place and register them online at www definitivetech com registration What s In Your Mythos ST L Carton Inside each Mythos ST L loudspeaker carton you should find 1 One Mythos ST L Super Tower with attached AC powe...

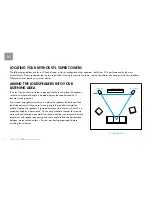
Page 7: ...between the speakers and your favorite listening position If your room arrangement forces you to place the speakers farther apart than the distance from which you are listening angle the speakers toward the middle Angling the speakers in pointed directly at the listener will result in a somewhat brighter clearer sound This angling creates a sharper focus and a more solid central image generally we...

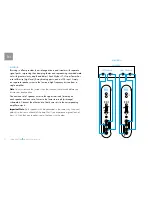
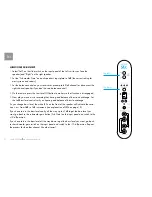
Page 8: ...tity Switch should be set to Left or Right depending on which side of the room the speaker is located Room Acoustics Ideally the speakers should be placed at one to two feet from room boundaries such as large pieces of furniture walls and especially corners Placing a speaker closer to room boundaries increases bass but may result in a boomy or bass heavy sound and degradation of stereo imaging Try...

Page 9: ...d knob and turn clockwise to raise height at that corner or counter clockwise to lower height A spirit level will help you achieve perfect verticality Carpet Spikes Use the optional carpet spikes to provide much greater stability and performance when placing your loudspeakers on carpeting Note take care when using the spikes as they may cause damage to wooden or other floors which are susceptible ...

Page 10: ...s Note that one of the terminals on the rear of each speaker is red and the other is black Make certain that you connect the wire from the red terminal of your amplifier or receiver to the red terminal on your speaker and the wire from the black terminal of your amplifier or receiver to the black terminal on your speaker Most wire has some indicator such as color coding ribbing or writing on one o...

Page 11: ...from a single amplifier Note You must remove the jumper strips that connect the terminals before you bi wire your loudspeakers Connect one set of speaker wires to the upper terminals tweeter on each speaker and one set of wires to the lower terminals midrange subwoofer Connect the other ends of both wire sets to the corresponding amplifier outputs Important Note Both speakers must be connected in ...

Page 12: ...ss constrained CAUTION You must remove the jumper strips that con nect the terminals before you bi amp your loudspeakers you will damage your loudspeakers if you don t After removing the jumpers connect the speaker wires from the high frequency amplifier outputs to the upper set tweeter of terminal posts on each speaker Follow the same procedure for connecting the low mid frequency amplifier outpu...

Page 13: ...f the multi channel receiver processor to Front L R LARGE and Subwoofer NO With this method you will get every iota of performance that your system can deliver You also have the option to use the low level LFE input in addition to the speaker wires This method gives you more control of the LFE channel level relative to the L R channel s bass Use a Y connector available from your dealer out of the ...

Page 14: ...g on the end of the electrical cord which is attached to the speaker through the hole at the bottom of the base The Mythos ST L has a special circuit that automatically turns the powered subwoofer section on when a signal is fed to the loudspeaker and does not require an on off switch Please note that it is normal for you to hear a small pop from the speaker when the amp powers up SUBWOOFER TUNING...

Page 15: ... mono music recording that has a good balance of bass and midrange Set the Left Bass level control until you hear a good balance of bass to midrange As you change bass level the white LEDs on the front of the speaker will indicate the varia tion or from 0dB in 1dB increments see explanation of LEDs on page 15 If you have to turn the bass level nearly all the way up to 7dB to get the bass level you...

Page 16: ... button again or the corresponding Bass Level toggle will take the loudspeaker out of mute 3 Left Bass and Right Bass Increases decreases the left and right loudspeaker s subwoofer levels respectively Note the volume range goes from 7 to 0 to 7 and is indicated by the LEDs at the base of the loudspeaker beneath the Definitive Technology logo 4 Low Level On Off Engaging Night Mode compresses the dy...

Page 17: ...rmous difference in timbre and imaging accuracy Fine Adjustment Now switch back to a stereo recording and use the Stereo Bass control to make your final adjustment you will probably want to turn the bass level down a bit As you make settings adjustments the white LEDs on the front of the towers light up to indicate the setting value and then turn off a few seconds later 1 Sit in your favorite list...

Page 18: ...shine then turn off sequentially Volume Levels Stereo Bass Left Right Bass On front of tower Indicated by 7 white LEDs to the left and right of the blue center LED Low Level Mode On Center Blue LED turns to red and dims Off Center red LED turns blue and trim value shown on white LEDs Hold and then fade to dim Blue LED Mute On Center blue LED turns red and then fades in and out until mute condition...

Page 19: ...r to their system If you choose to do so we strongly suggest using the SuperCube8000 www definitivetech com SuperCube8000 in order to achieve the highest level of sound quality possible This should be driven with an additional RCA low level cable connected to the LFE output of your receiver or processor Your receiver or decoder s bass management system should still be set to Large left and right m...

Page 20: ... the suggestions described below If you are still having problems please consult your Definitive Technology Authorized Dealer for assistance 1 Make sure all your system interconnects and power cords are solidly in place 2 Should you experience any level of hum or noise try plugging the power cords into the same power outlet as your amplifier 3 The system has sophisticated internal protection circu...

Page 21: ...no circumstances should loudspeakers be shipped to our offices or returned without contacting us first and obtaining return authorization Definitive Technology Offices 11433 Cronridge Drive Owings Mills Maryland 21117 Phone 410 363 7148 Technical Assistance It is our pleasure to offer assistance if you have any questions regarding your Mythos ST Ls or their set up Please contact your nearest Defin...

Page 22: ...sfers the Product to any other party This Warranty does not include service or parts to repair damage caused by accident misuse abuse negligence inadequate packing or shipping procedures commercial use voltage in excess of the rated maximum of the unit cosmetic appearance of cabinetry not directly attributable to defects in material or workmanship This warranty does not cover the elimination of ex...

Page 23: ...ubwoofer Power Amplifier 1200 Watt Class HD amplifier Overall Frequency Response 14Hz to 30kHz Recommended Amplification 20 350 Watts 2 83V Sensitivity 92 3 dB spL Amplifier Power On Off Indicated by blue LED Impedance compatible with 8 Ohm Impedance Minimum 3 6 Ohm 278Hz Tweeter Midrange Crossover Frequency 2366 Hz Midrange Woofer Crossover Frequency 111 Hz Tweeter High Pass Slope acoustic 12 dB ...

Page 24: ...2 dB octave Midrange Enclosure Type Sealed box Woofer Enclosure Type Dual Bass Radiators Dimensions greatest overall depth grille Depth 14 187 36 035 cm Height 50 809 129 05486 cm width 12 682 32 21228 cm Base Dimensions Depth 14 187 36 035 cm width 12 682 32 21228 cm Shipping Weight 75 lbs 34 0194 kg ...

Page 25: ...Definitive Technology 11433 Cronridge Dr Owings Mills MD 21117 1 800 228 7148 www definitivetech com ...

Reviews: