background image


14 


Position  both  the  comfort  cheek  pads  in  their  housing  (see  specific  instructions 

provided in the helmet user manual) making sure that all the press-studs click. 

Note:  Carefully  check  the  proper  final  positioning  of  the  cheek  pad,  pulling  the  chinstrap 

toward the inside of the helmet and testing the press-studs. 

Caution:  Make  sure  that  there  are  no  cables  sticking  out  of  the  helmet  and  that  the 

loudspeakers are in their housing. 

Caution: Always verify the proper length of the chinstrap and adjust it as necessary, once 

again referring to the specific helmet instructions. 


 Position the e-box in the relevant housing. First insert the front part, then press down 

on the e-box until both hooks fully  click. To remove the e-box, press the  two  sliding 
hooks at the same time until the e-box comes out. 

 
Warning:  Do  not  leave  the  helmet  exposed  to  atmospheric  agents  without  the  e-box  or 

the protection plate provided with the helmet. 


4.


REMOVING THE SYSTEM  


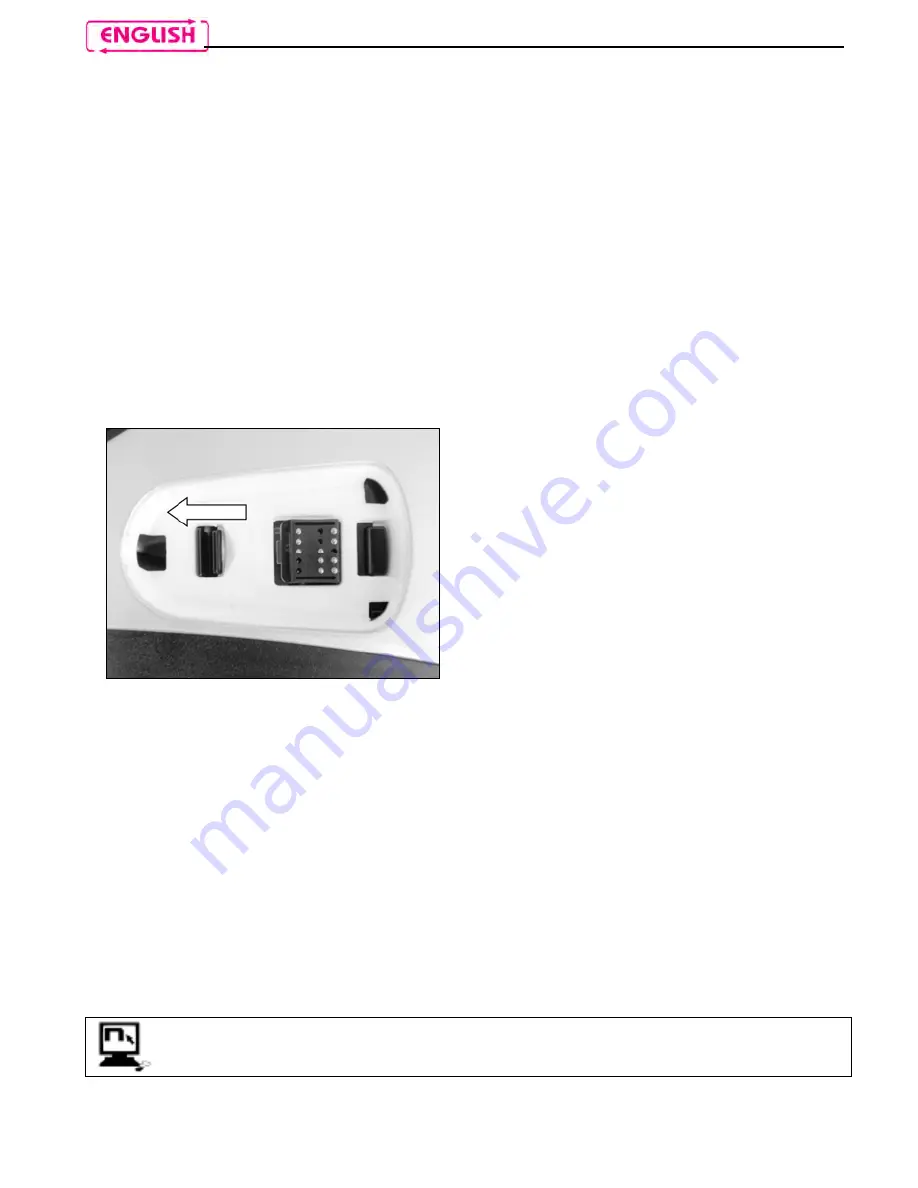
Fig. 31 

To  remove  the  system  from  the  helmet, 
remove  the  earphone  and  the  comfort 
cheek  pads  as  shown  in  the  assembly 
operations.  Then  remove  the  polystyrene 
cheek  pads.  Remove  the  protection  plate, 
then,  looking  at  the  helmet  from  the 
outside, release the connector by acting on 
the  fastening  clasp  as  illustrated  in  the 
figure.  

 
After  releasing  the  connector  from  the  shell,  also  remove  the  right  part  by  releasing  the 
battery holder.  
Now remove the entire system from the helmet. 


5.


SYSTEM CHARACTERISTICS 

N-Com B1 allows wireless connection to a mobile phone, a satellite navigator, and an MP3 
A2DP player using Bluetooth technology. 
 
The system can also be used for wireless intercom communication between two helmets, if 
both helmets are equipped with a N-Com Bluetooth system. 
 
The  system  can  be  expanded  by  means  of  a  USB  Multimedia  Wire  accessory  (sold 
separately), which is used for cable connection to multimedia sources. 


B1  can  be  managed,  updated  and  customised  using  the  “N-Com  Wizard” 
programme,  which  can  be  downloaded  from  the  “Download”  section  of  the 
Internet site www.n-com.it  

Summary of Contents for B1

Page 1: ...Firmware Version 1 xx EN USER INSTRUCTIONS AND SAFETY...

Page 2: ...te www n com it REFERENCE STANDARDS The products of the N Com line are in compliance with standards as per the table below B1 The Bluetooth system complies with the main safety requirements and other...

Page 3: ...15 6 PAIRING UP BLUETOOTH DEVICES 15 6 1 Affiliation reset function 16 7 MOBILE PHONE FUNCTIONS 16 8 GPS SATELLITE NAVIGATOR FUNCTIONS 16 9 BLUETOOTH A2DP MUSIC PLAYER 17 10 AUDIO DEVICES WITH CABLE C...

Page 4: ...vehicle in a safe area in compliance with Traffic Regulations and then answer the call Do not make any calls while riding Stop your vehicle in a safe place in compliance with Traffic Regulations and t...

Page 5: ...ering with it and or with the electronic system inside the helmet in addition to invalidating the product warranty can also lead to dangerous situations 1 6 Accessories and batteries Only use the type...

Page 6: ...2002 96 EC Do not dispose of these products together with undifferentiated urban waste The proper disposal of obsolete equipment contributes to preventing possible negative consequences on people s h...

Page 7: ...ed in the user manual of the helmet Remove the Noise Reducers from the two cheek pads and tear off the pre cut plastic if equipped Fig 4 Fig 5 Fig 6 Remove the back of the comfort padding by pulling o...

Page 8: ...8 Remove the right and left polystyrene cheek pads by gently pulling them out of the helmet The helmet shell can be opened slightly to facilitate the removal of the cheek pad Caution In case the polys...

Page 9: ...in figure 11 Position the microphone in its support as shown in figure 10 being careful that the fluorescent clamp is facing toward the inside of the helmet Insert screw in the microphone clamp use t...

Page 10: ...5 Insert the battery in its holder first positioning the side equipped with the cables outlet keeping the cables underneath the plastic tab Fig 16 Fig 17 Fig 18 Insert the connectors set in the cable...

Page 11: ...shell Fig 21 Looking at the helmet from the outside slide the rear positioning tab into groove A as shown in the figure Press in the area marked PUSH from inside the helmet until the fastening clasp B...

Page 12: ...pad Fig 24 Fig 25 Position the loudspeaker in the special housing obtained in the polystyrene cheek pad Fig 25 Fig 26 Replace the polystyrene cheek pad left side positioning the cable in the groove th...

Page 13: ...ng obtained in the polystyrene cheek pad right side Replace the polystyrene cheek pad right side positioning the cable in the groove you see in the cheek pad Fig 28 Only for full face helmets Insert t...

Page 14: ...th the helmet 4 REMOVING THE SYSTEM Fig 31 To remove the system from the helmet remove the earphone and the comfort cheek pads as shown in the assembly operations Then remove the polystyrene cheek pad...

Page 15: ...ng the system audio levels Update the device firmware The programme includes an on line guide that explains how it works after installing it on your PC press F1 to display this guide 6 PAIRING UP BLUE...

Page 16: ...l signal Hanging up rejecting a phone call Press on and keep it pressed for about 2 seconds until you hear the acoustic signal Voice call if equipped Press on and keep it pressed for about 2 seconds u...

Page 17: ...e B1 system is also equipped with Bluetooth AVRCP Audio Video Remote Control Profile protocol which allows you to stop and resume music reproduction directly from the helmet with devices equipped with...

Page 18: ...more than 4 seconds until the LEDS start to flash quickly 3 On either one of the two helmets press on briefly 4 After a few seconds the helmets recognize each another a beep is emitted to signal the p...

Page 19: ...cally turns itself off in case no button is pressed for 30 minutes The shutting off is signaled by a series of beeps in the helmet This function makes it possible to always have a small reserve of ene...

Page 20: ...call X 2s Hang up reject a phone call X 2s Redial last number X Mobile phone connection X 2s Mobile phone disconnection X 4s Call transfer X 4s Bluetooth peripheral Activate Conference Mode X Connect...

Page 21: ...defects caused by fortuitous events modifications or adjustments causes of force majeur or damages deriving from the product coming in contact with liquids The internal helmet components are not and...

Page 22: ...ponents shall become property of Nolangroup THIS WARRANTY VOIDS AND REPLACES ANY OTHER WRITTEN OR VERBAL WARRANTIES PROVIDED FOR BY THE LAW THAT CAN BE DEROGATED AT THE PARTIES WILL SPECIFICALLY NOLAN...

Page 23: ...15 WARRANTY REGISTRATION FORM Product name B1 Identification code Buyer s Information Name Last name Address Phone e mail Dealer s stamp Date of purchase...

Page 24: ...Printed on recycled paper B1 23 11 2012 10 57 00...

Reviews: