background image


21


Bluetooth  Kit  system  versions  prior  to  version  2.1  only  allow  this  use  with 
significantly shorter ranges. 


In order for two Bluetooth Kits to communicate with each other, they must 
be affiliated first, in other words they must be introduced to one another. 
 
6.1.


Affiliating two Bluetooth Kits 

1.


Put  both  Bluetooth  kit  MULti  systems  in  affiliation  mode  (starting  with 
the system  turned  off, press  the  “on” button and  keep  it pressed  until 
both LEDs start to flash quickly). 

2.


When both helmets are in affiliation mode briefly press the “on” button of 
the  Pilot’s  helmet.  The  affiliation  will  not  be  successful  unless  this  is 
done. 

3.


After a few seconds the helmets recognize one another, a beep confirms 
the successful affiliation and the interphone communication is activated. 

4.


Turn  off  both  systems  and  turn  them  back  on  in  order  to  store  the 
affiliation data. 

 
In the event that this operation is not successful, turn off both helmets and 
repeat the operation starting from point 1. 
 
N.B.: In case a cell phone was already affiliated prior to the affiliation of the 

Bluetooth  Kit  systems,  make  sure  that  this  affiliation  is  still  working. 
Otherwise, repeat the affiliation with the cell phone. 

 
All affiliations are stored even when the helmets are turned off, and they are 
maintained until the helmets are turned back on. As a result, the affiliation 
procedure  must  be  repeated  only  when  systems  other  than  the  affiliated 
ones are used.   

Summary of Contents for bluetooth kit multi

Page 1: ...EN SAFETY AND INSTRUCTIONS FOR USE ...

Page 2: ...lies with the specifications for a Class B digital device pursuant to Part 15 of the FCC Rules These limits are designed to provide reasonable protection against harmful interference in a residential installation This equipment generates uses and can radiate radio frequency energy and if not installed and used according to the instructions may cause harmful interference to radio communications How...

Page 3: ...helmets are equipped with an N Com Bluetooth Kit in addition to connection with a Bluetooth cell phone communication between the two helmets is also possible in wireless interphone mode The system can be expanded by means of the Multimedia Wire accessory which can be used for connection to multimedia sources such as MP3 readers satellite navigators PMR radio for motorcycle to motorcycle communicat...

Page 4: ...3 Cell phone functions _________ 19 6 BLUETOOTH INTERPHONE __ 20 6 1 Affiliating two Bluetooth Kits ___ 21 6 2 Interphone functions via Bluetooth _____________________ 22 7 BLUETOOTH RECEIVER A2DP PROFILE _______________ 23 7 1 Affiliation with A2DP devices ___23 7 2 Operation with A2DP receiver __23 8 SATELLITE NAVIGATORS ___ 25 9 CONNECTION TO OTHER AUDIO PERIPHERALS______ 25 10 CONNECTION TO OT...

Page 5: ...met and of the other accessories Warning The electronic components of the N Com system mounted inside the helmet are not waterproof Consequently make sure the inside of the helmet including the comfort padding does not get wet in order to avoid damage to the system If it does remove the N Com system and the helmet comfort padding and let it air dry Disconnect the battery connector and let it dry a...

Page 6: ...it does not cause a disturbance or distraction while riding and at the same time allows you to distinctively hear background noises Do not operate your cell phone or other devices connected to N Com while riding your motorcycle In all cases obey the Traffic Regulations and remember that riding the motorcycle has absolute priority over any other maneuver 1 3 Switching on the system in safe environm...

Page 7: ... of the audio sources connected to it before you use the system on the road Caution Adjusting the volume to very high levels may cause damage to your hearing Caution Adjust the volume of the N Com system where provided and of the audio sources connected to it so as to avoid audio reproduction at high volumes Constant exposure to high audio volumes may damage your hearing Caution An incorrect insta...

Page 8: ...nd accessories approved by Nolan for the specific model The use of a battery type different from the recommended one may lead to dangerous situations and invalidate the warranty Contact your local dealer to see about the availability of approved accessories When disconnecting the power supply cable of any accessory or of the battery charger always grab and pull the plug not the cable Do not use ba...

Page 9: ...g instructions The presence of a crossed out wheelie bin indicates that in the European Union the product is subject to separate collection at the end of its useful life European Directive 2002 96 EC Do not dispose of these products together with undifferentiated urban waste The proper disposal of obsolete equipment contributes to preventing possible negative consequences on people s health and on...

Page 10: ...10 2 CONTENT OF THE PACKAGING The N Com Bluetooth Kit MULTI package contains e box MULTI Wired support Pliers Adhesive plate Fixing screw key Helmet support adhesive rubber Battery charger ...

Page 11: ...ith screw pliers Fig 1 Fig 2 Fig 3 Thoroughly clean the outer surface of the helmet left side Apply the adhesive rubber to the back of the wired support fig 1 Insert the pliers between the helmet padding and the outer shell fig 2 Insert and tighten the screw securing the system to the helmet fig 3 Make sure the rubber is properly positioned on the shell Make sure the microphone is positioned exact...

Page 12: ...e the system to the helmet you can use the adhesive support instead Caution Once the adhesive is applied it cannot be reused in a different position and will have to be replaced once removed Use this fixing method only in situations where it is not possible to secure the system with the pliers Unscrew the screw completely and remove it from the system Remove the adhesive rubber if already in place...

Page 13: ...or the adhesive to stick completely During this time do not expose the helmet to atmospheric agents During the first 12 hours do not apply the e box MULTI Fig 5 Thoroughly clean the outer surface of the shell to ensure that the Adhesive Plate sticks properly Before gluing make sure the shell is dry and free from oil or dirt Before you glue the Adhesive Plate to the helmet determine the right spot ...

Page 14: ... the Velcro fig 6 Position the speaker so that it sticks perfectly to the cheek pad fig 7 Carry out this operation on both sides N B If possible position the speakers underneath the comfort padding of the helmet Suitably hide the connection cables behind the comfort padding ...

Page 15: ...rt the e box on the support until you hear the slider click Connect the wiring connector to the e box Fig 9 To remove the e box take out the connector move the slider to the side to release the stop and remove the e box by sliding it along the tracks ...

Page 16: ...essed for about 4 seconds until the LED turns off and you hear a beep Raising the Volume Press the button briefly to raise the volume The maximum volume is signaled by a double beep Lower volume Press the button briefly to lower the volume The minimum volume is signaled by a double beep 5 OPERATION WITH A BLUETOOTH CELL PHONE N Com Bluetooth Kit MULTI is equipped with Bluetooth HSP Headset and HFP...

Page 17: ...uetooth kit MULTI 1 Make sure that Bluetooth Kit MULTI is turned off 2 Press the middle button on After the first 4 seconds the system turns on Keep this button pressed for an additional 4 seconds until the LEDs start to flash quickly and a sharp beep is heard indicating the affiliation mode 3 While the helmet is in affiliation mode search for the Bluetooth devices according to the procedure speci...

Page 18: ...the cell phone and it is not lost when the two devices are turned off As a result it needs to be carried out only once N B The N Com system can memorize various types of Bluetooth devices in addition to a helmet for interphone communication N Com will look for the last 3 affiliated devices in sequence and it will connect to the first available device If the device previously affiliated and connect...

Page 19: ...splay symbols vary depending on the phone used for examples earphones auto Bluetooth logo etc Connection occurs automatically when the system is turned on Nevertheless you can connect or disconnect from the helmet see the commands table below or from the cell phone Answering a call Press any button briefly when you hear the ring tone Hanging up rejecting a call To end a call or reject an incoming ...

Page 20: ...fer a call in progress from the helmet to the cell phone press both and buttons at the same time and keep them pressed for 2 seconds 6 BLUETOOTH INTERPHONE To use the N Com Bluetooth Kit MULTI as a wireless interphone both helmets the pilot s and the passenger s need to be fitted with the Bluetooth kit The Bluetooth Kit MULTI system allows pilot passenger wireless communication with all the N Com ...

Page 21: ...this is done 3 After a few seconds the helmets recognize one another a beep confirms the successful affiliation and the interphone communication is activated 4 Turn off both systems and turn them back on in order to store the affiliation data In the event that this operation is not successful turn off both helmets and repeat the operation starting from point 1 N B In case a cell phone was already ...

Page 22: ...kit MULTI to find the other system depending on the connections that may be already active and the Bluetooth devices already present After pressing the on button wait for the search to end N B If you turn on the pilot s helmet first or in any other situation in which the Bluetooth connection is lost simply press the on button briefly on one of the two systems to start the search and the connection...

Page 23: ...th A2DP profile has already been affiliated you do not have to repeat the affiliation since the A2DP protocol was already stored during the cell phone affiliation procedure When you first use it the telephone must be connected and the receiver started from the cell phone so that the system can recognize it 7 2 Operation with A2DP receiver When you first use it connect the receiver previously affil...

Page 24: ... Play Press the button and keep it pressed for 2 seconds beep Pause function Pause When the receiver is connected and playing music press the button and keep it pressed for 2 seconds beep Next track Skip When the receiver is connected and playing music press the button and keep it pressed for about 4 seconds beep Stop playing music Stop Turn off receiver Press the button and keep it pressed for 2 ...

Page 25: ... allow you to listen to different audio devices to be connected by means of the specific Multimedia Wire sold separately You can listen to an MP3 device or an FM radio You can also connect to a satellite navigation system to the audio system of your own motorcycle or to a radio for communication between two motorcycles The N Com Bluetooth Kit MULTI system can fit cables from the N Com range both t...

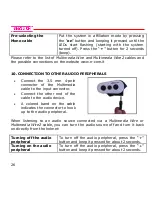
Page 26: ... connector of the Multimedia cable to the input connector Connect the other end of the cable to the audio device A colored band on the cable indicates the connector to hook up to the audio peripheral When listening to an audio source connected via a Multimedia Wire or Multimedia Wire2 cable you can turn the audio source off and turn it back on directly from the helmet Turning off the audio periphe...

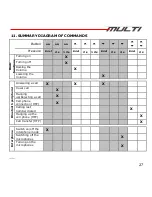
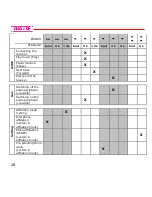
Page 27: ...f X Raising the Volume X Lowering the Volume X Bluetooth peripheral Answering a call X X X Vocal call X Hanging up Rejecting a call X Cell phone connection HFP X Calling last number dialed X Hanging up the cell phone HFP X Call transfer HFP X Interphone Switch on off the interphone mode X Switching off the microphones X Turning on the microphones X ...

Page 28: ...ause X Next track Forward X Disconnect the receiver X Aux Switching off the audio peripheral via cable X Switching on the audio peripheral via cable X Setting Affiliation mode setting X Interphone affiliation system in affiliation mode X Erase affiliations RESET system in affiliation mode X Pre selecting Mono cable system in affiliation mode X ...

Page 29: ...ced 12 2 Charging the battery Before using the N Com device for the first time recharge the battery completely for at least 10 hours To obtain best performances from the battery it is recommended to completely recharge the battery the first few times Afterwards you can recharge the battery for shorter periods Whenever possible it is best to recharge the battery completely Fig 11 Connect the batter...

Page 30: ... forfeiture of the warranty 13 LIMITED WARRANTY With this LIMITED WARRANTY CERTIFICATE Nolan warrants this Product to be free from defects in material and workmanship at the time of its original purchase by the buyer We invite you to Read the cautions pertaining to safety and proper use Read the warranty terms and conditions Keep the originals sales receipt This must be shown in case of repairs co...

Page 31: ...ain humidity food spillages or other liquids can result in damages to the N Com electronic devices damages for which Nolan shall not be responsible This warranty does not include those parts subject to wear and tear such as for example the rechargeable battery and the cables used for connection between the various N Com systems or between the N Com systems and other devices Since Nolan does not su...

Page 32: ...above PRIOR TO CONTACTING THE DEALER WE RECOMMEND THAT YOU READ CAREFULLY THE USER MANUAL ENCLOSED WITH THE PRODUCT AFTER 2 TWO YEARS FROM THE DATE OF PURCHASE THIS LIMITED WARRANTY IS VOID FOR ALL EFFECTS AND PURPOSES Repairs or maintenance under warranty do not extend the period of the warranty itself Therefore in case the product or one of its components is replaced this does not initiate a new...

Page 33: ...ights under the national jurisdiction in force or on the consumer s rights towards the dealer sanctioned by the purchase sale contract This warranty is valid throughout the European territory and it represents the only express warranty provided by Nolan in relation to the sale of its own products This warranty does not affect the rights to which the buyer is entitled and which are expressly provid...

Page 34: ... warranty covers only material and manufacturing defects Nolan cannot be held liable for damages to the product which are either wholly or partially attributable to any other cause including but not limited to a damage caused by improper use lack of due care normal wear and tear of internal and external components b scratches abrasions or other damage caused to the external parts of the N com by a...

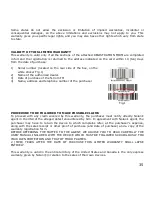
Page 35: ...of the purchaser Fig 1 PROCEDURE TO BE FOLLOWED TO MAKE POSSIBLE CLAIMS To proceed with any claim covered by this warranty the purchaser must notify directly Nolan s agent in the USA of the alleged defect encountered by him In agreement with Nolan s agent the purchaser may have to return the device to which complains refer at the purchaser s expense along with the sales receipt or other proof of p...

Page 36: ...he way of replacement the date of purchase of the original device remains the deciding factor For further information please contact the following address or telephone numbers CIMA INTERNATIONAL 1585 Beverly court Unit 118 Aurora IL 60502 Ph 630 701 1601 Fax 630 701 1606 E mail helmets aol com Toll free USA only 866 2helmet POUR LE CANADA CLARY SPORTS LOISIRS 67 ROUTE 329 ST DONAT QC J0T 2C0 CANAD...

Page 37: ...37 ...

Page 38: ...38 ...

Page 39: ...39 14 WARRANTY REGISTRATION FORM Product name Bluetooth kit MULTI Identification code Buyer s Information Name Last name Address Phone e mail Dealer s stamp Date of purchase ...

Page 40: ...Printed on recycled paper Bluetooth Kit MULTI 01 06 2016 16 40 00 ...

Reviews: