background image


7 of 8

www.NabcoEntrances.com

GT1505BumpOutConvenienceWindowInstallationManual

Rev. 12-15-17 

P/N C-00208

CHAPTER 7: ADJUST THE DRIVE BELT

Note: Adjust the Drive Belt only if it is too slack/too tight causing the Convenience Window not to open/close properly.

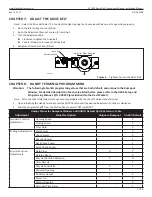
1. Go to the Idler Pulley. Loosen (2) Nuts.
2. Go to the Adjustment Bracket. Loosen (1) Jamb Nut.
3. Turn the Adjustment Bolt:


Clockwise to tighten the Drive Belt


Counter Clockwise to loosen the Drive Belt

4. Retighten (1) Jamb Nut and (2) Nuts.

Adjustment Bolt

DN 1819

Jamb Nut

Nut

Idler Pulley Slides Right/Le 

Figure 6 

Tighten/Loosen the Drive Belt

CHAPTER 8: HANDY TERMINAL PROGRAMMING

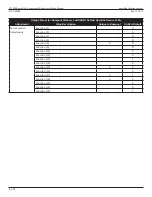
Attention:  The following table lists programming values that are both default, and unique to the Bumpout 

Window . For detailed description of each value listed below, please refer to the U30 E Setup and 

Programming Manual; P/N C-00203 (provided within the Decal Packet) .

Note: Extra Functions Adjustments settings are only available with the use of the Blue Handy Terminal.

1. Upon initializing the Handy Terminal, press the ENTRY button until the desired Adjustment Function is displayed.
2. Start the programming 

 Press the Shift buttons to select Y 

Press ENTRY

Unique Values for Bumpout Window  and NABCO Default Quick Reference Table

Adjustment

Value Description

Unique to Bumpout

NABCO Default

Standard Function 

Adjustment

Opening Speed

3

Closing Speed

2

Time Delay

2

Feeling Adjustments

Start Power

3

Check Power

6

Reaction Power

4

Back Check Speed

1

Latch Check Speed

1

Special Function 

Adjustments

Hold Close

N

Y

Holding Beam

Y

Recycle/Rotation Direction

Y

N

After Recycle

Y

Recycle Sensitivity

0

1

Reduced Opening

Y

-

Auxiliary Output

3

3

Power On

1

0

Manual Opening

0

Extended Time Delay

7

Summary of Contents for GT 1505

Page 1: ...rrective action can be achieved by a NABCO trained technician Failure to follow these practices may result in serious consequences NEVER leave a Window operating without all Safety detection systems o...

Page 2: ...the General Safety Recommendations Warning Labels contained in this manual Failure to do so may result in bodily injury or property damage Read study and understand the installation and operating ins...

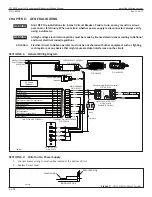
Page 3: ...xterior Activation BA 62 SLS M1 H M0 Holding Beam Interior Activation 12VDC Common 12VDC 6B 9DC12V 7 61 Mode Switch see Mode SW Usage shown left HANDY TERMINAL 6P RELATED DEVICES 16P To protect agains...

Page 4: ...n The Window Frame can also be secured to Rough Opening through the Header and at the Bottom Notice The GT 1505 Convenience Window is assembled at the NABCO Entrances Factory No disassembly is require...

Page 5: ...max 20 30V 30V 42 4Vpeak max Contact Output Class2 Load only N C N O 12VDC Common FUNCTION SLIDING DOOR SYMBOL No Reduced Opening Switch 7 6 5 4 3 2 1 Breakout Detector Sidelite Presence Sensor Exteri...

Page 6: ...epairs must be made by authorized NABCO facilities CAUTION Adjustments to the door can only be made with the NABCO Handy Terminal Mode SW Usage Gnd Gnd Gnd Open Open Open Gnd Open M0 M1 MODE TWO WAY O...

Page 7: ...escription of each value listed below please refer to the U30 E Setup and Programming Manual P N C 00203 provided within the Decal Packet Note Extra Functions Adjustments settings are only available w...

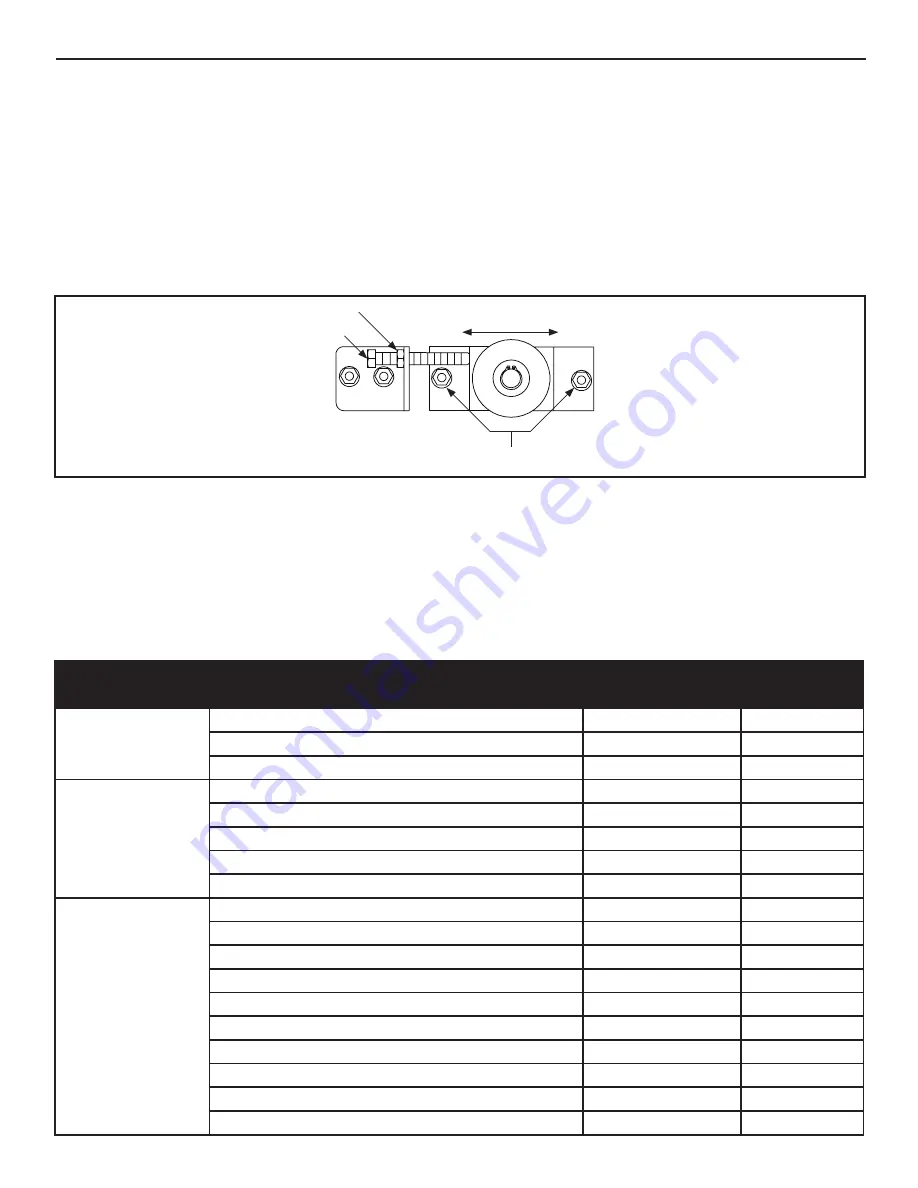
Page 8: ...fault Quick Reference Table Adjustment Value Description Unique to Bumpout NABCO Default Extra Function Function 1 N Adjustments Function 2 N Function 3 N Function 4 N Function 5 Y N Function 6 N Func...

Reviews: