2 of 5
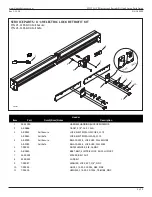
GT1175 U-19 Electric Lock Retrofit Kit Quick Setup Parts Guide
www.NabcoEntrances.com
P/N C-00299
Rev 2-15-18
SECTION 1: Retrofit the Belt Clip
Note: Electric Locks can not prevent Breakout. If preventing Breakout is deemed necessary, panic hardware must be fitted to
the Door Panels.
1.
Remove (2) 1/4-20 x 1 inch Hex Head screws used to secure the Belt Clip to the Belt Bracket. Save the spacers, screws and
lock washers for reinstallation.
a. Ensure the Belt Clip stays intact with the Belt, so the Belt does not lose Belt Tension.
2. Remove (2) 1/4-20 x 3/4 inch Hex Head screws used to secure the Belt Bracket to the Carrier. Save screws for reinstallation.
3. Obtain the Belt Clip Assembly provided within the Electric Lock Retrofit Kit.
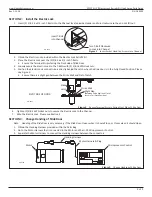
4. Review the Belt Clip Assembly to ensure the secured position will match
a. If necessary rotate the Latch so the Flat Side of Latch faces the Terminal Strip located on the Lock Assembly.
DN 0743
Flat Side of Latch
Terminal Strip
Terminal Strip
Flat Side of Latch
Figure 1
Proper Latch Orientation
5.
Secure the Belt Bracket to the Belt Clip with (2) 1/4-20 x 1 inch Hex Head screws, lock washers, and spacers that were saved
for reinstallation. Do not overtighten the screws.
a.
Ensure the Belt Clip is in the correct position (Top vs Bottom) as shown in
6. Secure the Belt Bracket to the Carrier with (2) 1/4-20 x 3/4 inch Hex Head screws that were saved for reinstallation. Do not
overtighten the screws.
Belt Clip Bo om
Terminal Strip
Belt Bracket Relay
Belt Clip Top
Terminal Strip
Belt Bracket
Relay
DN 0534
SINGLE SLIDE DOOR; RHFS, LHFO
BIPART SLIDE DOOR
Motor/Operator
U-19 & Earlier
Motor/Operator
U-19 & Earlier
Motor/Operator
U-19 & Earlier
Belt Clip Top
Belt Clip Top
11 11/16
11 11/16
8 5/16
SINGLE SLIDE DOOR; LHFS, RHFO
Figure 2
Belt Clip Location in Full Close Position


