background image


17 

DEFROSTING, CLEANING AND CARE 

THE  REFRIGERATOR  COMPARTMENT  DEFROSTS  AUTOMATICALLY.  Drops  of  ice  that  form  on  the 

back wall of the refrigeration compartment thaw during the time the compressor is not working and 

the thaw water runs down the thaw water runoff channel to the tray on top of the compressor, where 
it evaporates. 
REGULARLY CLEAN THE APPLIANCE. 

Remember  that  before  cleaning  the  appliance  body  you  must  disconnect  the 

appliance  from  the  electrical  energy  supply  socket  by  pulling  the  plug  out  of  the 
electricity outlet. 


Clean  the  appliance  inner  surfaces  with  warm  soapy  water.    Dishwashing  detergent  may  also  be 

used. Wipe dry inner and outer surfaces. 


Regularly clean the hermetic gaskets of the doors.  Wipe dry. 


At least once a year clean dust away from the back part of the appliance body 

and the compressor.  A soft brush, electrostatic cloth or vacuum cleaner may be 
used for cleaning.  


REGULARLY  CLEAN  THE  THAW  WATER  CHANNEL  SPACE  WITH  A  SPECIAL 

CLEANER FOR THAT PURPOSE. 


DO NOT use detergents  containing abrasive particles, acid, alcohol or benzene 
for  cleaning  the  appliance  inner  and  outer  surfaces.  DO  NOT  use  for  cleaning 

cloths or sponges that have coarse surfaces intended for scrubbing..


CHANGING THE OPENING DIRECTION OF THE DOORS 

It is  recommended that changing the opening direction of the doors should be done with a helper. 

You will need two spanners No. 8 and No. 10 and a Philips head screwdriver. 
When changing the opening direction of the doors, YOU CAN NOT lay the refrigerator horizontally! 

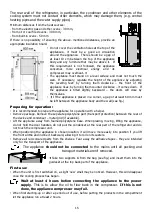
Do the actions below in the order they are listed (see fig. 2, page 2). 

WARNING! Turn off the appliance and pull the plug out of the electricity supply socket. 

1.


Remove  the  covers

  c

  from  the  body  of  the  refrigerator  and  of  the  inner  side  of  the  door.  Also 

remove the upper bracket 

6

 together with the nut and washers and the spacer under the bracket. 

2.


Remove the door of the refrigerator compartment.  

3.


Remove the bottom cover 

1

4.


Unscrew the axle 

2

 from the bottom bracket 

7

 and put it together with all washers on the other 

cabinet side by screwing to the bracket 

7

 on the opposite side symmetrically  to former position.  

5.


Hang the door on the axle 

of bracket 

7

6.


Turn  bracket 

4

  around  180°  together  with  the  washers  on  the  axle  and  the  plastic  spacer, 

transferring the washers to the  axle on the other side of the bracket. Once the bracket is attached 
to the freezer compartment door, fix it in place on the   other side of the refrigerator. 

7.


Turn  the  bracket 

6

  around 180° together  with  the  washers  on  the  axle  and  the  plastic  spacer. 

Remove the axle and the washers and reattach them on the other side of the bracket. Once the 
bracket 

is attached to the refrigerator compartment door, fix it in place on the other side of the 

refrigerator in the uppermost apertures. Use the covers 

c

 to cover the bracket and the remaining 

space. 

8.


Remove the bolt covers 

a

 and the stoppers 

b

. Remove the screws that hold the handle in place. 

Move the handle to the other side and screw them in place. Place the stoppers into the remaining 

apertures in the door, and put the screw caps in place. 

9.


Remove the cover 

10

 from the bottom cover 

1

 and insert it to the guides on the other side of the 

bottom cover (symmetrically to former position). Insert left and right legs of the bottom cover 

1


(see pic. 2) and push it until cover fixing. 


Summary of Contents for FK 2610

Page 1: ...FK 2610 FK 2650 FK 3080 Kühlschrank DE Gebrauchsanweisung Refrigerator GB Instructions for use ...

Page 2: ...1 ...

Page 3: ...rn Für Gäste in Hotels Motels Pensionen und anderen wohnungsähnlichen Räumlichkeiten SICHERHEITSHINWEISE Allgemeine Sicherheitsanforderungen WARNUNG Belüftungsöffnungen der Geräteverkleidung oder des Aufbaus nicht mit Einbaumöbeln verschließen Es muss eine ausreichende Luftzirkulation gewährleistet sein WARNUNG Zum Beschleunigen der Abtauung keine anderen mechanischen Einrichtungen oder sonstigen ...

Page 4: ...oder den Stecker ziehen lassen Kinder nicht mit der Verpackung spielen lassen Das Gerät kann von Kindern ab 8 Jahren sowie von Personen mit reduzierter physischen sensorischen oder mentalen Fähigkeiten oder Mangel an Erfahrung und oder Wissen benutzt werden wenn siebeaufsichtigt oder bezüglich des sicheren Gebrauchs des Gerätes unterwiesen wurden und die daraus resultierenden Gefahren verstanden h...

Page 5: ...t entfernt werden Wenn ihr Gerät über eine eingebaute innenbeleuchtung mit leuchtdioden led verfügt und diese nicht funktioniert wenden sie sich bitte an den wartungsservice um sie auswechseln zu lassen Die beleuchtung darf nur von fachleuten des wartungsservice ausgwechselt werden Sind Reparaturen oder Eingriffe am Gerät erforderlich müssen diese von einem autorisierten Kundendienst durchgeführt ...

Page 6: ... in einem trockenen gut belüfteten Raum in dem die Umgebungstemperatur mit der Klimaklasse übereinstimmt die auf dem Typenschild des Geräts angegeben ACHTUNG Der Gerät darf nicht in ungeheizten Räumen oder auf dem Balkon betrieben werden Das Gerät nicht in unmittelbarer Nähe einer Heizquelle Kochherd Heizkörper direkte Sonneneinstrahlung aufstellen Der Gerät darf nicht in Kontakt mit Heizungs Gas ...

Page 7: ...f den Rädchen leicht an den gewünschten Platz rollen Entfernen Sie alle roten Teile von den Ablageflächen ANMERKUNG Beim Öffnen der Gefrierschranktür fällt ein rotes Kleinteil heraus DIESES WIRD NUR FÜR DEN TRANSPORT BENÖTIGT Nehmen Sie die zwei Streben 1 und setzen Sie diese in die Führungen 2 im oberen Teil der Rückwand ein Das Gerät nicht ans Netz anschließen ohne vorher alle Verpackungs und Tr...

Page 8: ...ickles Butter und Marmelade 2 Mittlerer Bereich des Kühlschrankfachs kalter Bereich Zum Lagern von Käse Milch Milchprodukten Feinkost Joghurt 3 Unterer Bereich des Kühlschrankfachs kältester Bereich Zum Lagern von Aufschnitt Desserts Fleisch und Fisch Käsekuchen frischen Nudeln saurer Sahne Pesto Tomatensoße hausgemachten Speisen Tortencreme Pudding und Frischkäse 4 Obst Gemüsefach am Boden des Kü...

Page 9: ...NNE MIT DEM DAFÜR VORGESEHENEN REINIGUNGSINSTRUMENT Für die Innen und Außenreinigung KEINE körnigen säure alkohol oder benzinhaltigen Putzmittel verwenden Bei der Reinigung KEINE Scheuerlappen oder Schwämme mit rauer Oberfläche verwenden TÜRANSCHLAG Abb 2 siete 1 Bei Bedarf kann die Tür von Rechts auf Linksanschlag geändert werden Zur Vermeidung von Personen und Sachschäden den Wechsel des Türansc...

Page 10: ...nd waagrecht steht Zur Regulierung bedienen Sie sich der vorderen Stützfüße des Geräts Überprüfen Sie ob zwischen dem Kühlschrank und anderen Möbeln oder den Teilen an der Hinterseite des Geräts und der Wand ein Zwischenraum ist Ziehen Sie den Kühlschrank weg von den Möbeln oder der Wand Überprüfen Sie ob die lauteren Geräusche nicht von Flaschen Dosen Geschirr im Kühlschrank stammen die sich gege...

Page 11: ...hlkreislaufes bis zur fachgerechten Entsorgung nicht beschädigt werden dürfen Machen Sie ausgediente Altgeräte vor der Entsorgung unbrauchbar Ziehen Sie den Netzstecker aus der Steckdose Trennen Sie den Stecker vom Netzkabel Entfernen oder zerstören Sie evtl vorhandene Schnapp und Riegelschlösser Dadurch verhindern Sie dass sich spielende Kinder im Gerät einsperren Erstickungsgefahr oder in andere...

Page 12: ...andort des Gerätes ab Nutzinhalt Kühlteil in Liter 267 267 308 Frostfrei Kühlteil ja ja ja Klimaklasse N T N T N T Umgebungstemperatur in C 16 43 16 43 16 43 Luftschallemissionen dB A re1 pW 41 41 41 Abmessungen H x B x T in cm 145 x 60 x 65 145 x 60 x 65 163 x 60 x 65 Einbaugerät Gewicht des Gerätes kg 50 50 52 Elektrische Daten siehe Typenschild ANMERKUNG Der Hersteller behält sich das Recht vor...

Page 13: ...Do not damage the appliance refrigeration system WARNING Do not use electrical appliances inside the food storage compartments of the appliance unless they are of the type recommended by the manufacturer WARNING When positioning the appliance ensure the supply cord is not trapped or damaged WARNING Do not locate multiple portable socket outlets or portable power supplies at the rear of the applian...

Page 14: ...ocket by which the appliance is connected to the mains should be in an accessible place It is a legal requirement that the appliance is properly earthed The manufacturer will not be held liable for any damage or injury which may result from the failure to fulfil this requirement To avoid the exposure to danger always have faulty cable be replaced only by the manufacturer by our customer service or...

Page 15: ...of plastic parts Do not place any dishes with liquids on top of the appliance and do not keep flowers in vases or other liquid filled vessels on the appliance Do not place heavy objects on the top of the appliance Do not use water spray and steam to clean the appliance The appliance should be transported in the vertical position The manufacturer will not be responsible for any damage of the applia...

Page 16: ...wall see fig Preparing for operation It is recommended to prepare the appliance for operation with a helper Remove package Remove the separate polystyrene part transport protection between the rear of the device and condenser metal grid if available Lift the appliance away from foamed polystyrene base When placing moving lifting the appliance do not hold the door handles do not pull the condenser ...

Page 17: ...are as follows 1 Upper area of the refrigerator compartment door temperature zone Store tropical fruit cans drinks eggs sauces pickles butter jam 2 Middle area of the refrigerator compartment cool zone Store cheese milk dairy food deli food yoghurt 3 Lower area of the refrigerator compartment coldest zone Store cold cuts desserts meat and fish cheesecake fresh pasta sour cream pesto salsa home coo...

Page 18: ...ted see fig 2 page 2 WARNING Turn off the appliance and pull the plug out of the electricity supply socket 1 Remove the covers c from the body of the refrigerator and of the inner side of the door Also remove the upper bracket 6 together with the nut and washers and the spacer under the bracket 2 Remove the door of the refrigerator compartment 3 Remove the bottom cover 1 4 Unscrew the axle 2 from ...

Page 19: ...re the appliance stands and if possible remove the cause of the humidity Remarks on the appliance operating noise As the appliance operates and goes through the freezing cycle various noises will be emitted This is normal and is not a sign of any malfunction As the refrigerant circulates around the refrigeration system it causes sounds like murmuring bubbling or rustling Louder sounds like popping...

Page 20: ...gerating appliance category 1 Refrigerating appliance with one or more fresh food storage compartments Energy efficiency classification A A A Energy consumption in kWh year 133 104 138 The actual consumption depends on the pattern of use and the location of the appliance Usable capacity Refrigerator litres 267 267 308 Frost free refrigeration unit yes yes yes Climate classification N T N T N T Amb...

Reviews: