background image

EN - 14

4.  USE OF PRODUCT

4.1 

hob ControlS

Induction Zone

The information given in the following table 

is for guidance only.

Settings

Use for

0

Element off

1-3

Delicate warming

4-5

Gentle simmering, slow warming

6-7

Reheating and rapid simmering

8

Boiling, saute and searing

9

Maximum heat

P

Boost function

Cookware 

• 

Use thick, flat, smooth bottomed 

good quality cookware made of steel, 

enamelled steel, cast iron or stainless 

steel. The quality and composition of the 

cookware has a direct effect on cooking 

performance. 

• 

Do not use concave or convex bottomed 

cookware. Cookware made from 

aluminium and stainless steel with non-

ferromagnetic bottom, glass, copper, 

brass, ceramic, porcelain are unsuitable 

for induction heating.

• 

To check if the cookware is suitable 

for induction cooking you can hold a 

magnet to the base of the cookware. 

If the magnet sticks, the cookware is 

generally suitable or you can put little 

water in the cookware on a cooking 

zone set at maximum level. The water 

must heating at a few seconds.

• 

When using certain pans, you may hear 

various noises coming from them, this is 

due to the design of the pans and does 

not affect the performance or safety of 

the hob.

• 

To achieve the best cooking 

performance, the pan should be placed 

in the center of the cooking zone.

• 

 symbol flashes when the power level 

is selected in cooking zone display if 

unsuitable pan or no pan is placed on 

the cooking zone. The cooking zone will 

switch off automaticaly after 2 minutes.

• 

If a suitable pan is placed on the 

cooking zone   symbol will disappear 

and  cooking  continues at the selected 

power level.

• 

To obtain best energy transferring the 

diameter of the cookware base should 

match that of the cooking zone.

• 

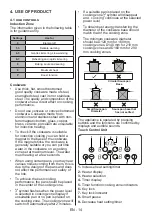
The minimum cookware diameter 

should be D120 mm for 160 mm 

cooking zones, D140 mm for 210 mm 

cooking zones and D160 mm for 290 

mm cooking zones.

Circular Saucepan 

Base

Small Saucepan 

Diameter

Saucepan base that 

has not settled

The appliance is operated by pressing 

buttons and the functions are confirmed by 

displays and audible sounds.

Touch Control Unit

1

2

4

3

5

6 7

8

9

10

11

12

1-

 Increase heat setting/timer

2-

 Heater display

3-

 Heater selection

4-

 Timer display

5-

 Timer function cooking zone indicators 

6-

 Key lock 

7-

 Key lock indicator 

8-

 Smart pause

9- 

Decrease heat setting/timer

Summary of Contents for KFI 6010

Page 1: ...Kochfeld Gebrauchsanweisung DE KFI 6010 EN Hob User Manual SL Kuhalna plo a Uporabni ki priro nik...

Page 2: ...e Gebrauchsanweisung vor der ersten Benutzung des Ger ts aufmerksam durch und bewahren Sie sie sorgf ltig auf Symbol Typ Bedeutung WARNUNG Gefahr von schweren Verletzungen oder Lebensgefahr GEFAHR EIN...

Page 3: ...n und Vorbereitung f r den Gebrauch 11 2 1 Hinweise f r den Installateur 11 2 2 Einbauen des Kochfeldes 11 2 3 Elektrischer Anschluss und Sicherheitshinweise 13 3 PRODUKTMERKMALE 14 4 Verwenden des Pr...

Page 4: ...en mit eingeschr nkten k rperlichen sensorischen oder geistigen F higkeiten bzw mit mangelnder Erfahrung oder mangelnden Kenntnissen verwendet werden sofern diese unter Aufsicht handeln oder hinsichtl...

Page 5: ...oder Topfdeckel auf die Oberfl che des Kochfelds da diese hei werden k nnen Schalten Sie bei Induktions Kochfeldern die Kochzone stets anhand des Einstellknopfes aus Verlassen Sie sich nicht auf die T...

Page 6: ...asart und Gasdruck im Gasversorgungsnetz und oder Spannung und Frequenz des Stromnetzes kompatibel zu den technischen Daten des Ger tes sind Die technischen Daten f r dieses Ger t sind auf dem Typensc...

Page 7: ...n Nehmen Sie den Herd erst in Betrieb nachdem er vollst ndig installiert wurde Das Ger t darf nur von einem autorisierten Techniker installiert werden Der Hersteller ist nicht haftbar f r Sch den die...

Page 8: ...sehr hohen Temperaturen in Brand geraten Gie en Sie niemals Wasser in brennendes Fett oder l Schalten Sie stattdessen den Herd aus und decken Sie die Pfanne mit ihrem Deckel oder einer Feuerdecke zu...

Page 9: ...den Entfernen Sie nicht die Einstellkn pfe um das Bedienfeld zu reinigen Um einen ordnungsgem en Betrieb sowie die gr tm gliche Sicherheit f r Ihr Ger t sicherzustellen empfehlen wir stets Original Er...

Page 10: ...11 65 EU ROHS entspricht Die vollst ndige EU Konformit tserkl rung finden Sie unter https content nabo at Dieses Ger t wurde ausschlie lich f r das Kochen zu Hause ausgelegt Jegliche andere Verwendung...

Page 11: ...beim Neukauf eines Das Symbol der durchgestrichenen Abfalltonne auf R dern auf dem Produkt oder seiner Verpackung bedeutet dass das Ger t nicht im Hausm ll entsorgt werden darf sondern eine separate...

Page 12: ...usw befinden die in Brand geraten k nnten Die Arbeitsplatte und M bel die das Ger t umgeben m ssen aus Materialien gefertigt sein die Temperaturen von ber 100 C standhalten k nnen Wenn ber dem Ger t e...

Page 13: ...A C C1 H G Das mitgelieferte einseitig selbstklebende Dichtband umlaufend um die Unterkante der Kochfeldoberfl che herum aufkleben Dabei nicht dehnen Selbstklebendes Dichtband Befestigungsklammer Arb...

Page 14: ...erden Bei einem falsch ausgef hrten Anschluss kann das Ger t besch digt werden Ein besch digtes Netzkabel darf nur von einer qualifizierten Fachkraft ausgetauscht werden Keine Adapter Mehrfachsteckdos...

Page 15: ...ODUKTMERKMALE Wichtig Die Merkmale der einzelnen Produkte k nnen sich unterscheiden und Ihr Ger t sieht m glicherweise anders aus als auf den Abbildungen Liste der Komponenten 1 Induktionszone 2 Bedie...

Page 16: ...Kochgeschirr und stellen es auf eine maximal aufgedrehte Kochplatte Das Wasser muss sich in wenigen Sekunden erw rmen Bei der Nutzung bestimmter Pfannen erzeugen diese vielleicht diverse Ger usche Die...

Page 17: ...n erl schen W hlen Sie die Kochstufe aus indem Sie auf die Tasten zum Erh hen Verringern der Kochstufe dr cken Die Kochzone ist nun betriebsbereit W hlen Sie f r k rzere Kochzeiten die gew nschte Koch...

Page 18: ...ufe Das Ger t kann nur ausgeschaltet werden Aktivieren Sie die Tastensperre indem Sie die entsprechende Taste mindestens 2 Sekunden lang dr cken Das Setzen der Sperre wird mit einem akustischen Signal...

Page 19: ...Sie das Kochfeld ein indem Sie erneut auf die Taste dr cken und verwenden Sie das Kochfeld weiter Wenn derselbe Fehler erneut angezeigt wird wenden Sie sich an einen autorisierten Kundendienst E4 Die...

Page 20: ...Stahl bestimmt sind da sie das Glas besch digen k nnen Falls im Boden oder in der Beschichtung von Kochgeschirr Substanzen mit einem geringen Schmelzpunkt verwendet werden k nnen diese die Glaskeramik...

Page 21: ...n Sie die Kindersicherung Die T pfe erzeugen Ger usche beim Kochen oder das Kochfeld gibt Klickger usche ab Dies ist normal bei Kochgeschirr f r Induktions Kochfelder Die Ger usche entstehen bei der E...

Page 22: ...ieverbrauch 3 Wh kg 182 0 Heiztechnologie 4 Induktion Gr e 4 cm 21 0 Energieverbrauch 4 Wh kg 182 0 Energieverbrauch des Kochfeldes Wh kg 182 0 Dieses Kochfeld stimmt mit EN 60350 2 berein Energiespar...

Page 23: ...uf hin dass Sie f r die L schung personenbezogener Daten auf dem zu entsorgenden Ger t selbst verantwortlich sind Entsorgung Das Symbol der durchgestrichenen Abfalltonne auf R dern auf dem Produkt ode...

Page 24: ...TION Injury or property damage risk IMPORTANT NOTE Operating the system correctly Thank you for choosing this product This User Manual contains important safety information and instructions on the ope...

Page 25: ...nance 8 2 INSTALLATION AND PREPARATION FOR USE 10 2 1 Instructions for the Installer 10 2 2 Installation of the Hob 10 2 3 Electrical Connection and Safety 12 3 PRODUCT FEATURES 13 4 USE OF PRODUCT 14...

Page 26: ...f they have been given supervision or instruction concerning use of the appliance in a safe way and understand the hazards involved Children should not play with the appliance Cleaning and user mainte...

Page 27: ...r separate remote control system Do not use harsh abrasive cleaners or scourers to clean oven surfaces They can scratch the surfaces which may result in shattering of the door glass or damage to surfa...

Page 28: ...ord is not trapped or damaged during installation If the supply cord is damaged it must be replaced by the manufacturer its service agent or similarly qualified persons in order to prevent a hazard Pl...

Page 29: ...ise during operation therefore a board must be installed underneath the product 1 3 During Use Do not put flammable or combustible materials in or near the appliance when it is operating Do not leave...

Page 30: ...he mains before carrying out any cleaning or maintenance operations Do not remove the control knobs to clean the control panel To maintain the efficiency and safety of your appliance we recommend you...

Page 31: ...chine This symbol on the product or on its packaging indicates that this product should not be treated as household waste Instead it should be handed over to the applicable collection point for the re...

Page 32: ...aterials in the close vicinity such as curtains oil cloth etc which may catch fire The worktop and furniture surrounding the appliance must be made of materials resistant to temperatures above 100 C I...

Page 33: ...D E T C2 A C C1 H G Apply the supplied one sided self adhesive sealing tape all the way around the lower edge of the cooktop Do not stretch it Self adhesive sealing tape Worktop mounting bracket Scre...

Page 34: ...stallation please ensure that isolated cables are used An incorrect connection could damage your appliance If the mains cable is damaged and needs to be replaced this should be done by a qualified per...

Page 35: ...3 PRODUCT FEATURES Important Specifications for the product vary and the appearance of your appliance may differ from that shown in the figures below List of Components 1 Induction zone 2 Control Pane...

Page 36: ...hear various noises coming from them this is due to the design of the pans and does not affect the performance or safety of the hob To achieve the best cooking performance the pan should be placed in...

Page 37: ...Indicator The residual heat indicator indicates that the glass ceramic area has a temperature that is dangerous to touch After switching off the cooking zone the respective display will show H until t...

Page 38: ...dependent timer can be programmed for every cooking zone Select a cooking zone then select the temperature setting and finally activate the timer setting button the timer can be programmed to switch o...

Page 39: ...E5 Internal temperature of the hob is too high switch the hob off by pressing and let the heaters cool down E6 Communication error between the touch control and heater Call an authorised service agent...

Page 40: ...erials meant for steel as they may damage the glass If substances with a low melting point are used in the cookware s base or coatings they can damage the glass ceramic cooktop If plastic tin foil sug...

Page 41: ...during cooking or your hob makes a clicking sound during cooking This is normal with induction hob cookware This is caused by the transfer of energy from the hob to the cookware This is normal There i...

Page 42: ...vi materiali SVARILO Tveganje za po kodbo ali po kodbo lastnine POMEMBNO OPOMBA Pravilno upravljanje sistema Hvala ker ste izbrali ta izdelek Ta uporabni ki priro nik vsebuje pomembne varnostne inform...

Page 43: ...zdr evanjem 8 2 NAMESTITEV IN PRIPRAVA ZA UPORABO 10 2 1 Navodila za monterja 10 2 2 Namestitev kuhalne plo e 10 2 3 Elektri na povezava in varnost 12 3 LASTNOSTI IZDELKA 13 4 UPORABA IZDELKA 14 4 1 G...

Page 44: ...nanja e so pod nadzorom ali so prejele navodila za varno uporabo naprave in razumejo vpletena tveganja Otroci se z napravo ne smejo igrati Otroci ne smejo opravljati i enja ali vzdr evanja naprave bre...

Page 45: ...jim asovnikom ali lo enim sistemom za daljinski nadzor Za i enje povr in pe ice ne uporabljajte abrazivnih istil saj lahko opraskajo povr ino kar lahko povzro i razbitje steklenih vrat ali po kodbo po...

Page 46: ...ra zamenjati proizvajalec serviser ali podobna usposobljena oseba da bi se izognili tveganjem Otroci in ivali naj se ne pribli ujejo napravi Kadar je indukcijska kuhalna plo a v uporabi v bli ini ne i...

Page 47: ...ed delovanjem v napravo ali v bli ino naprave ne dajajte vnetljivih ali gorljivih materialov tedilnika ne pustite nenadzorovanega medtem ko kuhate s trdo ali teko o ma obo Pri mo nem segrevanju se lah...

Page 48: ...evanja poskrbite da bo naprava izklopljena iz omre ja Ne odstranite kontrolnih gumbov da bi o istili nadzorno plo o Da bi ohranili u inkovitost in varnost naprave vam priporo amo da vedno uporabljate...

Page 49: ...elom Odlaganje stare naprave Ta simbol na izdelku ali embala i ozna uje da z izdelkom ne smete ravnati kot z obi ajnimi gospodinjskimi odpadki Predati ga morate na ustrezno zbiralni mesto za reciklira...

Page 50: ...vese olja krpe itd ki hitro zagorijo Delovna povr ina in pohi tvo ki obkro a napravo mora biti izdelano iz materialov ki so odporni na temperature nad 100 C e je nad napravo name ena napa ali kuhinjsk...

Page 51: ...NA PLO Aa B D E T C2 A C C1 H G Prilo en enostranski samolepilni tesnilni trak namestite okoli celotnega spodnjega roba tedilnika Ne raztegujte ga Samolepilni tesnilni trak Nosilec za namestitev delov...

Page 52: ...rane kable Nepravilna priklju itev lahko po koduje napravo e je omre ni kabel po kodovan in ga je treba zamenjati mora to opraviti usposobljena oseba Ne uporabljajte adapterjev ve vti nic in ali podal...

Page 53: ...LASTNOSTI IZDELKA Pomembno Specifikacije za izdelek se razlikujejo in videz va e naprave se lahko razlikuje od naprave prikazane na slikah v nadaljevanju Seznam delov 1 Obmo je indukcije 2 Nadzorna pl...

Page 54: ...delu posode e se magnet prime je posoda za kuhanje na splo no primerna ali pa vanjo nalijte malo vode jo postavite na obmo je za kuhanje in ga nastavite na najve jo mo Voda se mora segreti v nekaj se...

Page 55: ...vrenja izberite eleno stopnjo kuhanja nato se dotaknite gumba P da aktivirate funkcijo oja itve Izklop obmo ij kuhanja Izberite element ki ga elite izklopiti s pritiskom za izbiro grelnika Z gumbom na...

Page 56: ...lagoditveno obmo je je med 0 in 99 minut e se v 10 sekundah prikazan as ne prilagodi se nastavi asovnik minutnega pomnilnika in utripajo a pika izgine Ko je asovnik nastavljen za ne od tevati as Ko as...

Page 57: ...daljujte z uporabo e se napaka znova prika e izklopite in vklopite vti naprave Vklopite grelno plo o s pritiskom na in nadaljujte z uporabo e se napaka znova prika e pokli ite poobla enega serviserja...

Page 58: ...s suho krpo Ne uporabljajte istilnih materialov namenjenih kovini saj lahko po kodujejo steklo e se v dnu ali prevlekah posode uporabljajo snovi z nizkim tali em lahko po kodujejo steklokerami no kuh...

Page 59: ...ep za otroke je vklju en Izklopite zaklep za otroke Med kuhanjem kozice povzro ajo hrup oziroma va a plo a med kuhanjem oddaja klikajo i zvok To je normalno za posodo ki je primerna za uporabo na indu...

Page 60: ...o skladnosti lahko prenesete s spletnega mesta www nabo at Vertrieben durch BAYTRONIC HandelsgmbH Harterfeldweg 4 A 4481 Asten office baytronic at Die vollst ndige Konformit tserkl rung finden Sie un...

Reviews: