background image

TEMPERATURE ADJUSTMENT SETTING

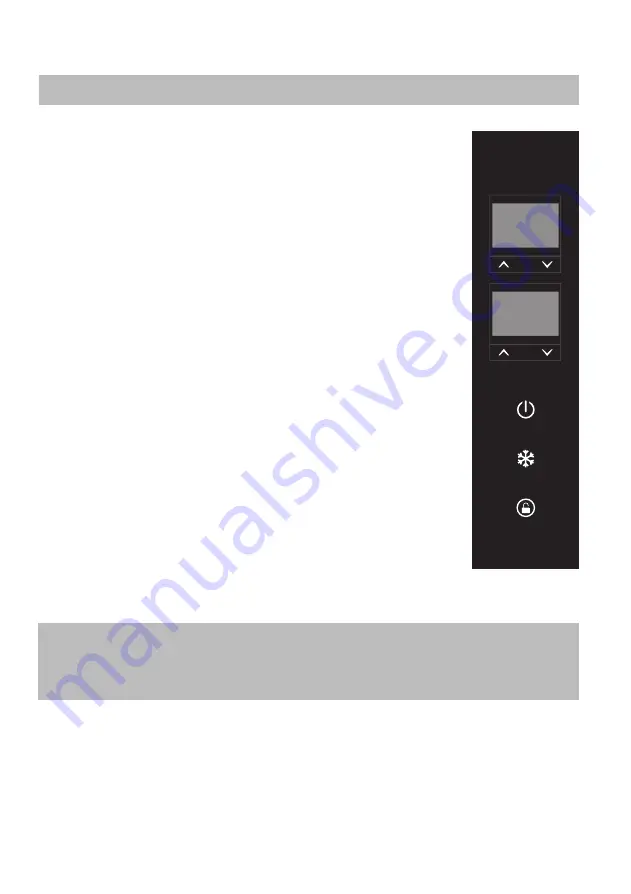
ON/OFF

1.Press and hold [on/off] to turn on/off the fridge.


● The partition plate is placed in place, the refrigerator works in the normal two-box mode, and both 

   displays are displayed.

● The divider is in the state of being drawn out. The refrigerator enters the single box mode to work.

12

2.Press [

 /

] to adjust the preset temp of left or right cabinet.

   Press and hold [

 /

] to adjust the temp linearly.

3.The left cabinet has a prior refrigeration, which requires that the temperature 
   of the left box must be lower than that of the right one. E.g. when the 
   temperature of the left cabinet is set as 10

, that of the right one cannot be 

   set higher.

4.When the temperature of the left cabinet is to be adjusted, restricted by the 
   right, the temperature of the right cabinet is supposed to be higher or equal 
   to that of the left. E.g. when the temperature of the right is -5

, if that of the

   left is to be set as 0

, the temp of the right cabinet should be adjusted 

   higher or equal to 0

.

5.Press [left fast-cooling] and enter the left cabinet fast-cooling mode, in which 
   the [fast-cooling] press will change from white into blue. After 15mins, the  
   fridge will be restored to L/R mode (if pressing again during the 15mins, the 
   fridge will be restored to L/R mode immediately).

6.The instruction display will be locked if the presses are not in use for 90s. 
   In locked state, the [unlock] press will keep lighting and other presses stop 
   working. Only when pressing and holding [unlock] for 3s till all the presses 
   light can they work again. [on/off] works all the time despite [unlock] press.

Summary of Contents for KM 200

Page 1: ...MODELL KM 200 Lesen Sie die Bedienungsanleitung vor der Inbetriebnahme Ihrer Kühlgefrierbox durch Bedienungsanleitung und Produktspezifikationen Bedienungsanleitung User Manual ...

Page 2: ......

Page 3: ...wie möglich die der Deckel geöffnet ist Das Netzkabel darf nur durch qualifiziertes Technikpersonal oder von durch den Hersteller autorisierten Stellvertretern innen ersetzt werden Trennen Sie die Kühlgefrierbox immer von der Stromversorgung bevor Sie Wartungsarbeiten durchführen Dieses Gerät ist für die Benutzung beim Camping geeignet ACHTUNG Blockieren Sie nicht die Lüftungsöffnungen im Gerät od...

Page 4: ...ngsring Innenfach HAUPTKOMPONENTE DES GERÄTS DATENBLATT MODELL KM 200 Außenabmessung L x B x H Nettogewicht Nennleistung Versorgungsspannung Temperatureinstellung Kältemittelgas Isolierung Material der Verkleidung 10 8 kg 50 W 12 24 V DC 18 C bis 10 C CFC freies R134a Cyclopentan ABS Kunststoff 570 x 320 x 315 mm 570 mm 320 mm 315 mm ...

Page 5: ...NG Für eine optimale Leistung und beste Effizienz ist es wichtig dass die Kühlgefrierbox an einer zuverlässigen und durch eine 15 A Sicherung abgesicherten DC Stromversorgung angeschlossen ist Empfehlenswert ist der direkte Anschluss an die Batterie um die Gefahr eines Spannungsabfalls zu verringern Hinweis Beziehen Sie sich für den Anschluss des Stromkabels auf die vorstehenden Bilder 12 24 V DC ...

Page 6: ... auf 0 C einstellen möchten dann müssen Sie zuerst für das rechte Fach eine Temperatur 0 C einstellen bevor Sie für das linke Fach 0 C einstellen können 5 Wenn Sie die Schockkühlen links Taste antippen dann wechselt das linke Fach in den Schockkühlmodus und die Farbe der Schockkühl Taste wechselt von Weiß nach Blau Nach 15 min wechselt die Kühlgefrierbox wieder in den Zweikammermodus wenn innerhal...

Page 7: ...cht die App nach verfügbaren Kühlgeräten und startet den Hilfeassistenten wenn sie sich mit Ihrer Kühlgefrierbox verbindet Temperatursteuerung Sie können die Temperatur durch Verschieben des Schiebereglers im Bereich von 18 10 C einstellen C F Umschalter Sie können durch Verschieben oder Antippen des Umschalters zwischen C und F Anzeige umschalten Batterieschutzmodus Sie können durch Verschieben o...

Page 8: ...rierbox steht im KFZ nicht sicher Die Kühlgefrierbox berührt eine Wand oder andere Gegenstände Interne Teile sind lose oder abgefallen Frost auf der Oberfläche der Kühlgefrierbox Wenn die Luftfeuchtigkeit der Umgebung mehr als 75 beträgt dann bildet sich auf der Geräteoberfläche eine leichte Frostschicht die eine normale Erscheinung ist HILFREICHE TIPPS Wenn Ihre Kühlgefrierbox nicht oder nicht or...

Page 9: ...n Fächern geringer als bei nur zur Hälfte gefüllten Fächern Wenn die Fächer gefüllt sind dann ist die kalte Luft zwischen den Nahrungsmitteln eingeschlossen wodurch die Kälte der Luft nicht abgegeben werden kann und erhalten bleibt Während einer Tour ist es empfehlenswert den durch verbrauchte Nahrungsmittel entstandenen Freiraum mit Wasserflaschen o ä zu füllen Dadurch verringert sich der Freirau...

Page 10: ...lständige Konformitätserklärung finden Sie unter www nabo at Entsorgung Dieses Gerät nicht im unsortierten Hausmüll entsorgen An einer ausgewiesenen Sammelstelle für Elektro und Elektronik Altgeräte entsorgen Dadurch tragen Sie zum Schutz der Ressourcen und der Umwelt bei Für weitere Fragen wenden Sie sich bitte an Ihren Händler oder an die örtlichen Behörden Importeur Hersteller baytronic Handels...

Page 11: ...zed by the manufacturer Before carrying out any maintenance operations on the refrigerator disconnect the power cable from the plug This appliance is suitable for camping use WARNING Keep ventilation openings in the appliance enclosure or in the built in structure clear of obstruction WARNING Do not use mechanical devices or other means to accelerate the defrosting process other than those recomme...

Page 12: ...Temperature setting 10 to 18 Refrigerant gas R134a CFC Free Insulation C pentane Shell material ABS 570x320x315mm ventilation of compressor Cable connection Fuse Digital LCD display Touch control panel Built in handle Sealing ring Inner cabinet SKETCH MAP OF MAIN PARTS DATA SHEET 570 mm 320 mm 315 mm ...

Page 13: ...car Car Boot or auto seat 3 Put the power cable well according to the interior decorated of car and connect the cigarette lighter plug to the cigarette lighter hole 4 Press the button ON OFF for 3 seconds then the refrigerator starts to work Remark DC Power cable Connect the car cigarette lighter Connect the car refrigerator You can refer to the above pictures to connect the power cable 12V 24V DC...

Page 14: ... the left cabinet is to be adjusted restricted by the right the temperature of the right cabinet is supposed to be higher or equal to that of the left E g when the temperature of the right is 5 if that of the left is to be set as 0 the temp of the right cabinet should be adjusted higher or equal to 0 5 Press left fast cooling and enter the left cabinet fast cooling mode in which the fast cooling p...

Page 15: ...struction display when it connects with your fridge State Temperature control the temp can be adjusted from 18 to10 Click or slide to control Celsius and Fahrenheit switch Celsius and Fahrenheit can be switched Click or slide to switch Battery protection mode three modes high medium low Click or slide to change Do not change it optionally The mode should be set according to your vehicle battery an...

Page 16: ...mperature setting Noise abnormality Car refrigerator placed unsteady Touch a wall or other object Internal parts loose or falling off Frosting on refrigerator surface When ambient air humidity is greater than 75 there will be slight condensation on the surface of the cabinet which is a normal phenomenon Where the refrigerator does not function or functions incorrectly before contacting one of our ...

Page 17: ... a half empty one When the cabinet is full there is little air space between the goods so the cold air is trapped when there is lots of air the coldness can not be captured and held On a trip it is a good idea to replace finished products with bottles of water or similar This will fill the empty spaces and allow the coldness to remain within the cabinet Make your selection of what you wish to remo...

Page 18: ......

Page 19: ......

Page 20: ......

Reviews: