background image

15 


INSTALLATION AND OPERATING CONDITIONS OF THE 

APPLIANCE 

Position: 


This  appliance  can  be  installed  in  a  dry,  well  ventilated  indoor  where  the  ambient 

temperature  corresponds  to  the  climate  class  indicated  on  the  rating  plate  of  the 
appliance. 

WARNING!  The appliance should not be operated in an unheated room or 
porch.    Place  the  appliance  away  from  heat  sources  such  as  kitchen 
stove/oven, radiators, or direct sunlight.  
The  rear  wall  of  the  refrigerator,  in  particular,  the  condenser  and  other 

elements of the cooling system must not contact other elements, which may 
damage them, (e.g. central heating pipes and the water supply pipes). 

Minimum distances from the heat sources:  

- from the electric gas and other ovens - 30 mm,  
- from oil or coal fired ovens - 300 mm,  

- from built-in ovens - 50 mm  
If  there  is  no  possibility  of  ensuring  the  above-  mentioned  distances,  provide  an 

appropriate insulation board.  


Do not cover the ventilation holes at the top of the appliances

 it must be a good air 

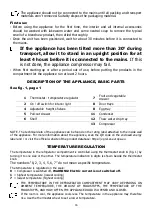
circulation around the appliance.  There should be a gap of at least 10 cm between the 
top of the appliance body and any furniture that may be above it.  If this requirement is 

not followed, the appliance consumes more electrical  energy  and its compressor may 
overheat (see fig. 4, page 2). 


If the appliance is placed in a corner, a gap of at least 60 mm must be left between the 
appliance body and the wall (see fig. 5, page 2). 


The appliance must stand on a level surface and must not touch the wall.  If necessary, 
regulate  the  height  of  the  appliance  by  adjusting  the  levelling  feet:  by  turning  them 
clockwise 

  the  front  of  the  appliance  rises,  by  turning  them  counter  clockwise 

  it 

comes  down.    If  the  appliance  is  tilted  slightly  backward 

  the  doors  will  close  by 

themselves. 

Preparing for operation: 


It is recommended to prepare the appliance for operation with a helper. 


Remove package. Remove the separate polystyrene part (transport protection) between 

the rear of the device and condenser 

 metal grid (if available). Lift the appliance away 

from  foamed  polystyrene  base. 

When  placing,  moving,  lifting  the  appliance,  do 

not  hold  the  door  handles,  do  not  pull  the  condenser  at  the rear  part  of  the 
refrigerator and do not touch the compressor unit. 


When positioning the appliance in chosen location, it will move more easily into position 

if you lift the front a little and incline it backward, allowing it to roll on its casters. 


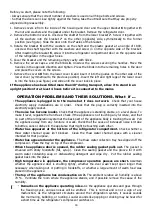
Remove  all  red-coloured  parts  from  the  shelves  (see  fig.  2,  page  1).  Tear  away  the 

adhesive tapes 


Take two supports 

1

 from the bag (see fig. 3, page 1) and insert them into the guides 

2


at the top back part of the appliance. 

Summary of Contents for KT 2670

Page 1: ...KT 3100 KT 2670 KT 2675 Kühlschrank DE Gebrauchsanweisung Refrigerator GB Instructions for use Original Gebrauchsanweisung ...

Page 2: ...1 KT 2670 KT 3100 KT 2675 ...

Page 3: ...2 ...

Page 4: ...lichen Räumlichkeiten CE Konformität Dieses Gerät entspricht zum Zeitpunkt seiner Markteinführung den Anforderungen die in den Richtlinien des Rates zur Angleichung der Rechtsvorschriften der Mitgliedsstaaten über die elektromagnetische Verträglichkeit RL 2014 30 EU und über die Verwendung elektrischer Betriebsmittel innerhalb bestimmter Spannungsgrenzen RL 2014 35 EU festgelegt sind Dieses Gerät ...

Page 5: ...t beschädigen z B durch Aufstechen der Kältemittelkanäle mit scharfen Gegenständen Abknicken von Rohrleitungen Beim Transportieren Aufstellen Warten und Entsorgen des Gerätes keine Teile des Kältekreislaufes beschädigen Damit im Falle eines Lecks im Kältemittel Kreislauf kein zündfähiges Gas Luft Gemisch entstehen kann muss der Aufstellraum laut Norm EN 378 eine Mindestgröße von 1 m je 8 g Kältemi...

Page 6: ...l entstandene Schäden ab deren Ursachen auf das Nichtbefolgen dieser Vorschrift zurückzuführen sind Keine Adapter Mehrfachstecker oder zweiadrige Verlängerungskabel ohne Nulleiter verwenden Sollte ein Verlängerungskabel nötig sein muß es der VDE GS Norm entsprechen Vor dem Aufstellen ein defektes kabel unbedingt durch ein neues vom selben typ wie das vom hersteller des Kühlgeräts verwendete ersetz...

Page 7: ...technisch nicht einwandfreien Geräts ist zu unterlassen Vor der Reinigung Das Gerät ausschalten und den Netzstecker aus der Steckdose ziehen Das Gerät darf nicht verbrannt werden Gerät nicht im Freien aufstellen Im Notfall sofort den Netzstecker aus der Steckdose ziehen Die Benutzung eines technisch nicht einwandfreien Geräts ist zu unterlassen Vor der Reinigung das Gerät ausschalten und den Netzs...

Page 8: ...rte Lufzirkulation muss gewährleistet sein Der Zwischenraum zwischen der Oberseite des Kühlschranks und einem darüber befindlichen Möbel sollte mindestens 10 cm betragen Abb 4 siehe Seite 2 Andernfalls steigt der Stromverbrauch des Kühlschranks an oder der Kompressor kann sich überhitzen Falls der Kühlschrank in einer Ecke aufgestellt werden soll belassen Sie einen seitlichen Abstand von mindesten...

Page 9: ...tor 5 Ausziehbare Schublade 12 Tauwasserverdunstung Gefäß 6 Ablageflächen 13 Kompressor 7 Schublade für Gemüse und Obst HINWEIS Die technischen Daten des Geräts finden Sie auf dem Produktetikett das an die Innenwand des Gerätefachs geklebt ist Für weitere Informationen zum Produkt scannen Sie den QR Code auf dem beiliegenden Energielabel und oder besuchen Sie die offizielle Website der Produktdate...

Page 10: ...smitteln in Berührung kommt oder auf diese tropft Wenn das Kältegerät längere Zeit leer bleibt schalten Sie es aus tauen Sie es auf reinigen Sie es trocknen Sie es und lassen Sie die Tür offen damit sich kein Schimmel im Gerät bildet ABTAUEN DER KÜHLKAMMER REINIGUNG UND PFLEGE DIE KÜHLKAMMER TAUT AUTOMATISCH AB Die sich hinten in der Kühlkammer bildenden Eistropfen schmelzen während der Betriebspa...

Page 11: ...ommt an die frühere Stelle von Halterung 2 Setzen Sie die Gefrierschranktür auf den Bolzen von Halterung 2 Achtung Tür festhalten Setzen Sie den Bolzen der Halterung 6 wieder in die Gefrierschranktür ein Decken Sie die Halterung und die freien Öffnungen mit den vier Abdeckkappen C ab Entnehmen Sie die Abdeckkappe 10 aus Abdeckleiste 1 und setzen Sie sie auf der gegenüberliegenden Seite wieder ein ...

Page 12: ...eräusch des Geräts Die vom Kühlschrank während des Betriebs verbreiteten verschiedenen Betriebsgeräusche sind normal und deuten nicht auf einen Defekt hin Das Plätschern Gurgeln und Rauschen kommt vom Kühlmittel das durch das Kühlsystem des Geräts zirkuliert Ein kurzes lauteres Aufheulen oder ein Klicken hört man wenn der Kompressor des Geräts sich einschaltet UMWELTHINWEISE Geräte die mit diesem ...

Page 13: ...the built in structure clear of obstruction WARNING Do not use mechanical devices or other means to accelerate the defrosting process other than those recommended by the manufacturer WARNING Do not damage the appliance refrigeration system WARNING Do not use electrical appliances inside the food storage compartments of the appliance unless they are of the type recommended by the manufacturer WARNI...

Page 14: ...concerning use of the appliance in a safe way and understand the hazards involved Cleaning and user maintenance shall not be made by children without supervision Children aged from 3 to 8 years are allowed to load and unload refrigerating appliances Requirements for the connection to the mains The appliance should only be connected to an earthed socket installed in accordance with the regulations ...

Page 15: ... socket before each maintenance activity Do not pull on the cord but hold the body of the plug instead It is forbidden to use a technically damaged appliance Do not place any switched on electrical devices such as microwave ovens hair dryers irons electric kettles or other electrical devices on top of the appliance because this may cause ignition of plastic parts Do not place any dishes with liqui...

Page 16: ...cal energy and its compressor may overheat see fig 4 page 2 If the appliance is placed in a corner a gap of at least 60 mm must be left between the appliance body and the wall see fig 5 page 2 The appliance must stand on a level surface and must not touch the wall If necessary regulate the height of the appliance by adjusting the levelling feet by turning them clockwise the front of the appliance ...

Page 17: ...ormation about the appliance scan the QR code on the enclosed energy label and or visit the official website of the product database https eprel ec europa eu TEMPERATURE REGULATION The temperature in the refrigerator compartment is controlled using the thermostat knob 1 fig 1 by turning it to one side or the other The temperature indication in digits is shown beside the thermostat knob The numbers...

Page 18: ...NING AND CARE THE REFRIGERATOR COMPARTMENT DEFROSTS AUTOMATICALLY Drops of ice that form on the back wall of the refrigeration compartment thaw during the time the compressor is not working and the thaw water runs down the thaw water runoff channel to the tray on top of the compressor where it evaporates REGULARLY CLEAN THE APPLIANCE Remember that before cleaning the appliance body you must discon...

Page 19: ...llations are in order Check that the plug is correctly inserted into the electricity supply socket The noise has become louder Check that the appliance is standing stable on a level place To make it level regulate the front feet Check if the appliance is not touching any furniture and that no part of the refrigeration system at the back part of the appliance body is touching the wall Pull the appl...

Page 20: ...and recycling of this product please contact your local authority your household waste disposal service or the retailer where you purchased the product If you decided to scrap the appliance make it impossible to use in order to prevent possible misadventure Pull out the electric plug from the electricity supply socket and then cut off the cord Tear off the gasket Break the door lock if any Do not ...

Reviews: