background image

GC-400ES

FR

6

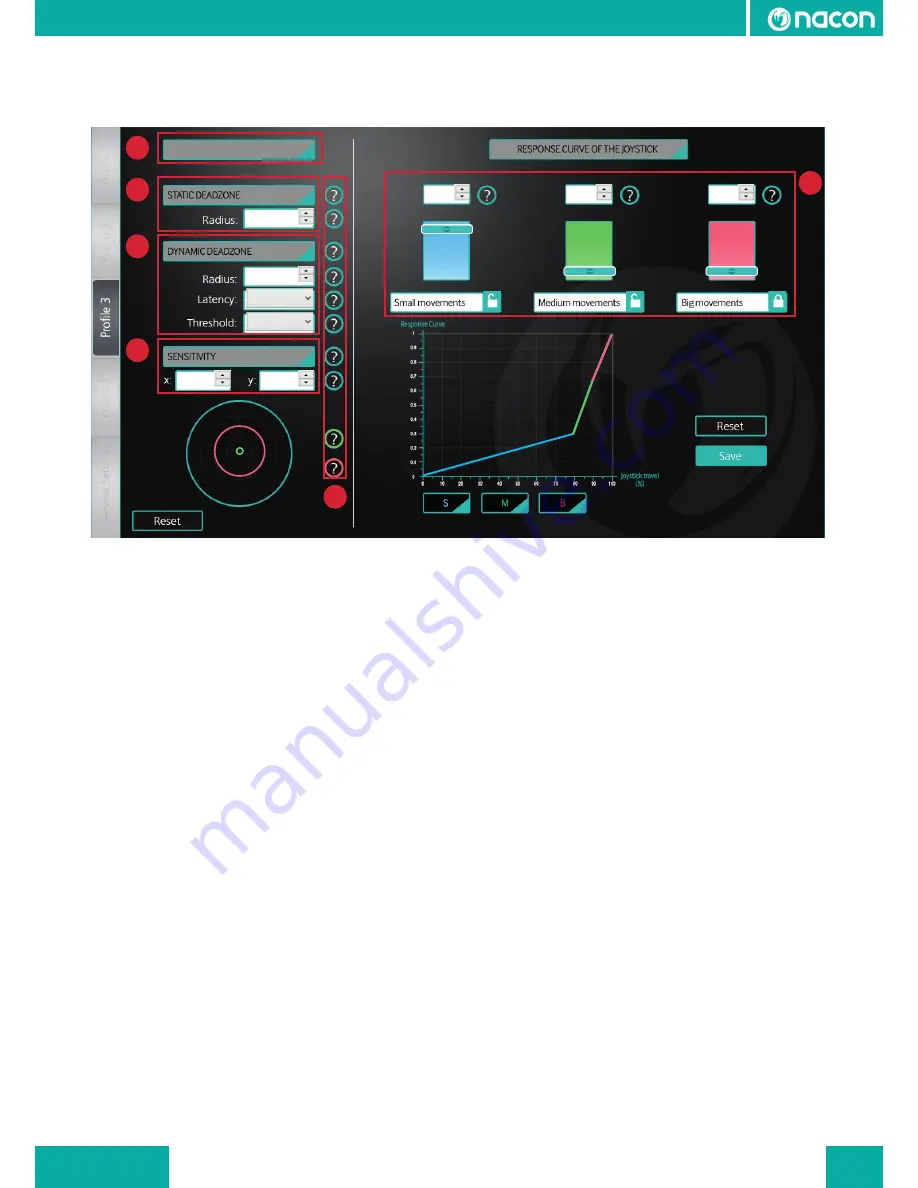
04. ADVANCE SETTINGS OF THE RIGHT ANALOGUE STICK

01. Profile name:

The name that you have given to your profile will be displayed in this location. 
02. Help:

By moving the cursor of your mouse over a question mark, help will be displayed informing you about 

the option or values to enter. 
03. Static Dead-Zone:

Zone in which no signal around the central position of the right analogue stick is sent. 
04. Dynamic Dead-Zone:

Zone in which the mouse cursor can stop even if your right analogue stick is tilted. 
a. Radius: defines the area in which the mouser cursor can stop.

b. Latency: defines the cursor movement stop time on the screen. 

c. Threshold: defines the ease of activation in the dynamic dead-zone. 
This option is here to simulate the stopping of a mouse in full motion. Thanks to this option, you will 

not need to release your right analogue stick to stop it. This will avoid any inadvertent movement and 

will mean you gain precious time. 
05. Sensitivity:

This section will allow you to define the sensitivity in relation to the X and Y axis.
NOTE: it may be wise to differentiate these 2 sensitivities if you use several screens side by side. 
06. Response curve of the analogue stick:

The response of the right analogue stick is split into 3 distinct areas: small, medium and big 

movements.  These areas will be more or less large depending on the values that you enter. The 

padlock located under the big movements can be moved to small or medium movements by clicking 

on the padlock located under these two. It will allow you to automatically adjust this value depending 

on the two others. 

1

3

4

5

2

6

 nacon-FPS-PRO

10

80

10

10

45

5

5

600 ms

Level 5

Summary of Contents for GC-400ES

Page 1: ...BB5101 GC 400ES INSTRUCTION BOOKLET eSport PC Gaming Controller for PC BB5101 INPUT DC 5V 200 mA Made in China Rue de la Voyette CRT2 59814 LESQUIN Cedex...

Page 2: ...HE HOME PAGE OF THE INTERFACE 03 INTRODUCTION TO GENERAL SETTINGS OF THE INTERFACE 04 INTRODUCTION TO THE ADVANCED SETTINGS OF THE INTERFACE RIGHT ANALOGUE STICK 05 INTRODUCTION TO THE CONTROLLER REMA...

Page 3: ...les created by the Nacon team will be available here A special section will be accessible to you on the site dedicated to the GC 400ES in order to share the profiles that you have created 02 Profile b...

Page 4: ...upcoming section ADVANCED settings of the Right analogue stick 06 Controller remapping This part will be detailed in the upcoming section REMAPPING interface 07 Quick settings This part allows you to...

Page 5: ...he keys used in your game NOTE 2 Changing the language and the keyboard type applies for all of the 4 profiles currently being configured 03 Calibration This option lets you re centre the right analog...

Page 6: ...e to simulate the stopping of a mouse in full motion Thanks to this option you will not need to release your right analogue stick to stop it This will avoid any inadvertent movement and will mean you...

Page 7: ...select the input of the controller in the table then click on the desired key of your keyboard or on the button of your mouse 03 Shortcut buttons Activate or not the M1 M2 M3 and M4 buttons located on...

Page 8: ...and Y sensitivity on the same screen You apply a sensitivity X 4 Y 3 This difference will allow you to be quicker for horizontal movements than for vertical movements You can adjust them at your conv...

Page 9: ...s used by the game is Therefore check if documentation is available with the list of game controls If this is not the case launch the game and go to the control options to find it out In this last cas...

Page 10: ...ES Disconnect the GC 400ES Connect the GC 400ES wait until the driver installation has finished Relaunch the GC 400ES software and check the firmware number again If the firmware number has returned t...

Page 11: ...http nacongaming com...

Reviews: