• Do not connect either wires to the earth terminal
in the plug which is marked by the letter “E” or by the
safety earth symbol or coloured green or green-and-
yellow.
Before replacing the plug cover, make certain that
the cordgrip is clamped over the sheath of the lead –
not simply over the two wire
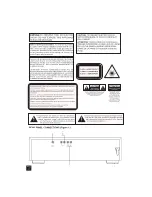
REAR PANEL CONNECTIONS
1. DIGITAL OUT
This output supplies a digital signal and can there-
fore only be connected to an input which is suitable
for this signal. Use a phono lead for this connection.
Never connect this socket to a non-digital input of
an amplifier, such as AUX, CD, TAPE, PHONO etc!
2. FIXED LINE OUT
For connecting a cable to the amplifier.
• Insert a red plug into the ‘R’ socket and the other
plug into the ‘L’ socket.
• Insert the two other plugs into the corresponding
sockets of the CD or AUX input of your amplifier.
You can also use the TUNER or TAPE IN connec-
tion, but never the PHONO input!
The NAD Link OUT connector allows remote-con-
trol commands to be relayed from this player to other
products equipped with a NAD-Link (or compatible)
input. To use this option, connect a cable from the
NAD Link OUT socket to the NAD Link IN jack on
another product.
3. NAD LINK IN/OUT
The NAD Link IN connector allows this player to
be operated by external control signals from a multi-
room controller or remote relay system. Connect a
cable from the controller to the NAD Link IN jack.
Using both IN and OUT connections, remote control
commands can be “daisy-chained” from one product
to the next.
4. AC LINE CORD
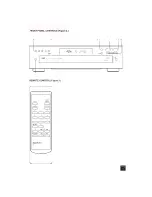
FRONT PANEL CONTROLS -
FUNCTIONAL OVERVIEW
1. POWER ON/OFF
Switching on and off.
2. DISC CAROUSEL DRAWER
3. OPEN/CLOSE
Opening and closing the CD compartment.
4 - 5
– Selecting another track during play.
– Selecting a track to start play with.
– Selecting tracks when compiling a programme.
– Fast search to a particular passage during play.
– Selecting the recording mode when making a
tape recording.
– Selecting the recording time when making a tape
recording.
6. PLAY
– Starting play.
– Returning to the beginning of a track.
7. STOP
– Stopping play.
– Erasing a programme.
8. SHUFFLE
Playing in random order.
9. PAUSE
Interrupting play.
10. REPEAT
Repeating play.
11. DISPLAY
Informs you about the functioning of the player.
12. TIME
Selecting the information you want to see on the
display.
13. DISC
– Selecting another CD during play.
– Selecting a CD to start play with.
– Selecting CDs when compiling a programme.
14. QUICK PLAY
Immediate playing of a particular CD.
15. LOAD
Rotating the turntable in the CD compartment
when inserting CDs.
– Selecting CDs when compiling a programme.
REMOTE CONTROL
1. STOP
– Stopping play.
– Erasing a programme.
2. SHUFFLE
Playing in random order.
3. 1-10 DIGIT KEYS
– Selecting another track during play.
NAD
5
GB


