ENGLISH
5
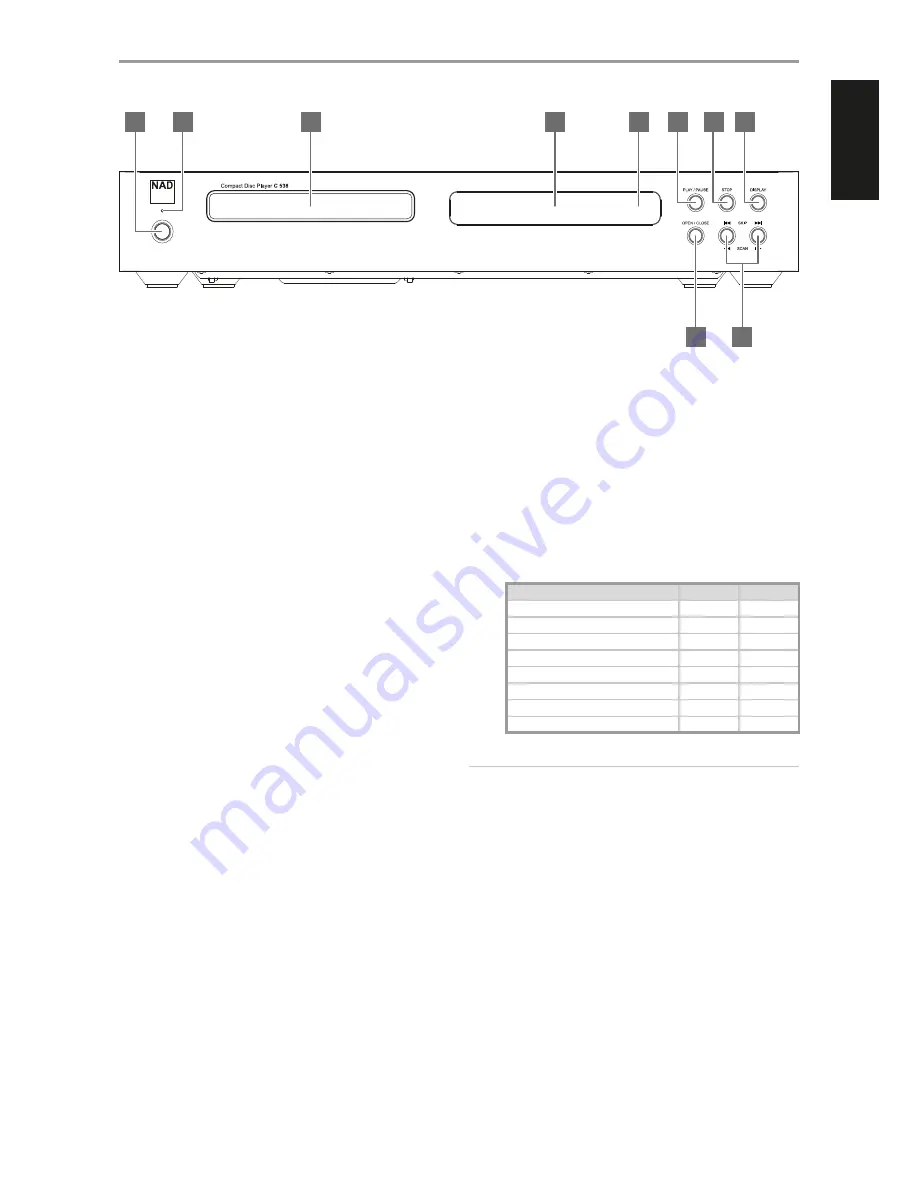
1 STANDBY BUTTON
•
Press this button to switch ON the C 538 from standby mode. The
Standby LED indicator will turn from amber to blue and illuminate
the Vacuum Fluorescent Display (VFD).
•
Pressing the Standby button again turns the unit back to standby
mode. The Standby LED indicator will change to amber color.
2 STANDBY LED
•
This indicator will light up amber when the C 538 is at standby
mode. When the C 538 is at ON state, this indicator will illuminate
blue.
3 DISC TRAY
•
With the disc tray open, insert a CD or other compatible media disc
face down onto the tray. Place the disc in the drawer, centered in
the smaller circular recess, with its label facing up.
•
“NO DISC” appears on the C 538’s VFD if the disc is placed upside
down or there is no disc loaded.
4 VACUUM FLUORESCENT DISPLAY (VFD)
•
The Vacuum Fluorescent Display (VFD) provides disc playback
information, settings and other indicators.
5 INFRARED (IR) SENSOR
•
The Infrared (IR) sensor receives IR commands from the supplied
remote control. An unobstructed line of sight between the remote
control and the IR sensor is required.
•
Do not expose the IR sensor to a strong light source such as direct
sunlight or illumination. If you do so, you may not be able to
operate the remote control with the C 538.
Distance:
About 23ft (7m) from the front of the IR sensor.
Angle:
About 30° in each direction of the front of the IR sensor.
6 PLAY/PAUSE
•
This dual-function button alternates between initiating disc
playback and pausing playback. Toggle this button to start, pause
or resume disc playback.
•
If the disc tray is open, press this button to automatically close the
tray and start playback if a disc is loaded.
7 STOP
•
Playback is stopped and pickup is reset to the beginning of the disc.
Display reverts to showing the number of tracks and total playing
time on the disc. For WMA/MP3 files, display will revert to total
number of files.
•
If the C 538 was programmed to play a selection of tracks/files, the
program will be retained in the player’s memory. Pressing [STOP]
twice at program mode will delete the program.
8 DISPLAY
•
Use this button to enable or disable auto standby mode. Refer to
section about “AUTO STANDBY”.
•
The following display information is shown by repeatedly pressing
DISPLAY button.
INFORMATION
AUDIO CD
MP3/WMA
Elapsed playback time of the current track
✓
Remaining playback time of the current track
✓
Remaining playback time of the disc
✓
Song information
✓
Song Title
✓
Artist Name
✓
Album Name
✓
Elapsed playback time of the current file
✓
NOTES
• Some information may not be displayed on some discs. Display is
dependent on the disc’s information content.
• If the file has no available information about the song title, artist or
album, the display will show “No ID3”.
9 OPEN/CLOSE
•
Disc tray is activated to slide open or draw close.
•
When in standby mode, this button will also power up the C 538
and at the same time open the disc tray.
10
9
SKIP
0 / 7
SCAN
8
•
SKIP
0
: Press once to Skip forward to the next track or file.
•
9
SKIP: Press once to Skip backward to the beginning of current
track or file. Press again to Skip backward to previous track or file.
•
7
SCAN
8
: Press and hold to scan backward or forward through
tracks or files.
IDENTIFICATION OF CONTROLS
FRONT PANEL
© NAD C538
1
2
3
4
5
6
7
8
9
10


