background image

SETUP

ASSEMBLY AND INSTALLATION

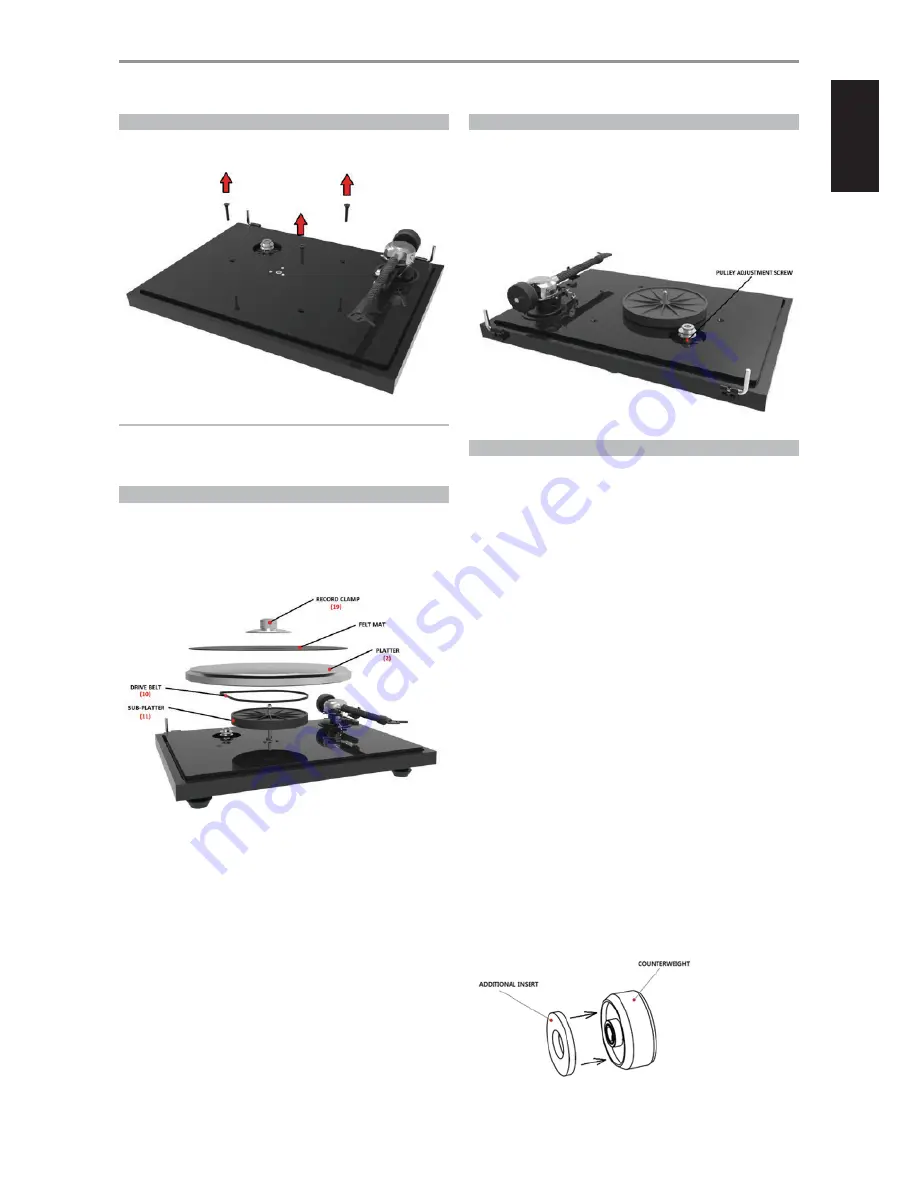
TRANSPORT SCREWS

Remove the three transport screws (12) from the top part of the chassis 
before installing the sub-platter (11), the drive belt (10) and the platter (2).

NOTE


The transport screws are used to ensure safe shipping and transport, 
and should be reinstalled prior to any future shipment or transportation 
of the turntable.

PLATTER, SUB-PLATTER AND DRIVE BELT INSTALLATION

Remove the protective cover from the sub-platter (11).
Install the sub-platter (11) and the drive belt (13) as shown in the following 
illustrations.
Install the platter (2) on the sub-platter (11) and screw the Record clamp 
(19) with LP on the platter.

ADJUSTING THE PULLEY HEIGHT

In rare instances, you may have to adjust the pulley height if it taps against 
the platter:
Carefully remove platter and drive belt from the turntable. Using a small 
flathead screwdriver, loosen the small screw and move the pulley to the 
desired position.

Tighten the screw back and fit the drive belt and the platter.

TONEARM ASSEMBLY

The tonearm includes a combination of cardan bearings in horizontal axle 
and Japanese ball bearings in vertical axle.
See the next steps to set up your tonearm.

1  CARTRIDGE INSTALLATION

If you purchased this turntable in a package that included the cartridge, 
this has already been done for you.

Install the cartridge into the aluminium headshell, using the 
appropriate hardware included with your cartridge.
Connect the cartridge as indicated below:

• 

White 

left channel L+

• 

Red 

right channel R+

• 

Green 

right channel R-

• 

Blue 

left channel L-

For correct cartridge alignment, use the two-point cartridge alignment 
protractor provided with your C-Sharp accessories. If unfamiliar with 
two-point setup, please refer to your dealer.

2  COUNTERWEIGHT ASSEMBLY

The counterweight has two separate parts:

The first part is the counterweight itself. The second part is an 
additional insert that enables optimal balancing of heavier cartridges. 

The counterweight without the additional insert can balance cartridges 
from 5 to 9 g. (The weight of the counterweight itself is 110 g.)

The counterweight with the additional insert can balance cartridges 
from 9 to 17 g. (The weight of the counterweight with the additional 
insert is 148 g.)

5

ENGLISH

POR

TUGUÊS

FR

ANÇ

AIS

ESP

AÑOL

IT

ALIANO

DEUT

SCH

NEDERL

ANDS

SVENSK

A

РУ

ССКИЙ

Summary of Contents for C 558

Page 1: ...ENGLISH PORTUGUÊS FRANÇAIS ESPAÑOL ITALIANO DEUTSCH NEDERLANDS SVENSKA РУССКИЙ Owner s Manual C558 Turntable ...

Page 2: ...must not be disposed of with regular household waste but must be returned to a collection point for the recycling of electrical and electronic equipment The symbol on the product user s manual and packaging point this out The materials can be reused in accordance with their markings Through re use recycling of raw materials or other forms of recycling of old products you are making an important co...

Page 3: ...l thermo plastic elastomers TPE suspension system dampens vibrations 6 A low profile sandwich floating chassis made of MDF is what gives this table a superflat silhouette IMPORTANT Your turntable was shipped partially disassembled in order to avoid damage to sensitive parts Please check immediately to make sure that neither the packaging nor the device was damaged in transit If you are missing par...

Page 4: ...skating mechanism 9 Motor with motor pulley 10 Drive belt 11 Sub platter 12 Transport screws 3x 13 RCA output with earth connection 14 Damped adjustable feet 15 Power supply socket 16 Dustcover 17 Dustcover hinge 18 Dustcover hinge fasteners 19 Record clamp IDENTIFICATION OF CONTROLS FEATURES AND CONNECTIONS 4 ENGLISH PORTUGUÊS FRANÇAIS ESPAÑOL ITALIANO DEUTSCH NEDERLANDS SVENSKA РУССКИЙ ...

Page 5: ...cardan bearings in horizontal axle and Japanese ball bearings in vertical axle See the next steps to set up your tonearm 1 CARTRIDGE INSTALLATION If you purchased this turntable in a package that included the cartridge this has already been done for you Install the cartridge into the aluminium headshell using the appropriate hardware included with your cartridge Connect the cartridge as indicated ...

Page 6: ...he grounding cable on the earth connection screw 5 VERTICAL TRACKING ANGLE SETTING VTA To set the Vertical Tracking Angle first put a record on the platter When the needle is lowered into the record groove the tube of the tonearm should be parallel to the surface of the record If it is not loosen both hexagonal screws in the tonearm base just enough to allow vertical movement of the arm pillar wit...

Page 7: ...anti skating sliding mechanism is supplied with a pre mounted anti skating weight and anti skating thread Put the eye of the anti skating thread around the hole for the HOOK SCREW and screw the HOOK SCREW into the tonearm through the eye of the anti skating thread as shown in the illustration below Step 4 Anti skating force adjustment Adjust the anti skating force by positioning the weight on the ...

Page 8: ...RTING THE MOTOR CHANGING THE SPEED Using the clamp after placing a record on the platter place the record clamp on the spindle and record Do not screw the clamp for playback CONTROLING THE TURNTABLE To start rotation of the platter press the button ON OFF switch 1 To play 45 r p m put the drive belt 13 over the larger diameter part of the motor pulley using accessory toll provided To revert to 33r...

Page 9: ...cation or is dirty or damaged REFERENCE TROUBLESHOOTING SERVICE Should you encounter a problem that you are not able to identify or alleviate despite the above information please contact your dealer for further advice Only when the problem cannot be resolved should the unit be sent to the responsible distributor in your country Guarantee repairs will only be effected if the unit is returned in app...

Page 10: ...230 mm Overhang 18 mm Power consumption 5W max 0 3W standby Voltage Universal swith mode power supply 15V DC 0 8 A 100 240V AC 47 63Hz Dimensions W x H x D 435 x 340 x 125mm Weight without box 5 5 kg turntable 1 74 kg platter Weight with box 8 kg ORTOFON OM 10 CARTRIDGE TECHNICAL DATA Frequency range 20 22 000Hz Channel separation 22dB 1kHz Output voltage 4mV Recommended load impedance 47kohms amp...

Page 11: ...11 ENGLISH PORTUGUÊS FRANÇAIS ESPAÑOL ITALIANO DEUTSCH NEDERLANDS SVENSKA РУССКИЙ ...

Page 12: ...onal a division of Lenbrook Industries Limited No part of this publication may be reproduced stored or transmitted in any form without the written permission of NAD Electronics International While every effort has been made to ensure the contents are accurate at the time of publication features and specifications may be subject to change without prior notice C558_eng_OM_v01 Jul 2017 ...

Reviews: