ENGLISH
9
•
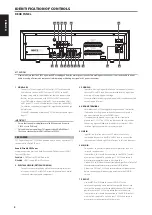
The PRE OUT output signal will be affected by the C 3050’s volume
and tone control settings.
•
Always turn OFF the C 3050 and associated external power
amplifiers before connecting or disconnecting anything to the PRE
OUT sockets.
8 SUBW
•
Connect SUBW to the low level input of corresponding powered
subwoofer.
•
Low frequency information up to 80 Hz is sent to the connected
subwoofer.
9 SPEAKERS A, B
•
The C 3050 is equipped with two sets of speaker terminals. Use the
SPEAKERS A terminals for the “main” speakers and use the SPEAKERS
B terminals for a second pair, for example, extension speakers
located in another room.
•
Connect C 3050’s Right speaker terminals marked “R +” and “R-” to
the corresponding “+” and “ - “ terminals of your designated right
speaker. Repeat the same for C 3050’s Left speaker terminals and
corresponding left speaker.
•
Double check the speaker connections before powering up the
C 3050.
•
Refer also to item about SPEAKERS SELECTOR (A, B, A+B, OFF) in the
IDENTIFICATION OF CONTROLS – FRONT PANEL.
10 AC MAINS INPUT
•
The C 3050 comes supplied with two separate mains power cords.
Select the mains power cord appropriate for your region.
•
Before connecting the plug to the mains power outlet, ensure that
the other of end of the power cord is firmly connected to the
C 3050’s AC Mains input socket.
•
Always disconnect the mains power plug from the mains power
outlet before disconnecting the other of end of the power cord
from the C 3050’s AC Mains input socket.
11 FUSE HOLDER
•
Only qualified NAD service technicians can have access to this fuse
holder. Opening this fuse holder may cause damage thus voiding
the warranty of your C 3050.
12 BLUETOOTH ANTENNA TERMINAL
•
Connect the supplied Bluetooth antenna to this Bluetooth antenna
terminal.
13 SERVICE
•
Service port is for internal use only and not for customer use.
14 IR IN
•
This input is connected to the output of an IR (infrared) repeater
(Xantech or similar) or the IR output of another compatible device
to allow control of the C 3050 from a remote location.
15 +12V TRIGGER OUT
•
The +12V TRIGGER OUT is used for controlling external equipment
equipped with a +12V trigger input.
•
Connect this +12V TRIGGER OUT to the other equipment’s
corresp12V DC input jack using a mono cable with 3.5mm
male plug.
•
This output will be 12V when the C 3050 is ON and 0V when it is
either OFF or in standby mode.
16 VU METER
•
Directs the NAD VU meter in the front panel to monitor Input Signal
or Speaker Output
Input Signal:
Monitor and reflect current Source input signal
Speaker Output:
Monitor and reflect Speaker Output signal
17 POWER
•
Supplies the AC mains power to C 3050.
•
When the POWER switch is set to ON position, the C 3050 goes to
standby mode as shown by the amber status condition of the front
panel Power LED indicator.
•
Press the front panel Power button, SR 10 ON button or any of the
Source Input selector buttons to power up the C 3050 from standby
mode.
•
If you do not intend to use the C 3050 for long periods of time
(such as when on vacation), switch off the POWER switch.
•
With rear panel POWER switched OFF, the C 3050 cannot be
powered up by the front panel Power button, SR 10 ON button or
any of the Source Input selector buttons.
MDC2 UPGRADE SLOTS
C 3050 supports NAD’s MDC2 architecture. By enabling two-way
communications between the module and component, MDC2 opens up
the future for new upgrades.
MDC2 BLUOS-D
The optional MDC2 BluOS-D module lets listeners play music
from their favourite streaming services through the C 3050.
MDC2 BluOS-D is equipped with Wi-Fi and Ethernet and uses
the acclaimed BluOS Controller app for Android, iOS, macOS,
and Windows.
Like all BluOS-enabled products, the MDC2 BluOS-D has
integrated support for dozens of streaming services and
supports Apple AirPlay 2, Spotify Connect, and Tidal Connect.
Two-way communications also enable the MDC2 BluOS-D
to stream music from sources connected to the C 3050 to
BluOS-enabled components in other rooms.
The MDC2 BluOS-D comes with Dirac Live® Limited Bandwidth (20Hz –
500Hz) installed with the option for advanced users to upgrade to the
Dirac Live Full Frequency version. Dirac Live function lets you measure
your room’s acoustics using a supplied microphone and intuitive app, and
then upload correction curves to the MDC2 BluOS-D. By compensating for
acoustic anomalies in your listening environment, Dirac Live dramatically
improves bass clarity, imaging, and timbral accuracy. Thanks to its two-way
architecture, the MDC2 BluOS-D performs room correction for all sources
connected to your C 3050. For Dirac Live Setup guidelines, go to
support.nadelectronics.com
and search for “Dirac Setup”.
IDENTIFICATION OF CONTROLS
REAR PANEL


