background image

GB

4

QUICK START

1. Remove the transit screw from the bottom of the unit.
2. Connect a twin RCA-to-RCA lead from the L (left) and R (right)

Line Output jacks to the corresponding CD inputs on your
amplifier.

3. Plug in the AC power cord.
4. Press the green POWER button to turn on the player.
5. Press OPEN to open the disc drawer.
6. Place a CD, label side up, in the tray’s circular recess. Be

certain that the disc is centred within the recess.

7. Press PLAY/PAUSE. The drawer closes automatically, and the

disc begins to play.

8. At any time you may press SKIP or to select different tracks on

the disc.

9. Press PLAY/PAUSE if you want to stop play temporarily while

keeping the pickup at its current position on the disc. Press
PLAY/PAUSE again when you want to resume playback. Press
STOP if you want to end play and reset the pickup to the
beginning of the disc.

NOTE ON INSTALLATION

IMPORTANT! 

Before installation, remove the red plastic transit

screw from the bottom of the unit. Remove by turning 90° counter-
clockwise and then pulling it out of its position. Never use force to
remove the screw; refer also to the label attached to the transit
screw. Retain the transit screw, should you need to transport the CD
Player over some distance (e.g. when moving house). To avoid
damage, it is important that the transit screw is replaced.

Install the NAD C541 Compact Disc player on a level, vibration-
free surface. (Severe vibration, or operation in a tilted position,
may cause the player to mis-track.) The player may be stacked
with other stereo components, as long as there is adequate
ventilation around it. If the player is placed in close proximity to
a radio tuner (AM or FM), a VCR, or a television set, the operation
of its digital circuits may produce static that would interfere with
reception of weak broadcast signals. If this occurs, move the CD
player away from other devices or switch it off when viewing or
listening to broadcasts.

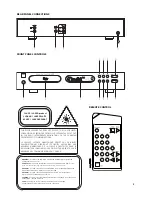
REAR PANEL CONNECTIONS

1. LINE OUTPUT

Connect a cable from these jacks to your amplifier. Plug one end
of a twin RCA-to-RCA lead into the L (upper) and R (lower) output
jacks. Connect the other end of the cable to your stereo amplifier’s
CD input, or to any other “line-level” input jacks (such as the
AUXiliary inputs). Do NOT connect this cable to the amplifier’s
PHONO input jacks. The RCA sockets on your NAD C541 are
colour coded for convenience. Red and white are Right and Left
audio respectively, and yellow for NAD Link and Digital Out.
Ensure that leads and sockets are not damaged in any way and all
sockets are firmly pushed home.

2. DIGITAL OUTPUT

The digital playback signal is available at this output jack. The
serial data output is taken after the error correction but before the
digital-to-analogue conversion and filtering. The output is
transformer-isolated from the built-in D-to-A circuits. It may be
connected to any digital signal processor that conforms to the
Sony/Philips (SPDIF) standard. 

To use the digital output, connect a cable from this jack to the “CD
Digital” or equivalent input on a digital processor or recorder. For
best results, the cable should be a 75 ohm coaxial cable of the
type used for video signals, with an RCA phono plug at each end.
(To distinguish them from similar phono-plug cables used for
analogue audio signals, video and digital signal cables often are
colour-coded with yellow plugs.)

3. NAD LINK IN/OUT

The NAD-Link connector is used to pass commands from other units
fitted with NAD-Link connectors. This allows centralised control of a
complete system, and also allows some of the basic functions of
other NAD components (such as a tuner, or cassette-deck) also
equipped with NAD-Link to be controlled with an NAD system remote
control. To function with such other units, connect the C541’s NAD-
Link Out to the NAD-Link In on the other unit. NAD-Link connectors
can be daisy-chained, IN to OUT, so that a whole system can be
controlled from the remote control facilities of one unit.

NOTES: 

It is advisable not to connect NAD-Link if these units that

have their own built-in remote control command receiver and are
positioned together, in direct view from the remote control
handset. If you are unsure, try operating the products without
NAD-Link first; If the unit responds to the remote control
command, it will not be necessary to connect NAD-Link.

Never loop the last unit back to the first NAD unit in the NAD-Link
chain. Unplug all units from the mains before connecting or
disconnecting NAD-Link.

4. AC LINE CORD

Connect this power cord to an AC mains wall outlet or to an AC
convenience outlet at the rear of your amplifier. 

FRONT PANEL CONTROLS

1. POWER ON/OFF

Press this green button to switch on the power to the disc player.
Press again and release to switch the power off. The display will
light up to indicate the unit is switched on and ready for use.

2. DISC DRAWER

To play a disc, press the OPEN button to open the disc drawer.
Place the CD within the large circular recess in the drawer, with
its transparent playing surface facing down. The label must face
UP. CD-3 discs (3-inch CD “singles”) can be played without the
aid of an adapter. Place the disc in the drawer, centered in the
smaller circular recess, with its label facing UP.

NOTE: 

This player was not designed to accommodate a “damping

disc” placed on a CD, nor two CDs stacked together. It plays audio
CDs, but not discs identified as CD-RW, CD-V, DVD, CD-I, CD-ROM,
or PHOTO CD. Refer also to chapter “A note on CD-R and CD-RW
audio discs”

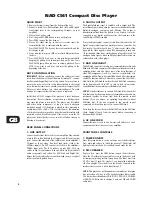
NAD C541 Compact Disc Player

Summary of Contents for C541

Page 1: ...Owner s Manual GB Manuel d Installation F Bedienungsanleitung D Manual del Usuario E Manuale delle Istruzioni I Manual do Propriet rio P Bruksanvisning S C541 Compact Disc Player...

Page 2: ...d into the unit or C The unit has been exposed to rain or liquids of any kind or D The unit does not appear to operate normally or exhibits a marked change in performance or E The device has been drop...

Page 3: ...RADIO ELECTRIQUE EDICTE PAR LE MINISTERE DES COMMUNICATIONS DU CANADA WARNING INVISIBLE LASER RADIATION WHEN OPEN AND INTERLOCKS DEFEATED AVOID EXPOSURE TO BEAM VORSICHT UNSICHTBARE LASERSTRAHLEN TRI...

Page 4: ...l data output is taken after the error correction but before the digital to analogue conversion and filtering The output is transformer isolated from the built in D to A circuits It may be connected t...

Page 5: ...hapter HDCD 4 OPEN Press this button to open the disc drawer and press it again to close the drawer If this button is pressed while a disc is being played playback will stop the pickup will reset to t...

Page 6: ...the SKIP button until you ve reached the track from where you want to start playback Press Play to start playback REMOTE CONTROL A wireless remote control is provided with your compact disc player en...

Page 7: ...oted however that it will not play back CD RW discs The quality of CD R audio discs varies widely which may affect playability Some factors that affect playability The quality of the disc itself Gener...

Page 8: ...e The laser operates at very low power and is concealed within the player mechanism Even when the player is disassembled the laser remains sealed within an optical system that causes its light to focu...

Page 9: ...GB 9...

Page 10: ...r st r o ou tout autre jack de niveau ligne entr es AUX par exemple NE CONNECTEZ PAS ce c ble aux jacks d entr e PHONO de l amplificateur Les prises de sortie RCA de votre NAD C541 sont rep r es par d...

Page 11: ...llument pendant la lecture r p tition de la totalit d un programme ou du disque LECTURE ALEATOIRE Lorsque le mode de lecture al atoire du C541 a t s lectionn le mot Al atoire RANDOM appara t sur l aff...

Page 12: ...SE pour activer le mode de Lecture Al atoire RANDOM Il est possible aussi d engager le mode de Lecture Al atoire pendant la lecture normale Il suffit pour cela d appuyer sur le bouton Lecture Al atoir...

Page 13: ...stocker le num ro de piste souhait e en m moire L affichage revient en mode d affichage Programme Entr e et s est avanc Pr p 02 ce qui indique que le lecteur est pr t pour la deuxi me entr e 4 Repren...

Page 14: ...graveurs donnent des r sultats meilleurs que d autres La vitesse d enregistrement du CD R En g n ral la qualit d un CD R est meilleure s il est enregistr une vitesse faible plut t qu une vitesse lev e...

Page 15: ...oncer la fiche du cordon dans la prise de secteur murale PROBLEME CAUSE PROBABLE SOLUTION LA LECTURE DU DISQUE NE COMMENCE PAS Le disque est l envers Le disque est excessivement sale Remettre le disqu...

Page 16: ...Verbinden Sie das andere Leitungsende mit dem CD Eingang Ihres Stereoverst rkers oder mit anderen Linepegel Eingangsbuchsen wie z B die AUX Eing nge Schlie en Sie diese Leitung NICHT an die PHONO Ein...

Page 17: ...Titel bereits abgespielt sind und wieviele noch verbleiben Die Nummer des gerade abgespielten Titels blinkt Im Anzeigefeld werden bis zu 16 numerierte Titel dargestellt OVER Wenn die eingelegte CD me...

Page 18: ...wegt Diese Taste funktioniert nur wenn der CD Player im Wiedergabe PLAY oder Pausemodus PAUSE ist Nach einem STOP Befehl oder dem Einlegen einer neuen CD muss zuerst PLAY gedr ckt werden bevor das Suc...

Page 19: ...eendigung der Programmwiedergabe dr cken Sie STOP Die gespeicherte Titelliste verbleibt im Speicher und wenn Sie das Programm erneut abspielen m chten dr cken Sie einfach wieder PLAY Wenn Sie das Prog...

Page 20: ...ehr besch digen als ein hnlicher Kratzer auf der transparenten Abspielseite Sie sollten daher beide CD Oberfl chen sorgsam behandeln Starke Kratzer oder Fingerabdr cke k nnen den CD Player aus der Spu...

Page 21: ...URSACHE ABHILFE CD WIEDERGABE STARTET NICHT Die CD wurde verkehrt herum eingelegt Die CD ist zu stark verschmutzt CD mit der bedruckten Seite nach OBEN einlegen CD s ubern KEIN TON Falsche Audiokabelv...

Page 22: ...dificadas con colores para comodidad Rojo y blanco son respectivamente audio de Derecha e Izquierda y amarillo para la conexi n NAD Link y Digital Out Asegure que los conductores y tomas no est n da a...

Page 23: ...a derecha situada cerca del borde izquierdo del visualizador de tiempo se enciende durante PLAY ESCUCHA Dos barras verticales indican que el tocadiscos est en PAUSE pausa En modo STOP el visualizador...

Page 24: ...cucha la pista final la exploraci n para y el visualizador Time muestra la tabla de contenido No hay modo de envuelta 11 SKIP Durante la escucha pulse el pulsador SKIP una vez para saltar hacia atr s...

Page 25: ...lles de bobina deben contactar el extremo de cada pila Empuje otra vez la cubierta del compartimento de pilas y presi nela suavemente hasta que se fije En algunos casos la corrosi n o aceite de las hu...

Page 26: ...ol bencina y sustancia similares Un disco muy sucio se puede lavar con un rociado de agua templada posiblemente con una peque a cantidad de detergente suave de cocina a adida y luego secarlo con una t...

Page 27: ...O COMIENZA LA ESCUCHA DEL DISCO El disco est cargado cabeza abajo El disco est demasiado sucio Vuelva a cargar el disco con el lado de la etiqueta ARRIBA Limpie el disco NO HAY SONIDO Conexiones de ca...

Page 28: ...o ai jack input marcati PHONO dell amplificatore Le prese RCA sul NAD C541 sono contraddistinte da codice colori per maggior convenienza Rosso e bianco indicano lati Destro e Sinistro giallo il colleg...

Page 29: ...MEMORY si ha l accensione di PROGRAM durante l ascolto di una selezione di piste preprogrammate del disco CONDIZIONE Una freccia orientata verso destra accanto al lato sinistro del display dell orolo...

Page 30: ...nte PLAY la musica viene ascoltata solo frammentariamente a basso volume mentre il riproduttore effettua la sua scansione Per circa i primi cinquanta secondi della pista la scansione avviene ad una ve...

Page 31: ...PROGRAMMA Pr p 02 10 10 3 23 p 02 PROGRAMMA Pr p 03 9 9 p 03 PROGRAMMA Pr p 04 10 6 16 p 04 PROGRAMMA Pr p 05 1 1 p 05 PROGRAMMA Pr p 06 PLAY ASCOLTO La distinta delle piste con display del calendario...

Page 32: ...o sicuro di dischi meno perfetti che non possono essere ascoltati su molti altri riproduttori Ricordare in ogni modo che i dischi vanno sempre maneggiati con la massima attenzione Per evitare danni ri...

Page 33: ...DUTTORE PER DISCHI NON FUNZIONA Il disco caricato al contrario Il disco troppo sporco Ricaricare il disco tenendo il lato dell etichetta IN ALTO Pulire il disco NON VI SUONO Connessioni non corrette d...

Page 34: ...lificador est reo ou a quaisquer outras tomadas de entrada de n vel de linha como por exemplo as entradas AUX Auxiliares N O efectue a liga o deste cabo s tomadas de entrada PHONO do amplificador As f...

Page 35: ...e no canto superior esquerdo durante a repeti o da reprodu o de uma nica faixa As indica es REPEAT Repetir e ALL Todas acender se o durante a repeti o da reprodu o de todo o programa ou CD RANDOM ALEA...

Page 36: ...r duas vezes o bot o de STOP Paragem Aquando da primeira press o do bot o de STOP Paragem a reprodu o ser interrompida e aquando da segunda press o o modo de Reprodu o Repetida ser desactivado 9 RANDO...

Page 37: ...ou do Teclado num rico de introdu o directa para seleccionar a primeira faixa da sequ ncia por si planeada O n mero da faixa seleccionada piscar no visor 3 Prima PROGRAM Programa o para guardar em me...

Page 38: ...e os de marca branca A qualidade do gravador de CDs ou do dispositivo de escrita de CD do computador Alguns gravadores e dispositivos de escrita proporcionam melhores resultados que outros O CD R foi...

Page 39: ...ade de lugar O CONTROLO REMOTO N O FUNCIONA As pilhas do comando de controlo remoto est o gastas H um objecto a tapar o sensor remoto do leitor de CD Substitua as pilha Retire quaisquer objectos que e...

Page 40: ...er respektive v nster ljudutg ngar och gula r f r NAD Link och digitalutg ngen 2 DIGITALUTG NG Den digitala ljudsignalen r tillg nglig fr n denna kontakt Signalen tas efter felkorrigeringen men innan...

Page 41: ...spelaren kommer den att l sas av f r att se hur m nga l tar den inneh ller och hur l ng speltid skivan har sp r och tidsinformationen visas sedan i f nstret Om sl den st ngs med ett tryck p PLAY visas...

Page 42: ...funktionerna och siffertangenterna SIFFERTANGENTER En extra funktion p fj rrkontrollen r siffertangenterna H r kan man l tt sl in numret p nskat sp r direkt F r att lyssna p sp r 5 tryck p 5 vill du l...

Page 43: ...t n om rkta no name skivor Kvaliteten p CD br nnaren eller den inspelningsbara CD spelaren Vissa br nnare spelare ger ett b ttre resultat n andra Vilken hastighet skivan r br nd med Oftast blir det b...

Page 44: ...RUMMANDE LJUD H RS L s kabelanslutning Kontrollera kablarna och dess anslutningar FJ RRKONTROLLEN FUNGERAR EJ Batterierna slut eller felaktigt isatta IR s ndaren eller mottagaren skymda IR mottagaren...

Page 45: ...S 45...
Page 46: ...LECTRONICS All rights reserved No part of this publication may be reproduced stored or transmitted in any form without the written permission of NAD Electronics International C541 Manual 09 00 Printed...

Reviews: