ENGLISH
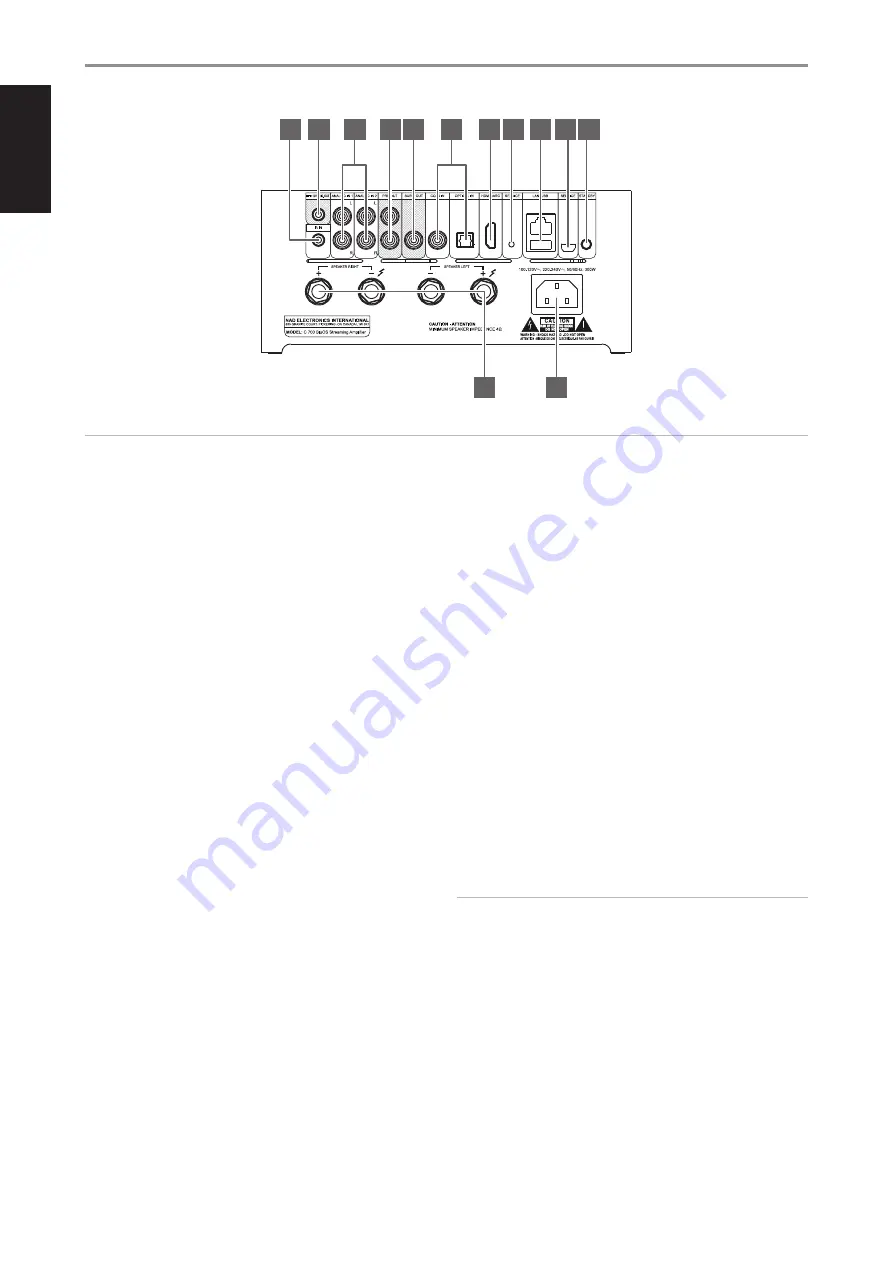
1 IR IN
•
This input is connected to the output of an IR (infrared) repeater
(Xantech or similar) or IR output of another compatible device to
allow control of the C 700 from a remote location.
IR LEARNING
IR Learning enables any IR remote control to learn BluOS basic remote
control codes. With the learned codes, the configured remote control
can be used to command your player.
•
To program IR Remote commands into your C 700, go to the
Settings
menu of the BluOS App, select
Player
,
IR Remote
and
then
IR Learning
.
•
Select the function desired from the IR Remote menu, point an IR
remote control at the unit and press the button to perform that
function.
•
Once successful, a check mark will appear beside the programmed
function. You can now use the IR remote control to command the
C 700 with the programmed functions.
2 +12V TRIGGER OUT
•
The +12V TRIGGER OUT is used for controlling external equipment
equipped with a +12V trigger input.
•
Connect this +12V TRIGGER OUT to the other equipment’s
corresp12V DC input jack using a cable with 3.5mm male
plug.
•
This output will be 12V when the C 700 is ON and 0V when it is
either OFF or in standby mode.
3 ANALOG IN 1-2
•
Input for line level sources such as CD player, tuner or any
compatible devices. Use dual RCA-to-RCA cable to connect the
source device’s left and right “Audio Output” to these line input
ports.
•
The sources will appear as “Analog Input 1” and “Analog Input 2” in
the navigation drawer of the BluOS App.
4 PRE OUT
•
Use dual RCA-to-RCA cable to connect PRE-OUT to the
corresponding analog audio input of compatible devices such
as amplifiers, receivers or other applicable devices. This makes it
possible to use the C 700 as a pre-amplifier to such devices.
5 SUBW (SUBWOOFER) OUT
•
Connect SUBW OUT to the low level input of corresponding
powered subwoofer.
•
Low frequency information below the selected crossover setting is
sent to the connected subwoofer.
6 OPTICAL IN/COAXIAL IN
•
Connect to corresponding optical and coaxial digital output of
sources such as CD or BD/DVD players, digital cable box, digital
tuners and other applicable components.
7 HDMI eARC
•
Connect to TV that supports HDMI Control (CEC) and Audio
Return Channel (ARC) or Enhanced Audio Return Channel (eARC)
functions. HDMI CEC, ARC and eARC functions are possible if
external devices that also support these features are interconnected
with C 700 via HDMI connection.
•
Use HDMI cable to connect HDMI ARC/eARC to corresponding
HDMI ARC/eARC port of TV. Use HDMI cable that has Ultra High
Speed HDMI Certification Label to enjoy support for larger
bandwidth and high bitrate format.
•
With ARC/eARC connection established, C 700 will output audio
signal from TV.
IMPORTANT
• Ensure that the audio setting/format of ARC/eARC-connected devices to
C 700 is set to PCM only.
• Only audio output signal from TV is supported by HDMI eARC port.
There is no video output at HDMI eARC port of C 700.
8 SERVICE
•
These USB port and tact switch are for servicing purposes only. Not
for consumer use.
IDENTIFICATION OF CONTROLS
REAR VIEW
6
4
5
6
9
8 10
7
8
11
12
2
1
3
ATTENTION!
Please ensure that the C 700 is powered off or unplugged from the mains power outlet before making any connections. It is also advisable to power down
or unplug all associated components while making or breaking any signal or AC power connections.


