background image

IDENTIFICATION OF CONTROLS

REAR PANEL

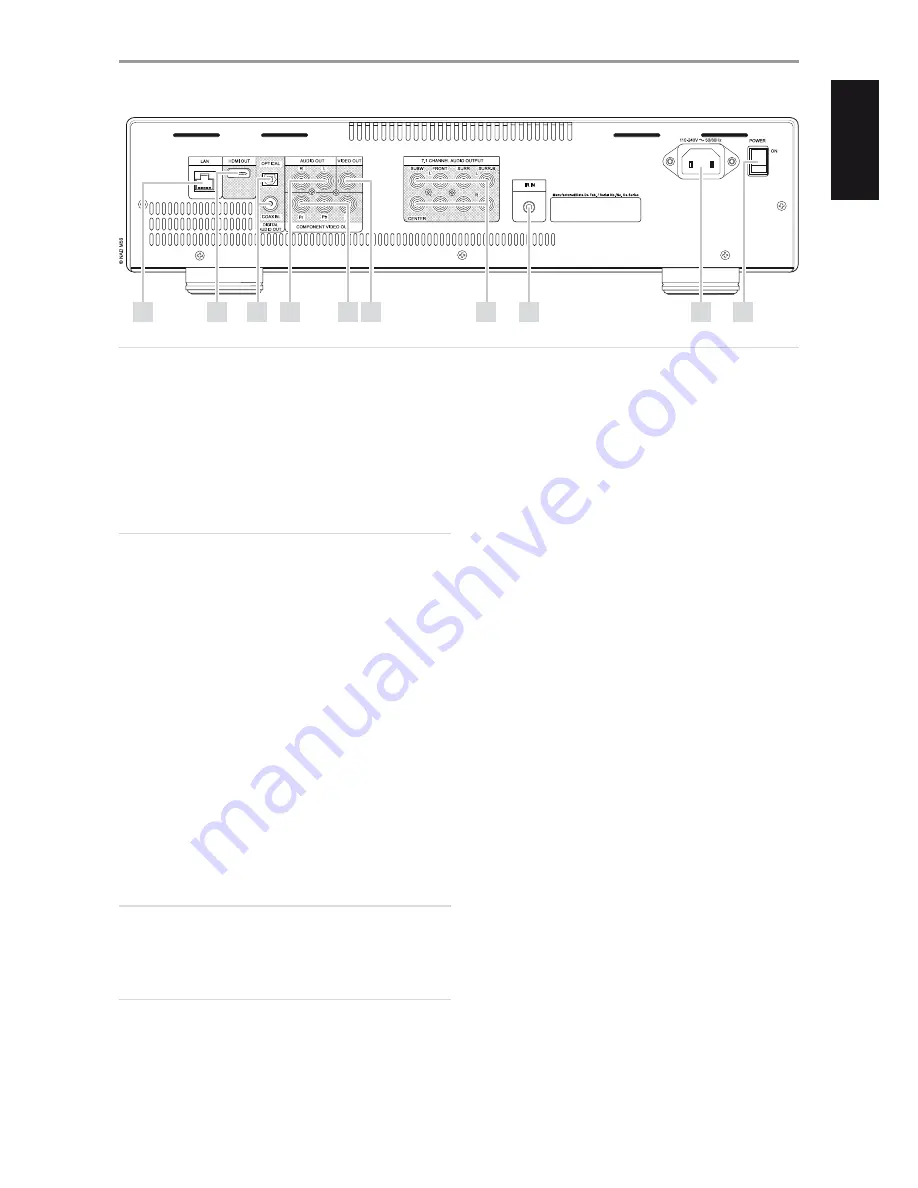
1  LOCAL AREA NETWORK (LAN) PORT:

 Using a commercially available 

straight LAN cable (Category 5/CAT5 or better with RJ45 connector), 
connect this LAN port to the corresponding port of your modem or router. 
By connecting the M56 to broadband internet, you can playback a disc that 
offers BD-Live function.  Refer also to the “NETWORK SETUP MENU” section 
of “USING THE M56” under the “OPERATION” main heading.

NOTES

•  NAD is not responsible for any malfunction of the M56 and/or the 

internet connection due to communication errors or malfunctions 
associated with your broadband internet connection or other connected 
equipment. Contact your Internet Service Provider (ISP) for assistance or 
the service bureau of your other equipment.

•  Contact your ISP for policies, charges, content restrictions, service 

limitations, bandwidth, repair and other related issues pertinent to 
internet connectivity.  

•  Some disc related material available through internet may not be 

compatible with the M56. Contact the producer of the disc for questions 
about such content availability or compatibility.

2  HDMI OUT:

 Using a HDMI cable (supplied only for European version 

model), connect the HDMI OUT jack to the corresponding HDMI input jack 
of a compatible equipment like a HDTV, a projector or an A/V Receiver.  

Dolby TrueHD, Dolby Digital Plus and DTS-HD Master Audio are 
supported with maximum 7.1 channels when HDMI OUT is the selected 
audio output port. Make sure to connect to an amplifier or receiver with 
a built-in (Dolby Digital, Dolby Digital Plus, Dolby TrueHD, Dolby Digital 
Plus, DTS-HD Master Audio and other applicable formats) decoder to 
playback applicable multichannel audio formats.

WARNING


Before connecting and disconnecting any HDMI cables, both the M56 
and the ancillary source must be powered OFF and unplugged from the 
AC outlet. Failure to observe this practice may cause permanent damage 
to all equipment connected via HDMI sockets.

IMPORTANT NOTICE 


If your HDMI equipped TV is not capable of decoding DTS or Dolby 
Digital Bitstream, set the M56’s HDMI or SPDIF setting at the “Audio 
Setup Menu” to “PCM Stereo”.  There may be a rushing noise heard if your 
TV is not capable of decoding the DTS (or Dolby Digital) Bitstream; most 
TVs do not have this capability.

3  DIGITAL AUDIO OUT (COAXIAL, OPTICAL):

  The digital playback 

audio output signal is available at these ports. Connect the optical or 
coaxial digital OUT ports to the corresponding S/PDIF digital input of an 
amplifier, receiver, computer soundcard or other digital processors.

4  AUDIO OUT:

 This analog audio output can be connected to the 

corresponding analog audio input of a compatible equipment like an 
amplifier, receiver, TV or stereo system. 

5  COMPONENT VIDEO OUT:

 Connect to the corresponding component 

video input of a compatible equipment like a monitor/television, 
projector, A/V receiver or processor. Be sure to observe consistency in 
connecting the appropriate Y, Pb, Pr jacks to the corresponding sources/
inputs. Do not rely purely on the color coding of the jacks, which may 
not always be consistent among brands.

6  VIDEO OUT:

 Connect to the corresponding composite video input of 

a compatible monitor/television, projector, A/V receiver or processor 
using quality dual-RCA cable designed for video signals.

7  7.1 CHANNEL AUDIO OUTPUT:

  The M56 contains a multi-channel 

decoder.  It enables playback of discs recorded in multi-channel 
surround without the need for an optional decoder.  Connect to the 
corresponding multi-channel audio input of a receiver or a processor.

8  IR IN:

  This input is connected to the output of an IR (infrared) repeater 

(Xantech or similar) or the IR output of another component to allow 
control of the M56 from a remote location. Most NAD products with IR 
OUT are fully compatible with the M56.

9  AC MAINS INPUT:

 The M56 comes supplied with a separate AC Mains 

cable.  Before connecting the cable to a live wall socket, ensure first 
that it is firmly connected to the M56’s AC Mains input socket. Always 
disconnect the AC Mains cable plug from the live wall socket first, 
before disconnecting the cable from the M56’s Mains input socket.

10  POWER SWITCH:

 The POWER switch supplies the master AC mains 

power for the M56. When this switch is at ON position, the M56 is in 
standby mode as shown by the amber status condition of the standby 
LED. Toggle the front panel’s STANDBY button to switch ON the M56 or 
back to standby mode. If you intend not to use the M56 for long periods 
of time (such as when on vacation), switch OFF the POWER switch. 
The front panel STANDBY button or M56 remote control’s [ON] button 
cannot activate the M56 when the POWER switch is switched OFF.

ATTENTION!


Please make sure that the M56 is powered off or unplugged before making any connections. It is also advisable to power down or unplug all associated 
components while making or breaking any signal or AC power connections.

3

4

5

6

9

1

2

7

8

10

9

EN

G

LI

SH

FR

ANÇ

AIS

ESP

AÑOL

IT

ALIANO

DEUT

SCH

NEDERL

ANDS

SVENSK

A

РУ

ССКИЙ

Summary of Contents for M56

Page 1: ...ENGLISH FRAN AIS ESPA OL ITALIANO DEUTSCH NEDERLANDS SVENSKA Owner s Manual M56 Blu ray Disc Player...

Page 2: ...only one way This is a safety feature If you are unable to insert the plug fully into the outlet try reversing the plug If the plug should still fail to fit contact your electrician to replace your o...

Page 3: ...difications to this equipment may cause harmful interference unless the modifications are expressedly approved in the manual The user could lose the authority to operate this equipment if an unathoriz...

Page 4: ...ng point this out The materials can be reused in accordance with their markings Through re use recycling of raw materials or other forms of recycling of old products you are making an important contri...

Page 5: ...n contact your local distributor IMPORTANT SAFETY INSTRUCTIONS 2 INTRODUCTION GETTING STARTED 6 UNPACKING AND SETUP 6 CHOOSING A LOCATION 6 DISC LOADING AND PLAYBACK 6 QUICK START 6 REGION MANAGEMENT...

Page 6: ...fingers well clear of the disc tray as it is closing Be especially careful with children s fingers around the closing disc tray as there is a risk of personal injury Press the disc tray is automatica...

Page 7: ...c to disc Some features may not be available on some discs VIDEO HIGHLIGHTS The BD ROM format for movie distribution supports three highly advanced video codecs includingMPEG 2 MPEG4 AVC H 264 and SMP...

Page 8: ...ype The speed will be retained even after the button is released press PLAY PAUSE to resume normal playback The front panel and ENTER buttons respectively simulate the same functions of the and ENTER...

Page 9: ...the optical or coaxial digital OUT ports to the corresponding S PDIF digital input of an amplifier receiver computer soundcard or other digital processors 4 AUDIO OUT This analog audio output can be c...

Page 10: ...scene for selective playback SEARCH Display or exit the search menu 7 TITLE POP UP Display DVD title menu or BD ROM pop menu if available MENU Access menu on a DVD disc if available 8 Select an item...

Page 11: ...ed setting selection 5 Press RTN to exit the Setup menu DISPLAY DISC OSD You can display the general disc playback status on the TV screen Some items can be changed using the menu To use the on screen...

Page 12: ...OUT CONNECTION For the 480i 576i resolution setting the output resolution of HDMI OUT will change to 480p 576p If you select a resolution manually and then connect the HDMI jack to TV and your TV does...

Page 13: ...play Mode to 24Hz for smooth presentation of film based materials 50 60Hz If 24Hz is selected and some picture disturbance is experienced when the video switches between video and film material set 10...

Page 14: ...by Digital or Dolby Digital Plus soundtracks It is useful when you watch your favorite action movie without disturbing others at night On The On setting is for late night sessions or other times when...

Page 15: ...wing 1 While at DVD Rating line menu press A Password prompt will come up in the menu screen 2 Input the password you have setup 3 Upon entering the password you can now set the parental rating level...

Page 16: ...nnection allows attached devices direct connection to the network and thus not subject to radio frequency interference 1 Select Wired from the CONNECTION SETTING menu 2 A menu prompts you to select OK...

Page 17: ...r any malfunction of the M56 and or the internet connection feature due to communication errors malfunctions associated with your broadband internet connection or other connected equipment NAD is not...

Page 18: ...e are cleared Built In Storage Delete all the downloaded contents from the built in storage USB Storage Delete all the downloaded contents from the connected USB storage DIVX VOD DivX is the name of a...

Page 19: ...ordings on CD R RW DVD R RW BD R RE discs or USB flash drive 1 Load the applicable disc or connect USB containing files Select Music from the Home menu 2 Press ENTER The MUSIC menu appears at the OSD...

Page 20: ...Use M56 remote control s red A green B yellow C or blue D buttons as indicated in the OSD go to the first file page move up or down the file page list or jump to last file page During playback press...

Page 21: ...k you through the quick and uncomplicated installation process 1 Close all Microsoft Windows programs and exit any anti virus software that may be running 2 Insert the Nero MediaHome 4 Essentials CD R...

Page 22: ...andard mode These settings can be used to re duce the noise level or set the black level of the video image on the screen Block NR Block Noise Reduction Set this option to Low Mid or High to reduce th...

Page 23: ...ow C button repeatedly until the picture returns to its normal size Zoom NOTE Zoom may not work on some discs or titles PICTURE Press to go to PICTURE MODE menu wherein video color setting options can...

Page 24: ...t a marker number that you want to recall Playback starts from the marked scene Alternatively press to highlight a marker number Use to select a marked scene you want to recall or clear Press ENTER an...

Page 25: ...ch PCM7 1ch PCM2ch PCM5 1ch PCM7 1ch PCM2ch PCM2ch PCM2ch PCM2ch PCM2ch PCM2ch PCM2ch PCM2ch DTS DTS DTS DTS DTS DTS DTS DTS DolbyDigital DolbyDigital DolbyDigital DTS DTS PCM2ch PCM2ch PCM2ch PCM2ch...

Page 26: ...Japanese 7465 Javanese 7487 Kannada 7578 Kashmiri 7583 Kazakh 7575 Kirghiz 7589 Korean 7579 Kurdish 7585 Laothian 7679 Latin 7665 Latvian Lettish 7686 Language Code Lingala 7678 Lithuanian 7684 Maced...

Page 27: ...T Lithuania CODE Country LU Luxembourg MO Macau MK Macedonia MG Madagascar MW Malawi MY Malaysia MV Maldives ML Mali MT Malta MH Marshall Islands MQ Martinique French MR Mauritania MU Mauritius YT May...

Page 28: ...l is set Cancel the rating function or change the rating level BD Live feature does not work Internet connection is not established Ensure that the M56 is connected to the local area network and can a...

Page 29: ...cense under U S Patent s 5 451 942 5 956 674 5 974 380 5 978 762 6 226 616 6 487 535 other U S and worldwide patents issued pending DTS is a registered trademark and the DTS logos Symbol DTS HD and DT...

Page 30: ...ll rights reserved NAD and the NAD logo are trademarks of NAD Electronics International a division of Lenbrook Industries Limited No part of this publication may be reproduced stored or transmitted in...

Reviews: