background image

SAVE THESE INSTRUCTIONS FOR LATER USE.
FOLLOW ALL WARNINGS AND INSTRUCTIONS MARKED ON THE 
AUDIO EQUIPMENT.

1  Read instructions 

- All the safety and operating instructions should be 

read before the product is operated.

2  Retain instructions 

- The safety and operating instructions should be 

retained for future reference.

3  Heed Warnings 

- All warnings on the product and in the operating 

instructions should be adhered to.

4  Follow Instructions 

- All operating and use instructions should be 

followed.

5  Cleaning 

- Unplug this product from the wall outlet before cleaning. 

Do not use liquid cleaners or aerosol cleaners. Use a damp cloth for 
cleaning.

6  Attachments 

- Do not use attachments not recommended by the 

product manufacturer as they may cause hazards.

7  Water and Moisture 

- Do not use this product near water-for example, 

near a bath tub, wash bowl, kitchen sink, or laundry tub; in a wet 
basement; or near a swimming pool; and the like.

8  Accessories 

- Do not place this product on an unstable cart, stand, 

tripod, bracket, or table. The product may fall, causing serious injury to 
a child or adult, and serious damage to the product. Use only with a 
cart, stand, tripod, bracket, or table recommended by the manufacturer, 
or sold with the product. Any mounting of the product should follow 
the manufacturer’s instructions, and should use a mounting accessory 
recommended by the manufacturer.

A product and cart combination should be moved with 
care. Quick stops, excessive force, and uneven surfaces may 
cause the product and cart combination to overturn.

10  Ventilation 

- Slots and openings in the cabinet are provided for 

ventilation and to ensure reliable operation of the product and to 
protect it from overheating, and these openings must not be blocked 
or covered. The openings should never be blocked by placing the 
product on a bed, sofa, rug, or other similar surface. This product should 
not be placed in a built-in installation such as a bookcase or rack unless 
proper ventilation is provided or the manufacturer’s instructions have 
been adhered to.

11  Power Sources 

- This product should be operated only from the type 

of power source indicated on the marking label. If you are not sure of 
the type of power supply to your home, consult your product dealer or 
local power company.  
The primary method of isolating the amplifier from the mains supply 
is to disconnect the mains plug. Ensure that the mains plug remains 
accessible at all times. Unplug the AC power cord from the AC outlet if 
the unit will not be used for several months or more.

12  Grounding or Polarization 

- This product may be equipped with a 

polarized alternating-current line plug (a plug having one blade wider 
than the other). This plug will fit into the power outlet only one way. 
This is a safety feature. If you are unable to insert the plug fully into the 
outlet, try reversing the plug. If the plug should still fail to fit, contact 
your electrician to replace your obsolete outlet. Do not defeat the safety 
purpose of the polarized plug.

13  Power Cord Protection 

- Power-supply cords should be routed so that 

they are not likely to be walked on or pinched by items placed upon or 
against them, paying particular attention to cords at plugs, convenience 
receptacles, and the point where they exit from the product.

14  Outdoor Antenna Grounding 

- If an outside antenna or cable system 

is connected to the product, be sure the antenna or cable system is 
grounded so as to provide some protection against voltage surges 
and built-up static charges. Article 810 of the National Electrical Code, 
ANSI/NFPA 70, provides information with regard to proper grounding 
of the mast and supporting structure, grounding of the lead-in wire 
to an antenna discharge unit, size of grounding conductors, location 
of antenna discharge unit, connection to grounding electrodes, and 
requirements for the grounding electrode.

NOTE TO CATV SYSTEM INSTALLER

This reminder is provided to call the CATV system installer’s attention to Section 
820-40 of the NEC which provides guidelines for proper grounding and, in 
particular, specifies that the cable ground shall be connected to the grounding 
system of the building, as close to the point of cable entry as practical.

15  Lightning 

- For added protection for this product during a lightning 

storm, or when it is left unattended and unused for long periods of 
time, unplug it from the wall outlet and disconnect the antenna or 
cable system. This will prevent damage to the product due to lightning 
and power line surges.

16  Power Lines 

- An outside antenna system should not be located in the 

vicinity of overhead power lines or other electric light or power circuits, 
or where it can fall into such power lines or circuits. When installing an 
outside antenna system, extreme care should be taken to keep from 
touching such power lines or circuits as contact with them might be 
fatal.

17  Overloading 

- Do not overload wall outlets, extension cords, or 

integral convenience receptacles as this can result in a risk of fire or 
electric shock.

18  Object and Liquid Entry 

- Never push objects of any kind into this 

product through openings as they may touch dangerous voltage points 
or short out parts that could result in a fire or electric shock.  Never spill 
liquid of any kind on the product.

WARNING: THE APPARATUS SHOULD NOT BE EXPOSED TO 
DRIPPING OR SPLASHING, AND OBJECTS FILLED WITH LIQUIDS, 
SUCH AS VASES, SHOULD NOT BE PLACED ON THE APPARATUS. 
AS WITH ANY ELECTRONIC PRODUCTS, USE CARE NOT TO SPILL 
LIQUIDS INTO ANY PART OF THE SYSTEM. LIQUIDS CAN CAUSE A 
FAILURE AND/OR A FIRE HAZARD.

IMPORTANT SAFETY INSTRUCTIONS

2

EN

G

LIS

H

FR

A

N

Ç

A

IS

ES

PA

Ñ

O

L

IT

A

LIA

N

O

D

EU

TS

CH

N

ED

ER

LA

N

D

S

SV

EN

SK

A

РУ

СС

К

И

Й

Summary of Contents for T557

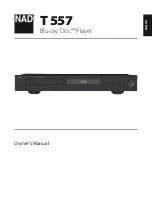
Page 1: ...ENGLISH FRAN AIS ESPA OL ITALIANO DEUTSCH NEDERLANDS SVENSKA Owner s Manual T557 Blu ray Disc Player...

Page 2: ...only one way This is a safety feature If you are unable to insert the plug fully into the outlet try reversing the plug If the plug should still fail to fit contact your electrician to replace your o...

Page 3: ...TO BEAM FCC NOTICE This equipment has been tested and found to comply with the limits for a Class B digital device pursuant to part 15 of the FCC Rules These limits are designed to provide reasonable...

Page 4: ...minimized thus contributing to the protection preservation and quality improvement of the environment RECORD YOUR MODEL NUMBER NOW WHILE YOU CAN SEE IT The model and serial number of your new T 557 ar...

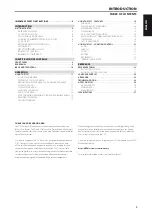
Page 5: ...ty information contact your local distributor IMPORTANT SAFETY INSTRUCTIONS 2 INTRODUCTION GETTING STARTED 6 UNPACKING AND SETUP 6 CHOOSING A LOCATION 6 DISC LOADING AND PLAYBACK 6 ASSEMBLY OF RUBBER...

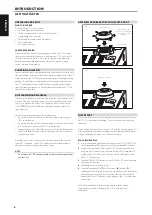
Page 6: ...s closing Be especially careful with children s fingers around the closing disc tray as there is a risk of personal injury Press the disc tray is automatically closed Playback of the first track start...

Page 7: ...to disc Some features may not be available on some discs VIDEO HIGHLIGHTS The BD ROM format for movie distribution supports three highly advanced video codecs including MPEG 2 MPEG4 AVC H 264 and SMP...

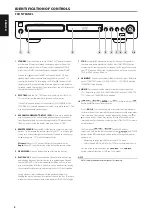
Page 8: ...lay and Pause of a BD DVD CD or other compatible media disc Press to start play or resume play after Pause If the disc tray is open press this button to automatically close the tray and start playback...

Page 9: ...cting and disconnecting any HDMI cables both the T 557 and the ancillary source must be powered OFF and unplugged from the AC outlet Failure to observe this practice may cause permanent damage to all...

Page 10: ...ed scene for selective playback SEARCH Display or exit the search menu 7 TITLE POP UP Display DVD title menu or BD ROM pop menu if available MENU Access menu on a DVD disc if available 8 Select an ite...

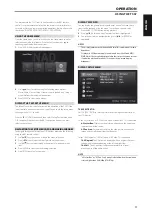
Page 11: ...sired setting selection 5 Press RTN to exit the Setup menu DISPLAY DISC OSD You can display the general disc playback status on the TV screen Some items can be changed using the menu To use the on scr...

Page 12: ...CONNECTION For the 480i 576i resolution setting the output resolution of HDMI OUT will change to 480p 576p If you select a resolution manually and then connect the HDMI jack to TV and your TV does not...

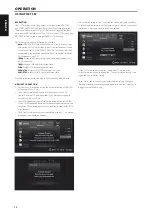
Page 13: ...splay Mode to 24Hz for smooth presentation of film based materials 50 60Hz If 24Hz is selected and some picture disturbance is experienced when the video switches between video and film material set 1...

Page 14: ...nverts any 96 kHz and 192 kHz signals to 48 kHz so your system can decode them 96KHz If your receiver or amplifier is not capable of handling 192 kHz signals select 96 kHz When this choice is made thi...

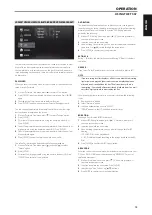
Page 15: ...owing 1 While at DVD Rating line menu press A Password prompt will come up in the menu screen 2 Input the password you have setup 3 Upon entering the password you can now set the parental rating level...

Page 16: ...electing or ENTER the CONNECTION SETTING as below is shown Use to configure your connection with below OSD Static Select to set manually the IP address Subnet Mask Gateway and consequently the DNS Ser...

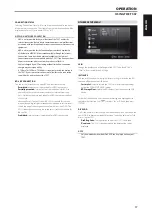
Page 17: ...ner certificates Internet access and AACS Online functions are prohibited for all BD Live contents without a certificate Advanced Access Content System AACS is a standard for content distribution and...

Page 18: ...lay Audio CD and MP3 WMA formatted recordings on CD R RW DVD R RW BD R RE discs or USB flash drive 1 Load the applicable disc or connect USB containing files Select Music from the Home menu 2 Press EN...

Page 19: ...green B yellow C or blue D buttons as indicated in the OSD go to the first file page move up or down the file page list or jump to last file page During playback press RTN once or twice to go back to...

Page 20: ...re in picture PIP secondary audio Virtual packages and other features for BD Video supporting BONUSVIEW BD ROM version 2 Profile 1 version 1 1 Final Standard Profile In addition to the BONUSVIEW funct...

Page 21: ...ow C button repeatedly until the picture returns to its normal size Zoom NOTE Zoom may not work on some discs or titles PICTURE Press to go to PICTURE MODE menu wherein video color setting options can...

Page 22: ...ct a marker number that you want to recall Playback starts from the marked scene Alternatively press to highlight a marker number Use to select a marked scene you want to recall or clear Press ENTER a...

Page 23: ...M2ch PCM2ch PCM2ch PCM2ch PCM2ch PCM2ch PCM2ch PCM2ch PCM2ch PCM2ch PCM2ch PCM2ch PCM2ch PCM2ch PCM2ch PCM2ch DTS DTS DTS DTS DTS DTS DTS DTS DolbyDigital DolbyDigital DolbyDigital DTS DTS PCM2ch PCM2...

Page 24: ...Japanese 7465 Javanese 7487 Kannada 7578 Kashmiri 7583 Kazakh 7575 Kirghiz 7589 Korean 7579 Kurdish 7585 Laothian 7679 Latin 7665 Latvian Lettish 7686 Language Code Lingala 7678 Lithuanian 7684 Maced...

Page 25: ...Lithuania CODE Country LU Luxembourg MO Macau MK Macedonia MG Madagascar MW Malawi MY Malaysia MV Maldives ML Mali MT Malta MH Marshall Islands MQ Martinique French MR Mauritania MU Mauritius YT Mayot...

Page 26: ...or change the rating level BD Live feature does not work Internet connection is not established Ensure that the T 557 is connected to the local area network and can access the internet External USB i...

Page 27: ...ther U S and worldwide patents issued pending DTS is a registered trademark and the DTS logos Symbol DTS HD and DTS HD Advanced Digital Out are trademarks of DTS Inc 1996 2008 DTS Inc All Rights Reser...

Page 28: ...l rights reserved NAD and the NAD logo are trademarks of NAD Electronics International a division of Lenbrook Industries Limited No part of this publication may be reproduced stored or transmitted in...

Reviews: