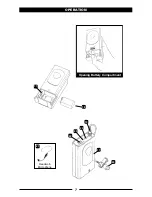
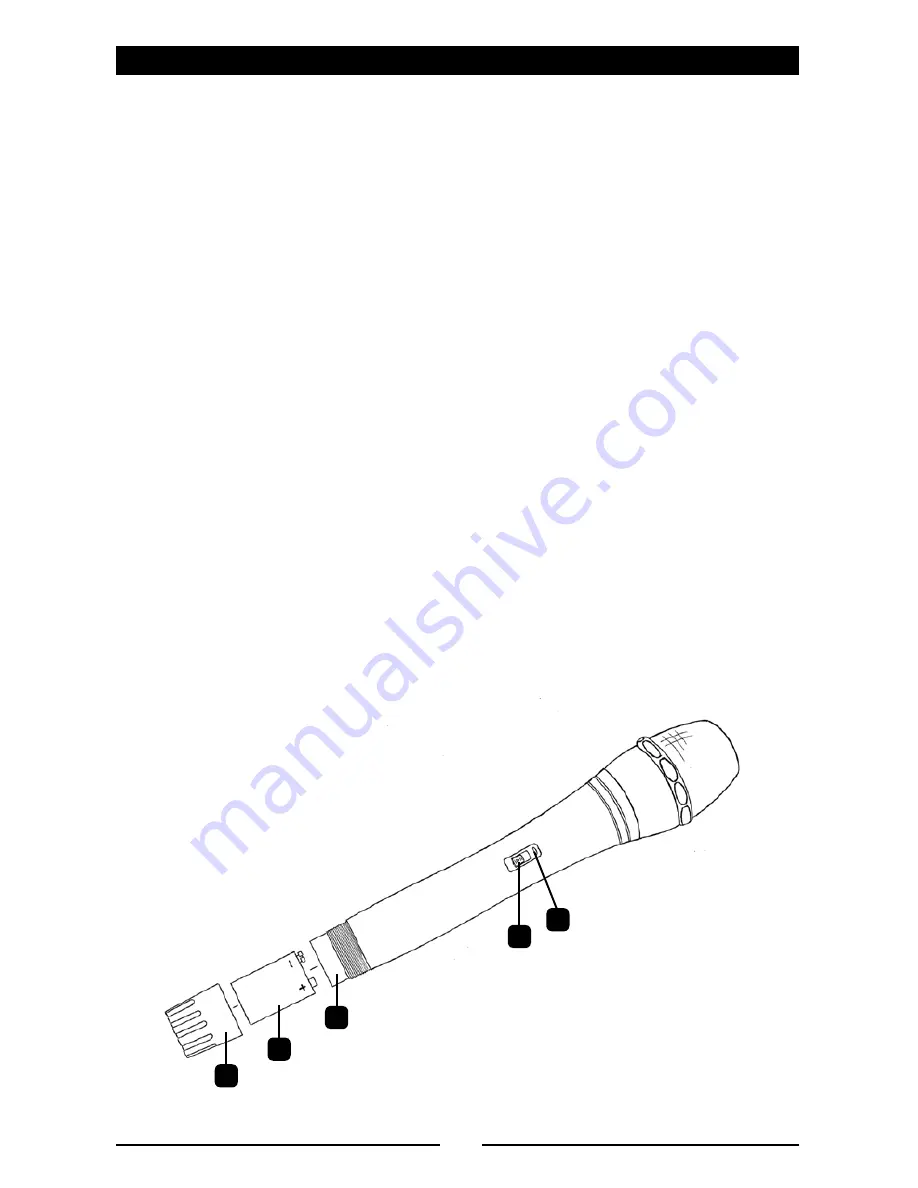
background image

5

12

14

13

15

16

opeRaTIon

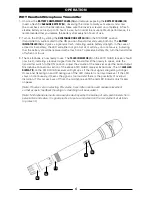
WHT Handheld Microphone Transmitter

1.  Unscrew the 

BATTERY COMPARTMENT COVER (12)

 and remove, exposing the 

BATTERY HOLDER (13)

Insert a fresh 9V 

ALKALINE BATTERY (14)

, observing the correct polarity as marked, and screw 

the cover back on to the microphone. Make sure the cover is screwed on completely. A fresh 

alkaline battery can last up to 15 hours in use, but in order to ensure optimum performance, it is 

recommended that you replace the battery after every ten hours of use.

2.  Turn on the WHT by sliding the 

OFF/STANDBY/ON SWITCH (15)

 to the STANDBY position 

(transmitter on, audio muted) or the ON position (transmitter and audio both on). The 

BATTERY 

INDICATOR LED (16)

 will give a single quick flash, indicating usable battery strength. In the case of 

a dead or low battery, the LED will either not go on at all or will stay on continuously, indicating 

that the battery should be replaced with a fresh one. To preserve battery life, turn the transmitter 

off when not in use.

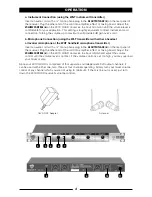
3.  The microphone is now ready to use. The 

TX LED INDICATOR (7)

 on the 401X QUAD receiver should 

now be lit, indicating a received signal from the transmitter. When ready to speak, slide the 

transmitter switch to the ON position. Adjust the volume of the receiver as per the Audio Output 

Microphone Connection section of the above 401X QUAD receiver instructions. The AF 

LEVEL LED 

DISPLAY (7)

 on the 401X QUAD receiver will light up as if the input signals are getting stronger. 

Occasional flickering on and off during use of the LED indicator is normal. However, if the LED 

stays on continuously, it means the signal is too loud and there is the possibility of overload 

distortion. If this occurs, back off from the microphone until the red LED indicator only flickers 

on peaks.

[Note: Observe care in selecting PA volume, transmitter location and speaker placement 

so that acoustic feedback (howling or screeching) will be avoided.]

[Note: Microphone elements can easily be destroyed by the buildup of salts and minerals from 

perspiration and saliva. It is good practice to put a windscreen on the mic element at all times 

to protect it.]

Summary of Contents for 401X Quad

Page 1: ...OWNER S MANUAL 401x QUAD 4 Channel VHF Wireless Microphone System...

Page 2: ...eceivers in one convenient rugged all metal single rack space housing makes operating 4 wireless systems at the same time easier than ever Front mount dual antenna jacks for either onboard or remote a...

Page 3: ...s on the MUTE CONTROL 9 should be turned clockwise until the LED extinguishes For each of the four channels when the Mute is properly adjusted the corresponding LED will light only when the system s t...

Page 4: ...r the WHT handheld microphone transmitter Insert an audio cord with a mono phone plug in the AF OUTPUT JACK 8 on the rear panel of the receiver Plug the other end of the cord into amplifier effect or...

Page 5: ...e transmitter off when not in use 3 The microphone is now ready to use The TX LED INDICATOR 7 on the 401X QUAD receiver should now be lit indicating a received signal from the transmitter When ready t...

Page 6: ...ady to use The TX LED INDICATOR 7 on the 401X QUAD receiver should now be lit indicating a received signal from the transmitter When ready to speak slide the transmitter switch to the ON position and...

Page 7: ...Operation 7 Headworn Microphone Opening Battery Compartment 17 20 21 22 23 24 19 17 18...

Page 8: ...the Audio Output Instrument Connections section of the above 401X QUAD receiver instructions The AF LEVEL LED DISPLAY 7 on the 401X QUAD receiver will light up as if the input signals are getting stro...

Page 9: ...9 Operation Opening Battery Compartment 26 25 28 29 25 30 31 27...

Page 10: ...ON switch input level adjust LED Indicator Unit ON single flash Low Battery Alert steady RF Power Out 50mW Max allowed by FCC Harmonic Spurious Emissions 40dB Battery 9V Alkaline Battery Life Up to 20...

Page 11: ...exclusion of incidental or consequential damages the above limitations and exclusions may not apply to you This warranty gives you specific legal rights and you may also have other rights which may v...

Page 12: ...type accepted under FCC rules parts 90 74 and 15 This device complies with RSS 210 of Industry Science Canada Operation is subject to the following two conditions 1 this device may not cause harmful...

Reviews: