background image

SNR-CI-H Series   

Network IP Cameras User Manual 


25/ 32 


Setup steps: 

Step 1: Log in IP camera via the IE browser (the default IP is 192.168.55.160). 

Step 2: Switch to the page 

[network settings]

, fill in the device IP address assigned by network 

administrator in to 

[Basic Parameters]

, e.g. 192.168.55.160; 

Step 3: Fill in subnet mask, default value is 255.255.255.0; 

Step 4: Fill in gateway address, default value is 255.255.255.0; 

Click 

[Save]

 to save the parameters. Start the device, enter its IP address into IE browser to 

visit it. 

  D ynamic IP 

Dynamic IP means that IP camera obtains IP address from DHCP server. See below picture 

for the network topology:


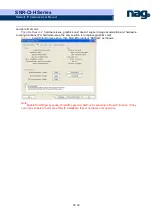
Please refer to below picture for the network settings: 


Log in IP camera via IE, turn to 

[Network Settings]

 and check 

[DHCP on/off].


After setting all the parameters, click 

[save]

 and restart to make the parameters valid. 

If a wireless IP camera needs to 
be visited via W iFi mode, users 
need to set IP address, subnet 
mask, gateway, SSID number 
and password in “WiFi   
settings” 

Summary of Contents for SNR-CI-H Series

Page 1: ...SNR CI H Series Network IP Cameras User Manual Network IP Cameras User Manual ...

Page 2: ...transmission and monitoring It is easy to install and operate Before installation please check to see whether you have the product and all accessories ready If anything is missing please contact your supplier in time Package contents 1 IP Camera 1pc 2 Power Adapter model depends on the camera model 1pc 3 User s Manual 1pc 4 Compact Disk 1pc 5 Certificate of quality 1pc 6 Warranty Card 1pc Optional...

Page 3: ...ettings 7 5 2 Video Settings 8 5 3 Alarm Settings 10 5 4 Network Settings 12 5 5 User Management 18 5 6 Front end Settings 19 5 7 Storage Device 19 5 8 Visit Settings 21 Appendix 1 Network Interface of IP Camera 22 Appendix 2 Default Network Parameters 22 Appendix 3 Apply for DDNS domain name service 22 Appendix 4 Visit IP camera under different network environments 24 Appendix 5 FAQs 29 ...

Page 4: ...the ActiveX File download dialogue box pops up click Run or Save to download ActiveX after download it double click the downloaded file xdview exe to install it After installation completes a message Register OCX success will appear see the picture below 2 Login Reopen Internet Explorer after ActiveX installation completes input IP address of the IP camera to turn to login page enter username defa...

Page 5: ...p click Snap snap the current image and save it in JPG format automatically to the storage directory of snapped images Record Manual image recording automatically record current images and save them in 264 format to the storage directory of recorded images after the recording function turned on Displayed status after recording starts Playback Click Playback the playback page will pop up for search...

Page 6: ...ty is 512 entries of message when the number of entries exceeds 512 system will delete records of the earliest date automatically Zoom In This feature allows the manual drag and drop of video display area to realize partial zoom in Full Screen Display images in full screen right click to exit full screen mode PTZ Control Allows four directional rotation automatic adjustment of PTZ rotation speed e...

Page 7: ...ures of a specific period Play Choose the recorded image or snapped picture in file list right click the file or picture or click play button to play The contents will be displayed in the right window users can view the playing information and control the process see below picture Click icon to turn to previous year Click icon to turn to next year Click icon to turn to previous month Click icon to...

Page 8: ...e Click Pause to pause download manually click Start to continue to download the unfinished files click Delete to delete the downloaded files click Close to close the download information interface 5 Set System Parameters 5 1 System Settings See below picture for the interface of System Settings System Clock click synchronize with system to synchronize the date and time of IP camera with those of ...

Page 9: ... the latest edition obtained from supplier is V2 2 1 3 then the kernel edition after upgrade should be V2 2 1 3 Note Don t cut off the power and internet connection while upgrading 5 2 Video Settings See below picture for the interface of Video Settings Video interface of CCD models Video Name the name of video channel displayed at the bottom left of image movable maximum characters allowed 32 Tit...

Page 10: ...mage quality 2 WAN default value I frame interval 25 frame rate 5 bitrate CBR 384kbps image quality 4 Note Non professional users please use Advanced Settings with caution Auto Iris Level adjust the control level of auto iris to control the illumination of lens iris reduce illumination of auto iris increase illumination of auto iris Works only on auto iris lens Auto select this button when using a...

Page 11: ...e power frequency Video Mirror Rollover set video mirror vertical mirror of images and rollover horizontal rollover of images 5 3 Alarm Settings 5 3 1 Motion detection See below picture for the interface of IP camera Motion detection In this page users can set features like motion detection on off sensitivity detection time linkage alarm output alarm output duration E mail sending when alarm been ...

Page 12: ...an be saved via E mail sending or FTP uploading Set detective area left click and drive the mouse to set the surveillance areas 4 areas at most All set the whole video as motion detection area Clear clear all motion detection areas After setting all the parameters click save to make the parameters valid 5 3 2 Sensor Alarm See below picture for the interface of IP camera Sensor Alarm Set sensor ala...

Page 13: ...he linkage alarm output after being triggered in seconds the range of the duration is 0 86400s 0 means that there is no limit for alarm output E mail sending Send network failure alarm information to users via E mail details about E mail setting please refer to Network Settings Linkage Snapping When alarm is triggered the device SD card will be driven to snap pictures The pictures can be saved via...

Page 14: ...is 80 users are recommended not to change it DNS address The default DNS address is the DNS address of Guangdong province users outside the area please use DDNS function to set the DNS address as their local DNS address Note after revise and save parameters the device will restart If it is applied in LAN please pay attention to avoid conflict between its IP address and the IP addresses of other de...

Page 15: ...of wireless router The mode must be compatible with the supported modes of IP camera Wireless mode supported by IP camera 802 11b g protocol low power Wi Fi model 802 11a b g n protocol high power Wi Fi model 4 Enable Wi Fi function compulsory 5 Open security setting optional This option can enable the security certification of wireless router If it is enabled users need to select the correspondin...

Page 16: ...uxiliary encryption mode WEP security type developing system sharing key and auto selection WPA WPA2 security type TKIP and AES It must be the same as the security option setting of wireless gateway router AP After setting completes save all parameters Then disconnect the network cable IP camera can be visited via wireless IP such as 192 168 1 160 Note The wireless network IP address and cable net...

Page 17: ... function PPPOE address after successful setting of device dial up it will display the public IP Address PPPOE user name ADSL dial up account obtain from the IP service provider PPPOE password ADSL dial up password obtain from the IP service provider On line duration start timing after dial up to see the online duration after successful dial up Active connection mode Active connection switch enabl...

Page 18: ...red one goes wrong system will switch to the alternate one FTP URL the IP address or HTTP address of FTP server FTP port port of FTP server the default port is 21 Remote path path on remote FTP server if the path doesn t exist or has not been filled in the device will create a file folder under the root directory of FTP server FTP user name and password user name and password of FTP server Note Us...

Page 19: ...check this switch to enable public IP mail notification function Interval select the interval of public IP mail notifications After enable this function when the device starts or detects public IP change it will send notification mail to the mail address set in mail settings 5 5 User Management See below for IP camera user manager settings interface You can set three users for every camera one is ...

Page 20: ... control of add on communication control device can be implemented PTZ decoder protocol Decoder address 1 255 Built in protocol echo the built in protocol name of current IP camera PTZ decoder protocol file uploading to upload the decoder dome camera communication protocol selected by users The system supports hundreds of decoder dome camera communication protocols it can also be defined by users ...

Page 21: ...d gets full in one hour the device will stop recording and snapping images After the one hour session ends system will delete the files of the hour and continue to record and snap pictures Scan the disk when device starts check storage device or not when IP camera starts Note 1 Hot plugging is not recommended for SD card compulsory hot plugging may damage the SD card causing data loss or abnormal ...

Page 22: ...low picture for the interface of IP camera Visit Settings PC live preview parameters setup Stream selection set video stream for PC live preview preferred stream and alternate stream are selectable The parameters of preferred and alternate stream can be set up in Video Settings Preview mode users can choose real time priority or fluency priority mode according to their needs Anti crack select this...

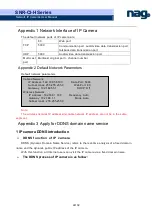
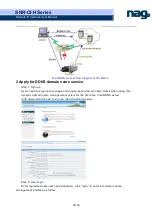
Page 23: ...network IP address cannot be in the same segment Appendix 3 Apply for DDNS domain name service 1 IP camera DDNS introduction DDNS function of IP camera DDNS Dynamic Domain Name Service refers to the real time analysis of a fixed domain name and the dynamic public IP address of the IP camera With this function all Internet users can visit the IP camera via a fixed domain name The DDNS process of IP...

Page 24: ...n up Users need to sign up to manage and inquire about domain name status when using this dynamic domain name management system for the first time Visit DDNS server http www mvddns net to sign up See the picture below Step 2 User login Enter registered user name and password click login to enter into domain name management interface as follow ...

Page 25: ...ents You can visit IP camera with your PC via LAN or WAN the following contents will tell you how to use IP camera under different network environments 1 LAN There are two ways to connect IP camera to LAN static IP and dynamic IP Static IP Static IP means that Your network administrator assigns a LAN IP address to IP camera The IP of your PC and IP camera must be in the some network segment to mak...

Page 26: ... 255 255 255 0 Click Save to save the parameters Start the device enter its IP address into IE browser to visit it Dynamic IP Dynamic IP means that IP camera obtains IP address from DHCP server See below picture for the network topology Please refer to below picture for the network settings Log in IP camera via IE turn to Network Settings and check DHCP on off After setting all the parameters clic...

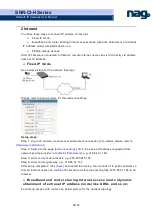
Page 27: ...ra via crossover cable direct connection For details please refer to Hardware Installation Step 2 Switch to the page network settings fill in the device IP address requested from network service provider in to Basic Parameters e g 218 84 31 168 Step 3 enter correct subnet mask e g 255 255 255 192 Step 4 enter correct gateway e g 218 84 31 131 After setup completes click Save and restart the device...

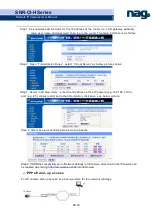
Page 28: ... 5 Fill in the registration password to log into DDNS server Step 6 fill in the domain name applied on DDNS server e g test mvddns net Step 7 Fill in DDNS server address e g www mvddns net Step 8 fill in the port of DDNS server default value is 30000 users are recommended not to change it Step 9 fill in the port number of public network data after mapping the default port is 5000 If several IP cam...

Page 29: ...ow picture shows Step 3 Select Add New Items enter the IP address of the IP camera e g 192 168 1 100 port e g 85 status valid and other information click save see below picture Step 4 After save successfully below screen appears Step 5 If DDNS is successfully set in Network Settings of IP camera direct visit to the IP camera can be realized via entering http test mvddns net 85 into IE browser PPPo...

Page 30: ...edition is V4 0 0 0 Backup file Solution Connect the power cord and network cable of IP camera press on RESET button and release it after 10 seconds system will run the back up programme automatically After enter into the back up programme upgrade system After upgrade completes the IP camera will work normally The back up programme offers only upgrade and parameter setup functions audio and video ...

Page 31: ... with IP camera Solution modify the physical address of IP camera Possible Reason 5 Web port has been modified Solution Contact Network Administrator to obtain related information Possible Reason 6 Unknown Solution Press RESET to restore default settings then connect it again the default IP address is 192 168 55 160 subnet mask is 255 255 255 0 7 7 7 7 The color of images is abnormal green or othe...

Page 32: ...on and hardware zooming functions For hardware issue the only solution is to replace graphics card Solution install DirectX image drive then Start Run input DXDIAG as follows Note Enable DirectDraw speedup Direct3D speedup AGP veins speedup in DirectX function If they can not be enabled that means DirectX installation fails or hardware not supportive ...

Reviews: