10
TY-GC62-010A Rev.2
5. Installation and removal
For installation, select a place with less vibration, without exposure to direct sunlight, with
less humidity and little dust, and not exposed to water or oil. When using one of the pressure
connection ports open to the atmosphere, avoid places where the pressure on the
open-to-atmosphere side fluctuates (where the wind directly hits for example). When
installing in such a place, please consider preventive measures such as extension of the
tube to where there is no impact of pressure fluctuation of the atmosphere open side.
Since the main body is made of resin, please be careful not to apply a
large force, and not make scratches.
■
5.1 Piping
We are offering a model that comes with apparatus for piping for this product. Please
contact the sales office for details.
Make sure to pipe the high pressure side of the applied pressure to the
connection port “H” and the low pressure side to the connection port “L”.
The pressure connection ports of the panel mount model are located on the rear side (L
and H 1 each) and on the side (L and H 1 each). Use the connection port of L and H to be
used, and fill in the other unused ports (other L and H) using the hexagon socket head plug
all way up to the main body. When the plug is used repeatedly, wrap with the seal tape and
block it so as to prevent leakage. In that case, tightening torque to the screw part should
be 1 N m or less. Torque is for the hexagon socket head plug.
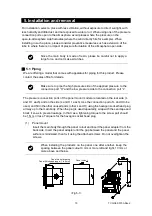
(1)
Panel mount
Insert the main body through
the panel cutout and insert the panel adapter from the
back side. Insert the panel adapter until the gap between the panel and the panel
surface is minimized, then fix it using the attached screws. Do not overtighten the
screws.
When installing the products on the panel one after another, keep the
spacing between the panel cutout 3 mm or more left and right, 13 mm or
more above and below.
<Fig.5-1>
Panel cutout
Panel mount drawing
Panel (thickness range: 1 to 4mm)

