NDS Quick Start Guide
English
Full NDS installation and operational information can be found in the Reference Manual
available on line at www.naimaudio.com
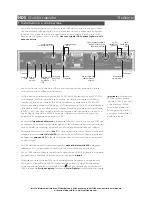
Out
sockets to a preamplifier, CD player or DAC
Remote In
socket. Use a cable terminated
with a 3.5mm jack plug at one end and a 3.5mm jack or phono plug as necessary at the
other end.
2 Switching On and Getting Started
• Once all connections have been made, switch on the NDS using the external power supply
power switch. The NDS will display a welcome screen and select its
Digital 1
input.
Note:
If the NDS is left unused its display will switch off after a preset time. The “Auto-off” time
can be adjusted within the setup menus.
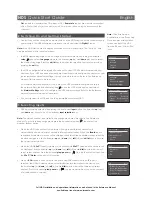
• The NDS display language can be changed. Enter setup mode by pressing the handset
setup
( ) key, select
Language
and use the handset
up
(
5
) and
down
(
6
) keys to select
the desired language. Press the
ok/list
key to confirm the selection. Leave setup mode by
pressing the
exit
key.
• The NDS is configured when shipped to connect to wired TCP/IP networks automatically.
However, if your NDS has been previously used and its network configuration altered, or your
router requires nonstandard settings, it may not be able to do so. Refer to the Reference
Manual if this appears to be the case.
If a wireless network connection is to be used, the NDS will require configuration to join
the network. Press the handset setup key ( ) once the NDS is switched on and select
the
Network Settings
option to configure the NDS wireless settings. Refer to the Reference
Manual for more information if necessary.
• If necessary select the NDS input on the preamplifier or external DAC.
3 Selecting Inputs
• NDS inputs can be selected by pressing the front panel
input
button, the handset
up
(
5
)
and
down
(
6
) keys or one of the handset
input selection
keys.
Note:
The default handset input selection key assignments are described in the Reference
Manual. To modify the key assignments press the handset setup key ( ) then select the
Handset Buttons option.
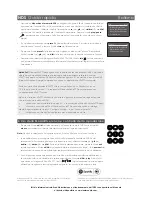
• When the NDS is connected to a network with high speed internet access it will
automatically download a list of available internet radio stations. When the
iRadio
input is
subsequently selected, a menu will be displayed that lists all the available stations sorted by
location and genre. Use the handset
up
(
5
),
down
(
6
),
left
(
3
) and
ok/list
keys to browse
the list and select stations.
• When the NDS
UPnP
™ input is selected, a list of available
UPnP
™ servers on the network will
be displayed. Use the handset
up
(
5
),
down
(
6
),
left
(
3
) and
ok/list
keys to browse and
select server content. Press the handset
play/pause
key ( ) to play the selected item. See
the
UPnP™ Notes
at the end of this section.
• When a
USB
device is connected to the front panel USB socket and the USB input is
selected, the NDS will display a menu and folder structure that reflects the device. Use
the handset
up
(
5
),
down
(
6
),
left
(
3
) and
ok/list
keys to browse the folders and select
content. Press the handset
play/pause
key ( ) to play an audio file or the entire contents
of a folder, album or playlist.
Note:
The n-Stream app,
available from the iTunes App
Store, enables wireless touch
screen control of the NDS
from an iPhone, iPad or iPod
touch.
Language 1/7
4
English
Deutsch
Français
Español
UPnP 3/3
UnitiServe
NAS
4
PC
USB
4/18
Brilliant Corners.wav
Grace and Danger.wav
Nelly The Elephant.wav
4
Solid Air.wav
Internet Radio
2/8
Added Stations
4
Naim's Choice
Location
Genre
Setup 4/9
Language
Inputs
Analogue Outputs
4
Network Settings
Network Settings
1/5
4
Name: NDS-C135
Wireless:
Not Used
Status: Not Connected
DHCP:
Yes


