background image

E9

8.6 AV Bypass

The NAIT XS 3 can be integrated within a multi-channel 
home theatre system, driving the front left and right channel 
speakers, by engaging its AV Bypass mode. AV Bypass 
mode enables a home theatre processor to take over volume 
control of signals connected to the NAIT XS 3 av input. It is 
engaged using the switch on the rear panel. The  
NAIT XS 3 volume control indicator will extinguish when AV 
Bypass mode is engaged and the av input is selected. The 
remote handset volume control will also be disabled.

Note: The AV Bypass feature must be used with care. It 
bypasses the NAIT XS 3 volume control leaving any signal 
connected to the av input to be passed to the speakers at 
full volume.

Note: Inserting a headphone plug while AV Bypass mode 
is selected temporarily returns the NAIT XS 3 to normal 
operation. Removing the headphone plug will return the 
NAIT XS 3 to AV Bypass mode.

Note: The mute function is disabled when AV Bypass 
mode is engaged.

8.7 Other Signal Inputs and Outputs

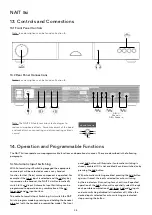
The NAIT XS 3 incorporates RCA phono sub out, DIN pre-
amp out, and DIN power-amp in sockets on its rear panel. In 
normal use the pre-amp out and power-amp in sockets are 
connected by a link plug. The link plug should be removed 
only in the following circumstances: 

•   A power supply upgrade is to be used. 

•    An alternative preamplifier is to be used with the  

  NAIT XS 3 power amplifier. See Section 8.8

•     An alternative power amplifier is to be used with the 

NAIT XS 3 preamplifier. 

Note: The power amp in socket carries a 24V DC power 
supply output intended for Naim preamplifiers that 
require an external power supply.

The RCA phono sub out sockets provide a stereo output 
intended for connection to an active subwoofer. The output 
signal is a duplicate of the preamplifier output. No low-pass 
filtering is applied.

8.8 Power Amp Mode Operation

If a NAIT XS 3 is to be used as a stereo power amp only it 
must be configured to operate in power amp mode: 

•    With the NAIT XS 3 switched off, remove its rear panel 

link plug and connect the interconnect cable from the 
preamp or preamp power supply to the power amp in 
socket

• 

 Switch on the NAIT XS 3. The mute button will flash to 
indicate that the link plug has been removed. Press and 
hold the mute button until it extinguishes. The NAIT 
XS 3 is now in power amp mode. Its volume control 
indicator and button illumination will extinguish.

• 

 To return the NAIT XS 3 to normal operation, switch it 
off, replace the link plug and switch it on again.

8.9 Power Supply Upgrades

The NAIT XS 3 preamplifier can be upgraded through the 
connection of an external Flatcap, Hi-Cap or Supercap 
power supply. The NAIT XS 3 and external power supply 
must be switched off when connections are made. Switch 
on the external power supply first followed by the NAIT XS 3 
when all connections are complete.

8.10 General Connections Notes

The NAIT XS 3 negative input and output connections for 
each channel are common. The mains earth (ground) should 
always be connected regardless of what other equipment is 
used in conjunction with the amplifier. The mains earth only 
grounds the case and the electrostatic screen within the 
transformer, and is not connected to the signal negative. In 
order to avoid hum loops, the signal negative of the whole 
system should be connected to the mains earth (ground) in 
one place.

A signal ground connection is fitted to the NAIT XS 3 rear 
panel. This is intended to be used to connect a turntable 
pick-up arm signal earth only.

8.11 External Control and Interface

The NAIT XS 3 is fitted on its rear panel with a 3.5mm jack 
Remote In socket and a mini-USB interface socket.

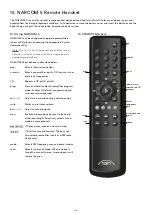
The Remote In socket can be used for RC5 remote control 
of the NAIT XS 3 via a wired connection or a remote IR 
repeater.

The mini-USB socket enables firmware upgrades and 
diagnostic tests to be carried out. Contact your Naim 
retailer for more information if required. 

Note: The mini-USB interface is not intended for the 
connection of USB memory devices.

Summary of Contents for SUPERNAIT 3

Page 1: ...Reference Manual INTEGRATED AMPLIFIERS SUPERNAIT 3 NAIT XS 3 NAIT 5si ...

Page 2: ...Operation and Programmable Functions E7 8 NAIT XS 3 E8 9 Controls and Connections E10 10 System Upgrade Connections E11 11 Operation and Programmable Functions E12 12 NAIT 5si E13 13 Controls and Connections E14 14 Operation and Programmable Functions E14 15 NARCOM 5 Remote Handset E16 16 Diagram Icons E17 17 Specifications E18 18 Product Recycling E19 Section Page ...

Page 3: ... fuses should be fitted Fuses of a lower rating will fail after a period of use Do not wire voltage dependent resistors or noise suppressors into mains plugs They degrade the mains supply and the sound 2 1 Mains Plug Wiring In some territories a mains plug may need to be fitted to the supplied mains lead As the colours of the wires in the mains lead may not correspond with the coloured markings id...

Page 4: ... circumstances depending on where you live and the earthing arrangements in your home you may experience radio frequency interference Controls on broadcasting in some territories allow very high levels of radio frequency radiation and both the choice and exact siting of equipment may be critical Susceptibility to radio frequency interference is related to the wide internal bandwidth necessary for ...

Page 5: ... in preference to RCA phono sockets Note Where an input has DIN and phono socket options only one should be connected at any one time Always use high quality interconnect cables to connect sources to inputs The Naim Hi Line will produce the best results 4 3 Speaker Outputs A set of stereo speaker connection sockets is provided on the rear panel Custom Naim loudspeaker connectors are supplied to ma...

Page 6: ...l link plug and connect the interconnect cable from the preamp or preamp power supply to the power amp in socket Switch on the SUPERNAIT 3 The mute button will flash to indicate that the link plug has been removed Press and hold the mute button until it extinguishes The SUPERNAIT 3 is now in power amp mode Its volume control indicator and button illumination will extinguish To return the SUPERNAIT...

Page 7: ... ch2 cd and tuner in ch1 ve ch1 out ch2 out ch2 av and stream in out ve ve ve ch1 ch2 aux 2 in Note The link plug should be removed only if a power supply upgrade is to be used or an alternative preamplifier is to use the SUPERNAIT 3 power amplifier section It should remain fitted in all other circumstances ch2 ch2 ch1 ch1 nc ve ve ve bi amp out power amp in ve ve ve ch1 ch2 preamp out DIN Phono D...

Page 8: ...tems upgrades using external power supplies or additional power amplifiers are possible Contact your Naim retailer or local distributor for more information Icon descriptions can be found in Section 16 6 1 SUPERNAIT 3 with Hi Cap power supply and StageLine phono amplifier 6 2 SUPERNAIT 3 with additional NAP 200 power amplifier ...

Page 9: ...y 7 3 Display The SUPERNAIT 3 front panel button illumination can be switched off by pressing the remote handset in preamplifier mode disp function Any subsequent handset or front panel operation will temporarily restore the display A second operation of the disp function will restore the display 7 4 Switch on After switch on the SUPERNAIT 3 will remain muted for 20 seconds while control systems a...

Page 10: ...rresponds to a DIN input socket on the rear panel The aux 2 DIN socket also carries a power supply output intended to power a Naim StageLine or SuperLine phono preamplifier Note For optimum sound quality DIN sockets should always be used in preference to RCA phono sockets Note Where an input has DIN and phono socket options only one should be connected at any one time Always use high quality inter...

Page 11: ...amp only it must be configured to operate in power amp mode With the NAIT XS 3 switched off remove its rear panel link plug and connect the interconnect cable from the preamp or preamp power supply to the power amp in socket Switch on the NAIT XS 3 The mute button will flash to indicate that the link plug has been removed Press and hold the mute button until it extinguishes The NAIT XS 3 is now in...

Page 12: ...lug should be removed only if a power supply upgrade is to be used an alternative preamplifier is to use the NAIT XS 3 power amplifier section or an alternative power amplifier is to use the NAIT XS 3 preamplifier section It should remain fitted in all other circumstances Note The NAIT XS 3 features various technologies to reduce microphonic effects Some movement of the board and sockets when conn...

Page 13: ...3 system upgrade Other system upgrades using external power supplies or additional power amplifiers are possible Contact your Naim retailer or local distributor for more information Icon descriptions can be found in Section 16 10 1 NAIT XS 3 with FlatCap XS power supply and StageLine phono amplifier ...

Page 14: ...button or remote handset mute key 11 3 Display The NAIT XS 3 front panel button illumination can be switched off by pressing the remote handset in preamplifier mode disp function Any subsequent handset or front panel operation will temporarily restore the display A second operation of the disp function will restore the display 11 4 Switch on After switch on the NAIT XS 3 will remain muted for 20 s...

Page 15: ...in preference to the RCA phono sockets if practical Do not connect both the DIN and RCA phono sockets of one input simultaneously 12 3 Speaker Outputs A stereo set of speaker connection sockets is provided on the rear panel The sockets can accept standard 4mm plugs but to comply with European legislation the Naim connectors supplied should be used Naim Audio speaker cable will provide the best res...

Page 16: ...elected and the cd play key is pressed on the handset the NAIT 5si will automatically switch to the cd input Automatic Input Switching can be programmed to operate on any combination of the cd tuner hdd and av input buttons To enable Automatic Input Switching first switch the NAIT 5si into program mode by pressing and holding the handset prog key with the handset in preamplifier mode The front pan...

Page 17: ...ypass mode is selected temporarily returns the NAIT 5si to normal operation Removing the headphone plug will return the NAIT 5si to AV Bypass mode Note The mute function is disabled when AV Bypass mode is engaged 14 3 Handset Volume Control The remote handset volume keys provides some alternative control characteristics A short press and release of a key will adjust by a preset nudge while pressin...

Page 18: ...l Adjusts channel balance mon Enables a record device output to be heard while recording Alternatively selects mono mode on some products CD play pause previous next and stop CD fast reverse and forward The keys can also select preamplifier inputs and FM radio frequencies mode Selects FM frequency scan and preset modes scan Selects tuner scan mode When a station is found the scan will pause A seco...

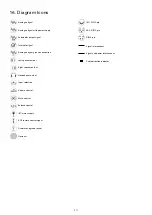
Page 19: ...ct Signal and power interconnect Cable direction indicator Subwoofer output signal Optional Turntable signal Analogue signal ground connection Left speaker output Right speaker output IEC mains supply Headphones output Input selection RC5 remote control signal Firmware upgrade socket Volume control Mute control Balance control ...

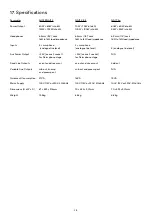
Page 20: ...analogue line level analogue line level 4 analogue line level Aux Power Output 24V on aux 2 socket 24V on aux 2 socket N A for Naim phono stage for Naim phono stage Fixed Line Outputs av out and stream out av out and stream out hdd out Variable Line Outputs sub out bi amp sub out and preamp out N A and preamp out Quiescent Consumption 37VA 16VA 19VA Mains Supply 100V 115V or 230V 50 60Hz 100V 115V...

Page 21: ... waste These products must be disposed of at facilities capable of re cycling them and appropriately handling any waste by products Contact your local authority for details of the nearest such facility Appropriate recycling and waste disposal helps conserve resources and protects the environment from contamination ...

Page 22: ...Naim Audio Ltd Southampton Road Salisbury England SP1 2LN Call 44 0 1722 426600 Email info naimaudio com naimaudio com 12 001 0348_R1 ...

Reviews: