background image

12

UnitiQute  Setup

frequency component of a speaker system incorporating 
small (restricted bandwidth) satellite speakers. When 
Small is specified, a 100Hz high-pass filter is applied to the 
UnitiQute speaker output signal.

Select 

None

 when no speakers are connected directly to 

the UnitiQute

Engaging the 

Loudness

 option applies low frequency boost 

to the speaker and preamplifier outputs that decreases as 
the volume setting is increased. Through compensating for 
the ear’s reduced low frequency sensitivity at low volume 
levels, the Loudness function can make low volume 
listening more satisfying.

Note:

 The loudness contour operates at volume settings 

between 0 and 55.

The speaker 

Max. Volume

 and 

Balance

 parameters specify 

maximum allowed volume, and the channel balance 
respectively.

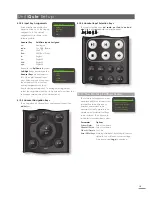
4.5  The  Headphones  Menu

The Headphones setup menu 
enables the 

Max. Volume 

parameter


to be specified:

Parameter 

Options

Max. Volume:


 0 to 100 (adjust 
using handset 

or 

5

 keys)

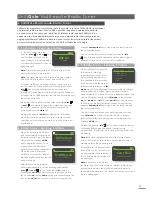
4.6 The Network Settings Menu

The Network Settings menu 
enables UnitiQute network 
parameters to be customised 
to suit the router and network. 
The options are tabulated 
and described in the following 
sections:

Parameter 

Options

Name:


User definable (text entry) 


Default: Uniti-xxxx 

Wireless: 

Not Used / Wireless Network Names

Status:


 Connected / No Signal / Login Failure / 
Busy / Etc.

DHCP:


Yes / No

The 

Name

 parameter enables the UnitiQute’s default 

network name to be changed.

The 

Wireless

 parameter enables a wireless network to be 

chosen and joined. See Section 4.6.1 below for detailed 
wireless set up notes. 

Network 

Status

 displays the current network connection 

status. 

The 

DHCP

 parameter enables the UnitiQute network 

settings to be modified. In most cases, specifying 

Yes

 and 

leaving UnitiQute set to DHCP, will be the appropriate 

option. See Section 4.6.2 below for notes on non-DHCP 
network connection.

Note:

 Devices installed on a network have an IP address 

through which they are identified by all the other items 
on the network. DHCP is a set of rules that enable the 
automatic allocation of addresses as items are connected 
(or switched on while connected) to the network. 
UnitiQute is set up by default to use DHCP.

Note:

 If UnitiQute is connected to the network both 

wirelessly and via Ethernet (wired), the Ethernet connection 
will take priority. 

4.6.1 Wireless Network    


Connection Set Up

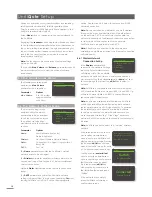
If the 

Wireless

 parameter is 

selected in the Network Settings 
menu the Select Network menu 
will display a list of the available 
networks. An option not to use a wireless connection is 
also provided. Use the handset 

up

 (

5

) or 

down

 (

6

) keys 

to scroll through the list and the 

ok/list

 key to select a 

network.

Note:

 UnitiQute is compatible with most commonly used 

Wi-Fi standards. Routers that support 802.11b and 802.11g 
will work, however those with 802.11n compatibility are 
recommended for best results.

Note:

 As with any wireless network hardware, UnitiQute 

connection reliability will be affected by both network 
router performance and Wi-Fi signal quality. To minimise 
the possibility of poor connection reliability, UnitiQute 
should be connected to network audio sources by no 
more than one wireless “leg”. Other “legs” necessary 
between UnitiQute and the network audio sources should 

be wired.

Note:

 UnitiQute cannot connect to a “hidden” wireless 

network.

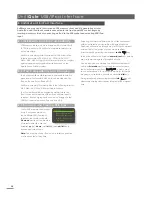
If the selected network is secure 
and requires a passphrase or 
access key to join, UnitiQute will 
display an alert message. Pressing 
the handset 

ok/list

 key will then 

open a text entry screen for entry 
of the passphrase or access key.

Use the handset 

numeric/text


keys to enter the passphrase or 
access key taking care to ensure 
that the letter case is correct. 
Press the handset 

ok/list

 key 

when text entry is complete. In 
the illustration the passphrase is 
“flatfish”.

If the network is successfully 
joined UnitiQute will display a 
confirmation screen.

Network Settings 

1/4

4

Name: 

Uniti-0131 

  Wireless: 

Not Used  

  Status:  Not Connected 
  DHCP 

Yes

Headphones 

1/1

4

Max. Volume: 

100 

Select Network 

3/6

  <Don’t Use Wireless> 
  LingNet 

4

GreenNet 


TomNet 

Now enter your wireless 
passphrase or access key.

Press OK to continue

flatfish 

abc

  flatfish

|

Press OK to confirm

Connected 

Press OK To Finish

Summary of Contents for UNITIQUTE -

Page 1: ...R E F E R E N C e M A N U A L U N I T I Q U T E A L L I N O N E A U D I O P L A Y E R E N G L I S H...

Page 2: ...5 4 Signal Outputs 16 5 5 Amplifier Fault Warnings 16 6 UnitiQute Multi mode Radio Tuner 17 6 1 FM Tuner Seeking Stations 17 6 2 DAB Tuner Seeking Stations 17 6 3 iRadio Tuner Seeking Stations 17 6 4...

Page 3: ...cket or wireless network connection 1 1 2 Signal Outputs The UnitiQute preamplifier provides the following signal outputs An S PDIF digital audio output pre volume balance control A preamplifier outpu...

Page 4: ...osLink dig 3 Digital Coaxial RCA phono dig 4 Digital Optical TosLink USB Digital USB Type A Note The front panel analogue digital jack socket can accept both conventional analogue 3 5mm plugs and mini...

Page 5: ...rear panel with a Signal Ground switch offering two positions Chassis or Floating Select the Chassis position unless UnitiQute is connected in a hi fi system incorporating another earthed source comp...

Page 6: ...ettings menu and re start UnitiQute If problems still persist contact your retailer installer or Naim Audio directly See Section 4 6 Note Before reporting network connection problems carry out a Facto...

Page 7: ...eoutput touchto mute un mute combined analogue and digital input USBinterface 3 2 Front Panel Display normal play mode In normal play mode the UnitiQute screen provides a variety of information on the...

Page 8: ...volume mute and transport play pause stop etc keys on the handset will remain operational Setup 1 9 4Language Inputs Speakers Headphones List mode is entered by pressing the handset ok list key and ca...

Page 9: ...forward Fast forward track cd Selects the rear panel Analogue input radio Sequentially selects the FM DAB and iRadio inputs pc Selects the UPnP input iPod Sequentially selects the USB iPod and front...

Page 10: ...ur UnitiQute you must first install the app on your iPad iPhone or iPod touch With the app installed and the iPad iPhone or iPod wirelessly connected to the same network as your UnitiQute start the ap...

Page 11: ...ver is an application that makes iTunes songs and playlists available to UPnP players 3 7 2 Using n Stream The n Stream app is based on three main screens The Inputs screen the Playing screen and the...

Page 12: ...gs at all however we would encourage you to read this section of the manual in order that you gain a full understanding of UnitiQute s abilities The following paragraphs describe each UnitiQute setup...

Page 13: ...Digital If Auto is specified the front panel input will automatically detect the audio signal format analogue or digital and configure the input appropriately Specifying Analogue or Digital will fix t...

Page 14: ...HCP is a set of rules that enable the automatic allocation of addresses as items are connected or switched on while connected to the network UnitiQute is set up by default to use DHCP Note If UnitiQut...

Page 15: ...twork router s user documentation for help with specifying fixed IP address settings 4 7 The Digital Output Menu The Digital Output setup menu enables the UnitiQute digital output to be switched on an...

Page 16: ...and options Parameter Options Enabled Yes No Selecting Yes primes the alarm Selecting No disables the alarm Alarm Time 07 00 Selecting the time opens a screen that enables the alarm time to be set by...

Page 17: ...are located around the ok list key exit cd radio pc iPod tv av hdd aux vol ok list input 4 10 4 Handset Input Selection Keys The input selection keys cd radio pc iPod tv av hdd aux are located beneat...

Page 18: ...age 5 2 Volume Control UnitiQute volume control is achieved by using the handset vol and vol keys or by continuously touching the front panel Naim logo the first touch increases volume the second touc...

Page 19: ...ed to the rear panel aerial input Internet radio requires UnitiQute to be connected to a broadband internet service via a network router that incorporates an appropriate firewall UnitiQute is able to...

Page 20: ...s the opportunity to rename a previously stored station Scroll to the preset to be renamed and press the ok list key to open a text entry screen Use the handset numeric text keys in text entry mode to...

Page 21: ...ion it should incorporate a firewall If UnitiQute is already connected to a network begin by selecting the UPnP input 7 1 UPnP Servers UPnP servers incorporate a software application that allows Uniti...

Page 22: ...memory sticks must be in Windows DOS format FAT FAT32 to be used with UnitiQute Macintosh formats are not compatible UnitiQute can play audio files stored on USB Sticks in the following formats MP3 M...

Page 23: ...k Analogue Input Overload 33 8dB Front panel input 27dB RCA input USB Front panel socket Other Inputs Ethernet IR Sensor Front panel RS232 Rear panel Mute Control Front panel touch logo Audio Formats...

Reviews: