4
UnitiQute Installation and Connection
2.9.2 Wireless Network Connection
If UnitiQute is to connect wirelessly to the home network
the supplied Wi-Fi antenna must be fitted to the rear panel
wireless antenna socket. Wireless configuration will also
be necessary before UnitiQute is able to connect to the
network. See Section 4.6.1 of this manual.
2.9.3 Network Settings
UnitiQute is set up when originally shipped not to require
any on-site network configuration but to connect to a
network automatically (it uses DHCP by default). However,
if your UnitiQute has been previously used, its network
configuration may have been altered leaving it unable
to connect automatically. If this appears to be the case
ensure that DHCP is selected in the Network Settings menu
and re-start UnitiQute. If problems still persist contact your
retailer, installer or Naim Audio directly. See Section 4.6.
Note:
Before reporting network connection problems carry
out a Factory Reset operation and try again. Select Reset
All Settings from the Factory Settings setup menu. See
Section 4.11.
Note:
A UnitiQute switched on without a working wired
network connection will only be able to connect to
a home network wirelessly. To use an Ethernet (wired)
connection, switch UnitiQute off, connect the network and
switch it on again.
Note:
For internet radio to operate UnitiQute requires
connection to a broadband internet service via a router/
modem with a built-in firewall.
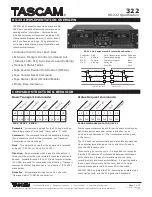
2.10 Control Socket
UnitiQute is fitted on its rear panel with a standard
RS232
interface socket. This socket is intended to enable
firmware upgrades and diagnostic tests to be carried
out. Contact your retailer, distributor or Naim for more
information if required.


