
4
5
naishkites.com
RELEASES & AGREEMENTS
RELEASE OF LIABILITY, CLAIM WAIVER AND ASSUMPTION OF RISK AGREEMENT
RELEASE AND WAIVER OF CLAIMS AGREEMENT
In consideration of your use of this product, you hereby agree to the following, to the fullest extent
permitted by law:
To waive any and all claims that you have or may have in the future against Naish International, a
division of Nalu Kai Incorporated, or any of its agents, resulting from use of this product and any of its
components.
To release Naish International, a division of Nalu Kai Incorporated, or any of its agents from any and all
liability for any loss, damage, injury or expense that you or any users of this product may suffer, or that
your next of kin may suffer, as a result of the use of this product, due to any cause whatsoever, including
negligence or breach of contract on the part of Naish International, a division of Nalu Kai Incorporated,
or any of its agents, in the design or manufacture of this product.
ARBITRATION
In further consideration of the sale to you of this product and any of its components, you hereby agree
to submit to binding arbitration any and all claims, which you believe you may have against Naish
International, a division of Nalu Kai Incorporated, or any of its agents, arising from the use of any of the
Naish International/Nalu Kai Incorporated equipment. The arbitration shall be pursuant to the rules of the
American Arbitration Association.
Arbitration shall be commenced within one (1) year from the date on which any alleged claim first arose.
Further, the arbitration shall be held in Maui, Hawaii unless otherwise mutually agreed to by all parties.
The submission to the American Arbitration Association shall be limited and the arbitration award may
be enforced by any court of competent jurisdiction.
BINDING EFFECT OF AGREEMENT
In the event of your death or incapacity, this Agreement shall be effective and binding upon your heirs,
next of kin, executors, administrators, assigns and representatives.
ENTIRE AGREEMENT
In entering into this Agreement, you are not relying upon any oral or written representations other than
what is set forth in this agreement and User’s Guide.
BY INFLATING THE LEADING EDGE AND ASSEMBLING THIS PRODUCT,
YOU ARE AGREEING TO:
1) be bound to the terms set forth below and 2) require anyone using this product to be bound by such
terms. If you are unwilling to be bound by these terms, return this product (before use) for a full refund.
ASSUMPTION OF RISK
Use of this product and any of its components involves certain inherent risks, dangers and hazards,
which can result in serious personal injury and death. In using this product you freely agree to assume
and accept any and all known and unknown risks of injury while using this equipment. The risks inherent
in the sport can be greatly reduced by abiding by the Warnings and Guidelines listed in this User’s Guide
and by using common sense.
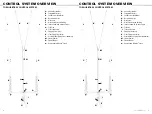
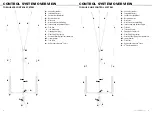
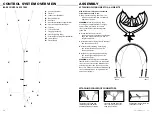
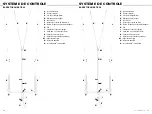
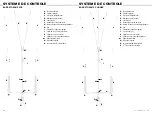
USE: KITESURF, LANDKITE RECOMMENDED WEIGHT: 30–100 KG
COMPATIBLE KITES: INFLATABLE 4-LINE AND 5-LINE
FUNCTION OF RELEASE: PUSH AWAY HANDLE WITH LOCKING LEVER PIN
FOR MAIN RELEASE & ROTATING PIN FOR DISCONNECTING RELEASE
FUNCTION OF RELEASE SYSTEM: MAIN RELEASE & DISCONNECTING RELEASE
WARNING & SAFETY PRECAUTIONS
WARNING & SAFETY
. Kiteboarding is a dangerous sport. Always use extreme caution when using this product.
. Misuse of this product can cause serious injury or death.
. Never use this product unless you are in good physical health and you are an experienced swimmer.
. Never act in a careless manner when using this product; never attempt to fly your kite over other people, pets or any other obstructions.
. You are responsible for your own safety and the safety of others around you when using this product.
. Your safety and the safety of others is not solely based on the use of a control system. Other factors, including knowledge of the sport
and your equipment, proper assessment of the conditions, awareness of your own physical limitations and personal understanding of the
surrounding environment are just a few factors that affect safety.
. Do not wait until an emergency situation to learn how to use the safety features of your control system. Learn about safety and emergency
response during instruction and do everything possible to mitigate or eliminate risky situations that would require the use of safety systems.
. Your safety systems must be maintained and regularly checked.
. Verify your leash will not get stuck when the safety is pulled before going out on the water.
. If you are under the age of 18, you must have your parents or legal guardian read these warnings and instructions. You must not use this
product without proper guidance and supervision by your parents or legal guardian.
. Use of this product exposes the user to unexpected and unavoidable risks, dangers and hazards.
. Do not use this product if you are under the influence of alcohol, drugs or medications.
. Never use this product during a thunderstorm, lightning, in offshore wind conditions or wind conditions that are above your ability level.
. Make sure you take lessons from a certified kiteboarding school before using this product on the water.
. Be sure you have been trained by a certified kiteboarding school to launch and land your kite before using this product.
. Always have an experienced kiteboarder assist you with launching and landing your kite on land.
. Make sure you know on-the-water self-rescue techniques before using this product.
. Our Quick Release Systems are developed and designed to be used by riders up to 100 kg (220 lbs).
. Always wear a harness designed for kiteboarding. Always wear a helmet, gloves, shoes, protective eyewear when using this product.
. Always wear a Coast Guard approved personal flotation device when using this product in the water.
. Always observe local rules and regulations when using this product.
. Make sure to always have a 100 meter semi-circle area downwind and on both sides of your flying position that is clear of people,
animals, Woody and other obstructions.
FLYING LINES
. Never touch the flying lines when this product is in use. Flying lines are extremely dangerous while under tension and can cause
serious injury or death.
. Never allow yourself or anyone else to go between the control system and the kite when the kite is unsecured on the ground or in
the launching position. The kite can launch unexpectedly at anytime and can cause serious injury or death to anyone near by.
. Always check your flying lines for knots before each use. Knots greatly reduce the strength of the flying lines and can break under
tension, which can cause serious injury or death.
. Always check your flying lines for wear before each use. Worn flying lines can break under tension, which can cause serious injury or death.
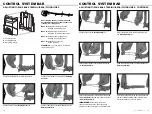
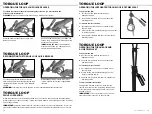
TORQUE LOOP QUICK RELEASE
. The expected lifespan of the Torque Loop Quick Release fluctuates depending on a variety of factors including use, conditions,
proper care and maintenance. With normal use, the expected lifespan is at least two years, not including flying lines and trim lines. It
is recommended you monitor the product closely for wear and tear and clear all components of sand and debris between sessions for
optimal functioning.
. Familiarize yourself with the way the Torque Loop Quick Release operates and test it on land in a non-emergency situation.
. Always inspect your Torque Loop Quick Release prior to launching your kite to make sure it is connected properly and in working order.
. The components in your Torque Loop Quick Release have a limited lifespan and must be changed often. If you see any sign of wear
on these components, you must replace them prior to use. Failure to do so, can result in serious injury or death.
. Remove any debris that may be inside the Torque quick release prior to use.
. Rinse your Torque Loop Quick Release with fresh water after every use.
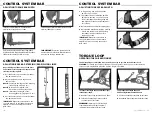
KITE LEASH
. The expected lifespan of the Kite Leash fluctuates depending on a variety of factors including use, conditions, proper care and
maintenance. With normal use, the expected lifespan is two years. After that time it is recommended you monitor the product closely
for wear and tear.
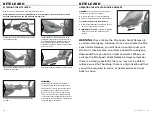
. Never use this product without a Kite Leash. A loose kite is extremely dangerous to everyone downwind of you.
. The Kite Leash system is not a permanent attachment to this product. Never permanently attach yourself to this product.
. Familiarize yourself with your leash’s Quick Release operation and test it on land in a non-emergency situation.
. Always inspect your leash’s Quick Release prior to launching your kite to make sure it is connected properly and in working order.
. Remove any debris that may be inside the quick release prior to use.
. The components in your Leash’s Quick Release have a limited lifespan and must be changed often. If you see any sign of wear on
the leash’s Quick Release components, you must replace them prior to use. Failure to do so, can result in serious injury or death.
. Rinse your Leash’s Quick Release with fresh water after every use.