background image

13

The number of screws, joint parts and spotlights are omitted.
Acrylic boards have different dimensions. (for front use, for side use, for back side).
 It is a part for power distribution. It is unnecessary when assembling using a blank module.
 It is an optional part. Please purchase separately.

*1
*2
*3
*4

Base module

(Surface module)

Frame part 

(spacer)

Base module (Plug-in module)

Control box SE/LE

Interface  part  

Interface part 

AC adapter 

Interface cable 

(short)

Spotlight

Interface cable 

(long)

Frame part 

(cover)

Frame part 

(straight)

Frame part 

(corner)

Frame part 

(center)

Joint  part 

Acrylic board 

(side)  *2

Acrylic 

board 

(front)  

Acrylic 

board (back)

Top board

Screw

Front face

*2

*2

*2

*3

*3

*3

*4

*3

*4

*3

*4

*3

*4

*3

*1

*  The contents of the set changes according to the selected module configuration.

*  The figure below is a combination example of the top surface,surface module, 

floor surface and plug-in module 

(e.g.:D202030S-PS)

*3

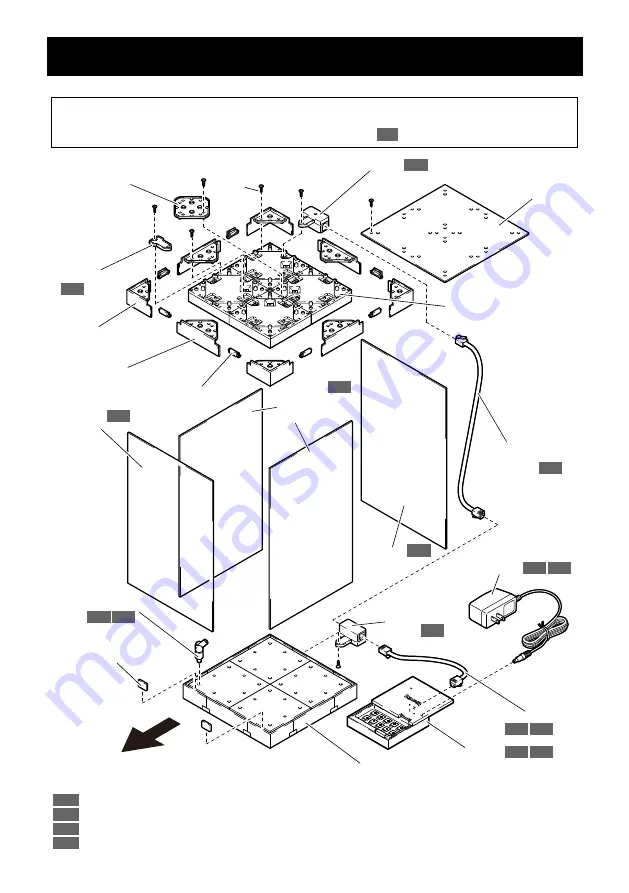
Standard Set

Names of Parts

Summary of Contents for DISPLE

Page 1: ...it Plug in module Starter Kit Surface module Base Module Control Box Standard Set Method of Parts Assembling Base Module Frame Parts Acrylic Board Wiring How to Use procedure for lighting effects Product Specification Troubleshooting Contact Us 1 6 7 7 8 9 10 11 11 11 12 13 14 14 15 16 17 18 19 21 21 I n s t r u c t i o n M a n u a l for all the collectors ...

Page 2: ... electric shock etc that require no hospitalization or long term hospitalization for treatment 3 Property damage expanded damage concerning houses household goods livestock and pets if you handle it incorrectly there s a possibility of death or serious injury 1 if you handle it incorrectly there s a possibility of injury 2 or property damage 3 WARNING CAUTION Please read these safety precautions c...

Page 3: ...ease do not process forcibly bend twist or pull the cables When unplugging the AC adapter from the outlet always hold the adapter and pull it out If you pull the cables it may be the cause of disconnection or short circuit and it may cause a fire or electric shock Confirm that the dust is not attached to the AC adapter and plug it into the outlet firmly up to the root If dust or the like is attached ...

Page 4: ...Where infants and pets can reach Places subject to vibration and impact Inclined places Close to objects generating strong magnetic force and radio waves When assembling please make sure to use precision screwdriver etc Please do not use electric screwdriver If not the product may be damaged because it is made of plastic resin Please do not touch the connector end part directly by hand If not stat...

Page 5: ...comfortable or painful in some of your spirit and body imme diately stop using the product When cleaning this product please turn off the power for safety and note the following Modules Please wipe with a dry cloth of soft material such as microfiber cloth Wiping with a highly volatile chemical such as thinner benzene or alcohol may cause the product to be damaged or distorted Please use a dry cott...

Page 6: ...t deviat ing from the specification rating and precautions described in this manual 4 This product is designed only for use in Japan If this product is used outside of Japan we shall not be responsible for any loss damages and troubles The AC adapter included in the Control Box Set is compatible with a power supply of 100V to 240V but the shape of the AC plug is for Japan domestic use A type Theref...

Page 7: ...the following cases When the warranty period has elapsed from the date of purchase Misuse disassembly remodeling damage due to repair by yourself Breakdown and damage due to unavoidable forces such as fire earth quake flood etc If the cause of the failure is due to other product than this product General failure or damage when used for general use other than home use e g business use 5 Your retuned ...

Page 8: ...s mini figures and collections of series items Lighting effects on such as figures and large plastic models and magnificent diorama directing are also possible What is DISPLE The size can freely be extended About DISPLE You can place an effect module such as a spot light type LED light on a plug in module In addition it is possible to illuminate with surface brightness of the surface module in suffici...

Page 9: ...wer can be supplied directly to the LEDs embedded in the model Surface Module It is a module that emits light with 9 LEDs inside It glows with sufficient brightness even by a single unit and the variation of lighting effect will also expand by setting a control box Blank Module It is a module with electronic board removed from the plug in module Please use it for substituting plug in module for siz...

Page 10: ...usly flashing Control Box SE Control Box LE It is a control box that controls the lighting effects which can be said as the brain of DISPLE In addition to supplying power to the base module you can control the base modules connected by joint parts with nine patterns of lighting effects Direction of lighting like stage lighting can also be done easily With SE built in sound collection microphone it ...

Page 11: ...ame as the Sound sensor 1 There is a difference in microphone sensitivity Control Box SE Lighting effect pattern 0 OFF 1 Lit Continues to light up 2 Blinking 1 Repeats lighting on and off at fixed intervals long 3 Blinking 2 Repeats lighting on and off at fixed intervals short 4 Dimming adjusted Brightness of the light changes stepwise 5 Dimming fixed You can fix the brightness of the lighting 4 Set i...

Page 12: ...rter Kit Surface Module Names of Parts Base module Surface module Control box SE LE Interface part AC adapter Interface cable Screw Base module Plug in module Control box SE LE Interface part AC adapter Interface cable Spotlight Screw ...

Page 13: ...12 Base Module Control box SE LE Names of Parts Rotary switch Power switch ID number ID number パターンナンバー each base module reverse side Control box SE Control box LE same as Control box SE ...

Page 14: ...g in module Control box SE LE Interface part Interface part AC adapter Interface cable short Spotlight Interface cable long Frame part cover Frame part straight Frame part corner Frame part center Joint part Acrylic board side 2 Acrylic board front Acrylic board back Top board Screw Front face 2 2 2 3 3 3 4 3 4 3 4 3 4 3 1 The contents of the set changes according to the selected module configurati...

Page 15: ...f current flow At this time make sure that current flows through all the base modules connect ed starting from the interface part mounting position 2 Please do not touch metal terminal end do not wet it and put foreign objects inside If not it may cause a contact failure or malfunction CAUTION The figure is a combination example of 200 X 200 size base module Use 8 screws to fix one frame part center T...

Page 16: ...ame part corner side by side Using a Phillips screwdriver fix each frame part with screws 4 Fit the frame part cover into each recess 4 screws are used to fix one frame part One screw is used to fix one frame part Please do not touch metal terminal end do not wet it and put foreign objects inside If not it may cause a contact failure or malfunction CAUTION 5 Use a Phillips screwdriver to secure the i...

Page 17: ...e 2 Fit the frame part spacer as shown in the groove on the front side 3 Fit the upper part base module on the top place 4 Enter the piece exhibit to be displayed 5 Fit the acrylic board for front side in the order from the top to the bottom as shown 6 Dimensions of acrylic boards are different for side use back use and front use 1 1 1 2 3 4 5 6 16 The figure is a combination example of 200 X 200 s...

Page 18: ... the control box and finally plug the AC adapter into the AC100V 240V outlet 3 Please do not pull or twist each cable forcibly nor touch metal terminal end do not wet it or enter foreign objects inside If not it may cause a contact failure or malfunction CAUTION Be sure to insert the connectors of each interface cable to the root until a click sound is heard Be sure to insert all the connectors firm...

Page 19: ...attern number 2 Upon checking all the connections of AC adapter interface cables and AC100V 240V outlet then turn on the power switch of the control box 3 Confirm that the lighting operates correctly as it is set and fix the top board with screws to the top side using a Phillips screwdriver 4 Refer to the product overview Control Box SE for the description of the lighting effect pattern Use 16 screw...

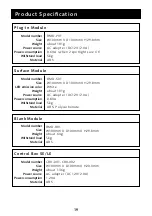
Page 20: ...dapter DC12V 2 0A 0 8VA 5kg ABS Polycarbonate Model number Size LED emission color Weight Power source Power consumption Withstand load Material Model number Size Weight Withstand load Material Model number Size Weight Power source Power consumption Material Control Box SE LE CBX 001 CBX 002 W100mm X D100mmX H20 0mm about 136g AC adapter DC12V 2 0A 1 2VA ABS Surface Module Blank Module BMD B01 W10...

Page 21: ... 24VA O P DC12V 2 0A Spotlight per piece PMO 001 W White about 4g DC12V supplied by Plug in module 0 15VA ABS Product Specification Model number Size Weight Power source Power consumption Model number LED emission color Weight Power source Power consumption Material 20 ...

Page 22: ...YER we will introduce them on our official site etc Is the power plug inserted securely into the outlet Power does not come on Are the metal terminals of the base module joint parts interface parts etc dirty or foreign matter attached There is a part where the lighting flickers or does not light up Is the ID number of the control box the same as the ID number of the base module Cannot set the desired...

Reviews: