background image

3

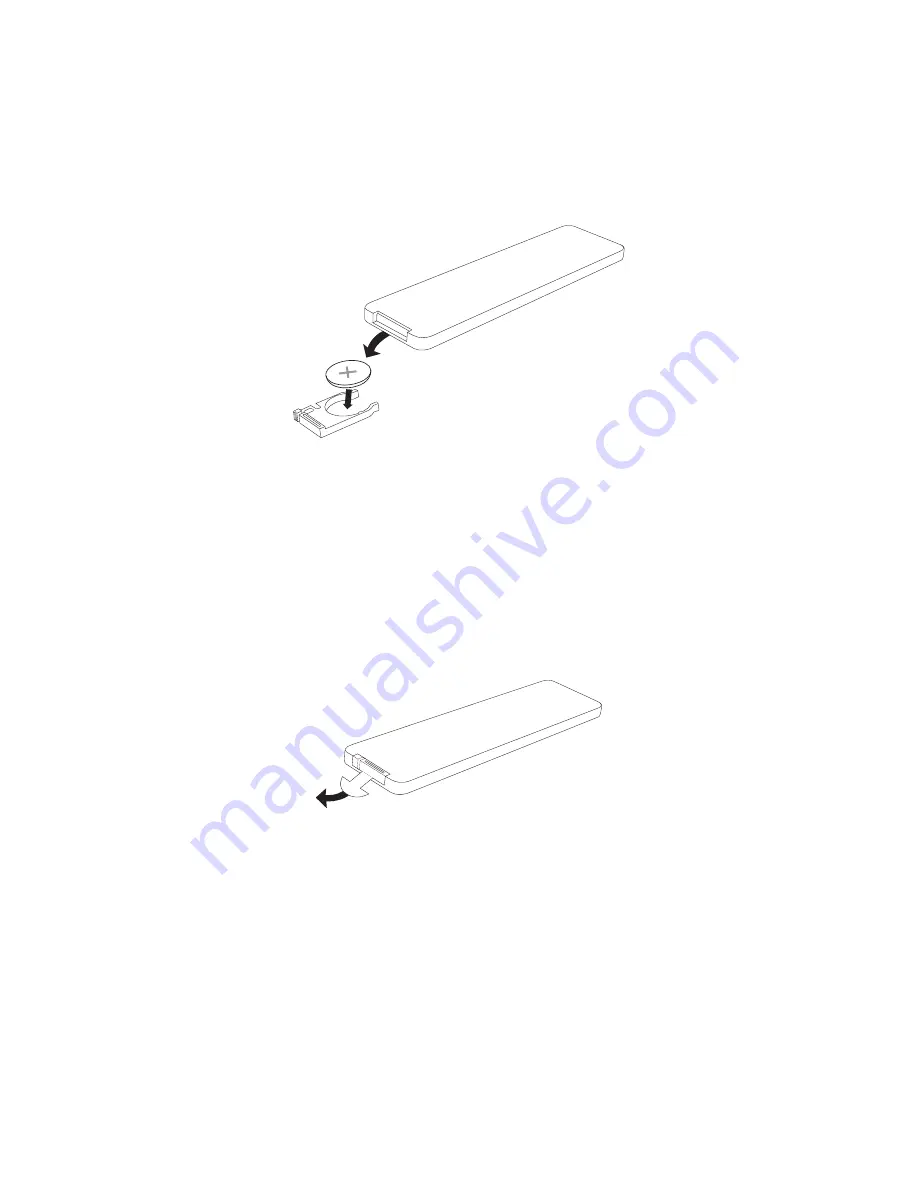
Slide out battery compartment on rear of remote control (remove battery if replacing).
Place new CR2025 in battery well as shown (make sure ‘+’ side is facing up).
Re-insert battery compartment.

1.
2.
3.

INSTALLING / REPLACING THE BATTERY

The remote control comes with one CR2025 battery which must be installed. When the range of the remote
seems reduced or if it ceases to work properly, it’s time to replace the battery.

Remove the protection slip from the remote control battery compartment as shown below.
Your Nakamichi Delta 20 comes supplied with one CR2025 battery.

1.

Connect the power adaptor’s DC plug to the power jack on the back of your product. Then connect the
power plug to your AC outlet.
The DISPLAY will show “00:00” for the first time.
To turn on the unit, press the Volume knob on the front panel or the Standby key on the remote control,
the unit will go into the DAB mode and start scanning. If there is a DAB station being received, the clock
and date will then be updated automatically. Or otherwise you have to perform the clock settings afterwards.

2.

3.
4.

GETTING STARTED

WARNING: Lithium batteries can cause burns if disassembled, shorted, recharged, exposed to water, 
fire, or high temperatures. Do not place loose batteries in a pocket, purse, or other container containing metal 
objects, mix with used or other battery types, or store with hazardous or combustible materials. Store in 
cool, dry, ventilated area. Follow applicable laws and regulations for transport and disposal.

Summary of Contents for DELTA 20

Page 1: ...DELTA 20 User manual...

Page 2: ......

Page 3: ...us radiation exposure or other unsafe operation Cleaning Use a soft dry cloth to avoid making scratches to the surface Do not use cleaning alcohol or other solvent uids to clean the surface of the Cab...

Page 4: ...on function from volume up down to scrolling up down in di erent mode In DAB mode rotate to explore the stations you are searching for or have stored You can then press on this knob to enter into the...

Page 5: ...r product Then connect the power plug to your AC outlet The DISPLAY will show 00 00 for the rst time To turn on the unit press the Volume knob on the front panel or the Standby key on the remote contr...

Page 6: ...elect DAB station and FM frequency PAIR PLAY PAUSE In BT mode press and hold for Bluetooth pairing When Bluetooth connected short press for play or pause during BT device playback MENU Press this butt...

Page 7: ...o your desired frequency or you can press keys on the remote control one click increases or decreases the frequency by 50kHz Hold on your Remote the FM radio will search for the previous next station...

Page 8: ...ON when connection is successful If the speaker cannot nd the latest Paired device in 10 seconds it will then go back to the Pairing mode and be ready for the pairing from other Bluetooth devices 1 2...

Page 9: ...trol to adjust your volume level Press on the remote control to enter set up menu in di erent mode then press on remote or rotate the VOLUME knob on the front panel to scroll up and down the menu foll...

Page 10: ...al If ANY is selected the clock will be synchronised to both the DAB and FM broadcasting signal 12 24 HR Set the time display mode 12 hours 24 hours BACKLITE Set the brightness of the display TIMEOUT...

Page 11: ...on the VOLUME knob to con rm and save Remark All time date alarm radio setting and Bluetooth device memories will be lost EQ Press on the remote or rotate the VOLUME knob on the front panel to select...

Page 12: ...ess the and key to activate deactivate the alarms or switch on the radio press or key on the remote control to select ALARM 1 or ALARM 2 then press to select ON OFF then press to save The and icons li...

Page 13: ...into your device I E Smart Phone for USB charging USB cable not supplied 1 2 TROUBLE SHOOTING AND SUPPORT If your DAB Clock Radio does not work as expected please rst read this manual No operation Ch...

Page 14: ...to 5 00pm excluding Public Holidays Or visit the Nakamichi website anytime 24 7 and use the e warranty service to make a claim NAKAMICHI SERVICE CONTACT DETAILS Australia Telephone 1300 565 197 Fax 0...

Reviews: