background image

Summary of Contents for NK12

Page 1: ......

Page 2: ...ot place the unit on the ampli er or receiver 6 Do not place this unit close to damp areas as the moisture will a ect the life of the laser head Important Safety Instructions CAUTION TO REDUCETHE RISK...

Page 3: ...g label is pasted on the back or the underside of the equipment t This device complies with Part 15 of the FCC Rules Operation is subject to the following two conditions 1 this device may not cause ha...

Page 4: ......

Page 5: ......

Page 6: ......

Page 7: ......

Page 8: ......

Page 9: ......

Page 10: ......

Page 11: ......

Page 12: ......

Page 13: ......

Page 14: ......

Page 15: ...the MP3 Link Socket 8 Connect Power 9 Pairing the Wireless Subwoofer with the Main Unit 9 1 Automatic Pairing 9 2 Manual Pairing 9 Basic Operation 9 Standby ON 9 Select Modes 10 Adjust theVolume 10 Se...

Page 16: ...ot place the unit on the ampli er or receiver 6 Do not place this unit close to damp areas as the moisture will a ect the life of the laser head Important Safety Instructions CAUTION TO REDUCETHE RISK...

Page 17: ...s pasted on the back or the underside of the equipment t This device complies with Part 15 of the FCC Rules Operation is subject to the following two conditions 1 this device may not cause harmful int...

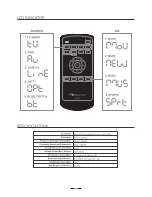
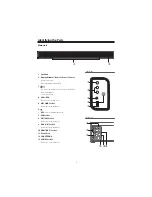
Page 18: ...n or press and hold to switch to Standby mode Select the play function 4 VOL VOL Increase decrease the volume level 5 MP3 LINK Socket Connect to an external audio device 6 NFC Near Field Communication...

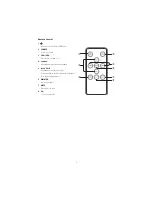
Page 19: ...ume level 4 H G In Bluetooth mode skip to previous next audio file 5 BF PAIR In Bluetooth mode start or pause playback Activate the pairing function in Bluetooth mode and disconnect the existing paire...

Page 20: ...control battery Replace the Remote Control Battery 1 Pull out the battery tray and remove the old battery 2 Place a new CR2025 battery into the battery tray with correct polarity as indicated 3 Insert...

Page 21: ...7 Wall Mounting...

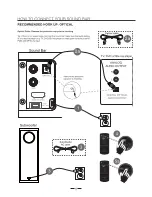
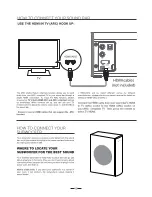
Page 22: ...L Socket A Remove the protective cap of the OPTICAL socket then connect an OPTICAL cable not included to the TV s OPTICAL OUT socket and the OPTICAL socket on the unit B Connect a COAXIAL cable not in...

Page 23: ...E UIF 1BJS JOEJDBUPS JT nBTIJOH G JU TUJMM EPFTO U XPSL QBJS UIF TVCXPPGFS XJUI UIF NBJO VOJU NBOVBMMZ 1 Unplug both units from the mains sockets again then plug them in again after 3 minutes 2 Press...

Page 24: ...d to the unit via Bluetooth Pair Bluetooth enabled Devices The first time you connect your bluetooth device to this player you need to pair your device to this player Note The operational range betwee...

Page 25: ...ledeviceonthe iconoftheunit 3 Operateyourmobiledevicedirectlyforplaybackfeatures 4 Todisconnect tapthemobiledeviceonthe iconoftheunittodisconnectordisableNFC fromyourmobiledevice Note This NFC functio...

Page 26: ...press any SOURCE button first select the correct source Reduce the distance between the remote control and the unit Insert the battery with its polarities aligned as indicated Replace the battery Aim...

Page 27: ...950 x 93 5 x 51 mm Speakers Total impedance 4 x 2 Wireless Subwoofer Power Supply AC 120V 60Hz Power Consumption 30W Output Power 60W Frequency Response 40Hz 200Hz Impedance 4 Dimension W x H x D 240...

Page 28: ...G XVHG LQ DFFRUGDQFH ZLWK WKH LQVWUXFWLRQV PD FDXVH KDUPIXO LQWHUIHUHQFH WR UDGLR FRPPXQLFDWLRQV RZHYHU WKHUH LV QR JXDUDQWHH WKDW LQWHUIHUHQFH Z LOO QRW RFFXU LQ D SDUWLFXODU LQVWDOODWLRQ I WKLV HTXL...

Reviews: