background image

16

Check that all screws and connecting parts are

firmly in place.

Always hold the machine firmly with both

hands.

Keep limbs and clothing away from the line

head when you start the motor or when it is

running.

Keep the machine far away from other persons,

especially children and also animals.

There may be foreign objects like stones in cut

and whirled-up grass.

Be especially careful when trimming lawn

edges, gravel borders and similar edges as

stones and dirt could be hurled by the cutting

line.

Never cross roads or paths with the machine

switched on.

Always hold the machine vertically. Every other

position is dangerous.

Maintain a safe distance of a minimum of 5 m

to persons and animals.

Before beginning work, remove foreign objects

like stones, for example from the area to be

trimmed as they might otherwise be hurled 

during trimming. If you see a foreign object 

while trimming, turn the machine off and 

remove it.

Always keep the area to be trimmed free of the

power cord and other objects.

Never cut into hard objects like stones, etc. You

will avoid injury and damage to the machine.

Never use the machine without the safety

devices.

Never hold the cutting device (line) in your

hands. Always wait until it has come to a 

complete stop on its own.

Hold the line head as close as possible to the

ground.

Cut only grass that is growing in the ground.

Never along a wall or on stones, etc.

When cutting on a hill always stand below the

line head.

Make sure that no objects have collected in the

line head, the safety cover or in the motor.

Always use the machine with the safety cover.

Always turn the machine off before storing it.

Be aware of the danger of injury in the area of

the cutting device which is used for cutting the

line.

ATTENTION: The line continues to rotate for

a few seconds after the machine has been

turned off.

Only put the unit down after the line has come

to a complete stop.

Check the machine for damage after an impact

or other form of damage.

Do not use a scythe blade, wire or similar

devices.

Use only accessories recommended by the

manufacturer.

Have your machine repaired only by qualified

specialists and only with original spare parts.

This will ensure that the safety of the machine

is maintained.

Additional warnings

a). If the supply cord is damaged, it must be 

replaced by the manufacturer, its service agent 

or similarly qualified persons in order to avoid a 

hazard.

Summary of Contents for 014508

Page 1: ...Translation of the original instru ctions Grass Trimmer Originalbetriebsanleitung Rasentrimmer Traduzione delle istruzioni originali Decespugliatore ET3500 D GB Art Nr 014508 I GARDEN TOOLS EXPERT GR...

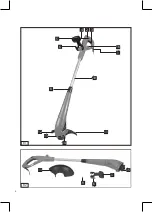
Page 2: ...2 B1 B2 2 5 6 4 6 9 5 8 3 1 16 10 11 14 13 12 11 15...

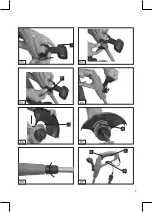
Page 3: ...3 B3 B4 1 B4 2 B5 B6 B7 B8 B9 5 6 11 16 9 4 3...

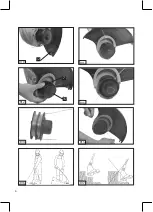
Page 4: ...4 B12 B13 B11 B14 B15 B16 B17 7 15 B10 12...

Page 5: ...rheitshinweise bitte mit aus Wir bernehmen keine Haftung f r Unf lle oder Sch den die durch Nichtbeachten dieser Anleitung und den Sicherheitshinweisen entstehen 1 Wichtige Hinweise Bitte lesen Sie di...

Page 6: ...end Sie sich dorthin begeben unbedingt ab Ben tzen Sie das Ger t nie bei Regen oder in feuchter nasser Umgebung Sch tzen Sie Ihr Ger t vor Feuchtigkeit und Regen Bevor Sie das Ger t einschalten berzeu...

Page 7: ...n oder Kieswege Wenn Sie das Ger t nicht benutzen bewahren Sie es an einem trockenen und f r Kinder unzug nglichen Ort auf Verwenden Sie das Ger t nur so wie es in dieser Bedienungsanleitung beschrieb...

Page 8: ...lmverstellung 9 Schraube 10 Holm 11 Schutzabddeckung 12 Schneideklinge 13 Motorgeh use 14 Fadenspule 15 Deckel der Fadenspule 16 Kabelzugentlastung 3 Lieferumfang ffnen Sie die Verpackung und nehmen S...

Page 9: ...Der angegebene Schwingungsemissionswert ist nach einem genormten Pr fverfahren gemessen worden und kann sich abh ngig von der Art und Weise in der das Elektrowerkzeug verwendet wird ndern und in Ausna...

Page 10: ...haubegek rzt Pos 12 B10 Ist der Faden bei der ersten Inbetriebnahme zu kurz dr cken Sie den Knopf an der Fadenspule und ziehen den Faden kr ftig heraus B15 Beim ersten Anlauf wird der Schneidfaden aut...

Page 11: ...auf die gekennzeichneten Knopf der Spulenabdeckung 7 und entnehmen diese B12 Entnehmen Sie die leere Fadenspule und montieren Sie eine neue Fadenspule F hren Sie den Faden durch die sen der Spulenand...

Page 12: ...ft nicht berpr fen Sie ob das Netzkabel ordnungsgem angeschlossen ist und pr fen Sie die Netzsicherungen Falls das Ger t trotz vorhandener Spannung nicht funktioniert senden Sie es bitte an die angege...

Page 13: ...ermitted to operate the machine 1 Safety Instructions The terms machine and tool used in the following refer to electrical tools with power cord and battery operated electrical tools without power cor...

Page 14: ...the machine at an adequate distance from your body Always turn the machine off wait for the motor to stop and unplug the cord during work breaks and when changing location Never leave the machine una...

Page 15: ...must be kept away from your body without exception Never turn the machine on without it being in the work position Always turn the machine off wait until the rotating line has come to a standstill an...

Page 16: ...r use the machine without the safety devices Never hold the cutting device line in your hands Always wait until it has come to a complete stop on its own Hold the line head as close as possible to the...

Page 17: ...to ensure that the equipment is properly b It is recommended that appliances should be supplied via a residual current device RCD with a tripping current of not more than 30mA Residual risks Even if y...

Page 18: ...preliminary assessment of the degree of exposure WARNING The value of the actual vibrations emitted while using the device may be different from the declared value depending on how the tool is used Es...

Page 19: ...o the perfect length automatically and tighten the Lock for height adjustment 8 7 Operation Remove the cover from the blade on the guard hood when you use the machine for the first time Pos 12 B10 Not...

Page 20: ...in its original packaging 11 Disposal and recycling Take a power tool in the domestic waste In accordance with European Directive on waste electrical and electronic equipment and its implementation in...

Page 21: ...rezza 1 Avvertenze importanti Leggete attentamente le istruzioni per l uso e attenetevi alle avvertenze Usatele per conoscere bene l apparecchio il suo uso corretto nonch le avvertenze di sicurezza At...

Page 22: ...in modo da evitare lesioni al capo alle mani e ai piedi Usate perci un casco occhiali protettivi o visiera stivali alti o scarpe robuste e pantaloni lunghi di stoffa robusta e guanti da lavoro Quando...

Page 23: ...IN 57282 VDE 0282 e devono avere una sezione minima di 1 5 mm2 Gli allacciamenti a spina devono avere contatti di terra e gli attacchi devono essere protetti dagli spruzzi d acqua Tenere la superficie...

Page 24: ...Sussiste pericolo di ingerimento e soffocamento Tosaerba a filo Impugnatura addizionale Calotta protettiva 1 x viti 4 Utilizzo proprio L apparecchio concepito per tagliare l erba del prato e di picco...

Page 25: ...hio Spegnete l apparecchio se non lo utilizzate Indossate i guanti Rischi residui Anche se questo elettroutensile viene utilizzato secondo le norme continuano a sussistere rischi residui In relazione...

Page 26: ...erba solo quando l interruttore premuto ossia quando il tosaerba in funzione Per tagliare in modo corretto far oscillare l apparecchio mentre si avanza Tenete l elettroutensile inclinato con un angolo...

Page 27: ...nutenzione qualsiasi 10 Conservazione Conservate l apparecchio e i suoi accessori in un luogo buio asciutto al riparo dal gelo e non accessibile ai bambini La temperatura ottimale per la conservazione...

Page 28: ...28 96dB 96dB A 16 1...

Page 29: ...29 GR On Off On Off 1 0mm2...

Page 30: ...30 On Off...

Page 31: ...31 5 a b 30mA a b c...

Page 32: ...32 x1 4 5 230 240 V 50 Hz 350 W 25 cm 12000 rpm 1 2 mm 84 2 dB A 2 1 1 1 2 3 On Off 4 5 6 7 8 9 10 11 12 13 14 15 16 3...

Page 33: ...33 K 3 dB 94 72 dB A K 3 dB 96 dB A ah 4 783 m s2 K 1 5 m s2 85dB A 6 6 1 3 4 3 4 1 4 2 6 6 2 5 5 6 3 6 7 11 9 6 4 8 8 8 7 12 10 15 9 4 On Off B9 On Off 20 16...

Page 34: ...34 12 10 B13 14 10 5 30 C 11 17 8 9 9 1 9 2 11 14...

Reviews: